
 Cars
Cars
 Trucks
 Buses
Buses
 Motorcycles
 Military
 Electronics
 Guns
Guns
 Buildings
 Aircraft
 Furniture
 Characters
 Animals
 Spacecraft
 Food
Food
 Ships
Ships
More
I found my inspiration on the Internet, once again, when I wanted to make an image with a Countach and a 512, I happened to find this image, with the exact two cars I fancy! Then because i’m not so good creating something from nothing, I decided to make the same in 3D, as a challenge to recreate the light mood, so as the speed effect.

I won’t go through the modeling process, because there is almost nothing, just the road and pavement… the rest was already modelled obviously.
It all starts with the cars really, they were already modeled, but needed textures. Preview here of a first step of draft texturing.

Here is the texture used for the Lamborghini. It works the same with pretty much all the colors if you “hue” it in both base & coat material :)

I did the road reflective a little, to make it more “interesting”. The texture is from… as written in the picture :)

Now for the lights, I usually do my chrome light, very reflective, and no glossy. Where here I did a very diffused glossiness to make it shines the light. The round vraylight is made to highlight the chrome and the glass. The squared light is including only the road for reflection purposes.

Then comes the scene, and here a screenshot of the workspace. I took the same view from the picture, with a more closed lens, maybe less dynamic than the original one, but also less distortion on the cars. I kept the idea of having the edge all along the road, with palms.

I took the trees from famous libraries. Here I painted one bush all along the road, with the tool Advanced Painter, to randomize the position, rotation and scale to make it look like more natural. The rest of the palms and trees are put manually.

I changed the texture a little, with a falloff to the white, to make the whole edge more light looking. (Do you see how it goes white on the edges of the preview sphere?)

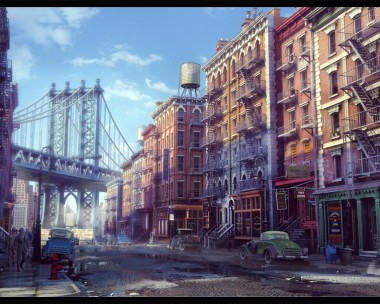
Matching a real picture with the same lighting is very difficult, so I went on my own here, make a low sun orange, and adding a HDR map of a sun rise. The background image is added onto a curved plan, and doesn’t generate any light, it’s just here for visual purposes. You could add it after on photoshop, but with the motion blur on the trees, it’s complicated to make it clean. I found a random image on internet, showing Hollywood sign, I flipped it to match the lighting, cloned it to extend it, and there you go.


VrayLightDome
I used a vrayLightDome, with a map HDR as texture, please find the details in the image next door. I put the HDR gamma at 2.0, which is a bit tricky, it helps to give that ambient light with light shadows, trying to avoid the dark areas. I spent quite some time adjusting parameters here, to find the right balance between the amount of reflection on the carpaint, and the light provided to the rest of the scene. You will have to adjust these values as well for your scene and your needs.
DirectLight
To help with the environmental light, I added a direct light, low, orange tint, low light, very diffused shadows, so you barely see the shades of the palms on the road.

For the background picture, as said earlier, it doesn’t do any light, I uncheck “visible in reflection” as well to fully enjoy the HDR.

Render settings. There’s no environment check, since the VrayLightDome does it all. I am not using a VrayCam, so it’s pretty much basic values.

In order to get the motion blur correctly, I animated the car between frame -5 and frame 5, I attached the camera to the motion of the car, so it’s moving together. I am rendering the final image at frame 0 so right in the middle.

Few tests before the final rendering. From finding the right HDR for the correct reflection to the blur effect, more or less intense…


I render few passes from the Render Elements panel. Such as Reflection and Zdepth, and others that I didn’t use this time. In this situation, the bare render ended up quite well already.

After some simple levels & contrast. The main thing maybe here was to sort the fog on the background. I used the Zdepth pass to make it deeper where the light comes from.


See below, all the modifications on a black background.

And the final image, with drivers added discretly. Some glow effects for the lights from the picture above, slight vignetting, and color distortion to try to match reality :)

And Grey render.


Benoit Aubry
I am a CG artist, and a semi professional photographer. Currently located in Cyprus, and working with Pyxel Studios since few years now, I am specialized in architectural design as you can see with all the cars. Gathering all the tools I learnt, I do photo-realistic 3D renders, offering ideas to people, or helping them visualize theirs.


Add a comment