
 Autos
Autos
 LKW
LKW
 Busse
Busse
 Motorräder
 Militär
 Elektronik
 Waffe
Waffe
 Gebäude
 Flugzeuge
 Möbel
Möbel
 Charaktere
 Tiere
Tiere
 Raumfahrzeug
 Lebensmittel
 Schiffe
ansehen
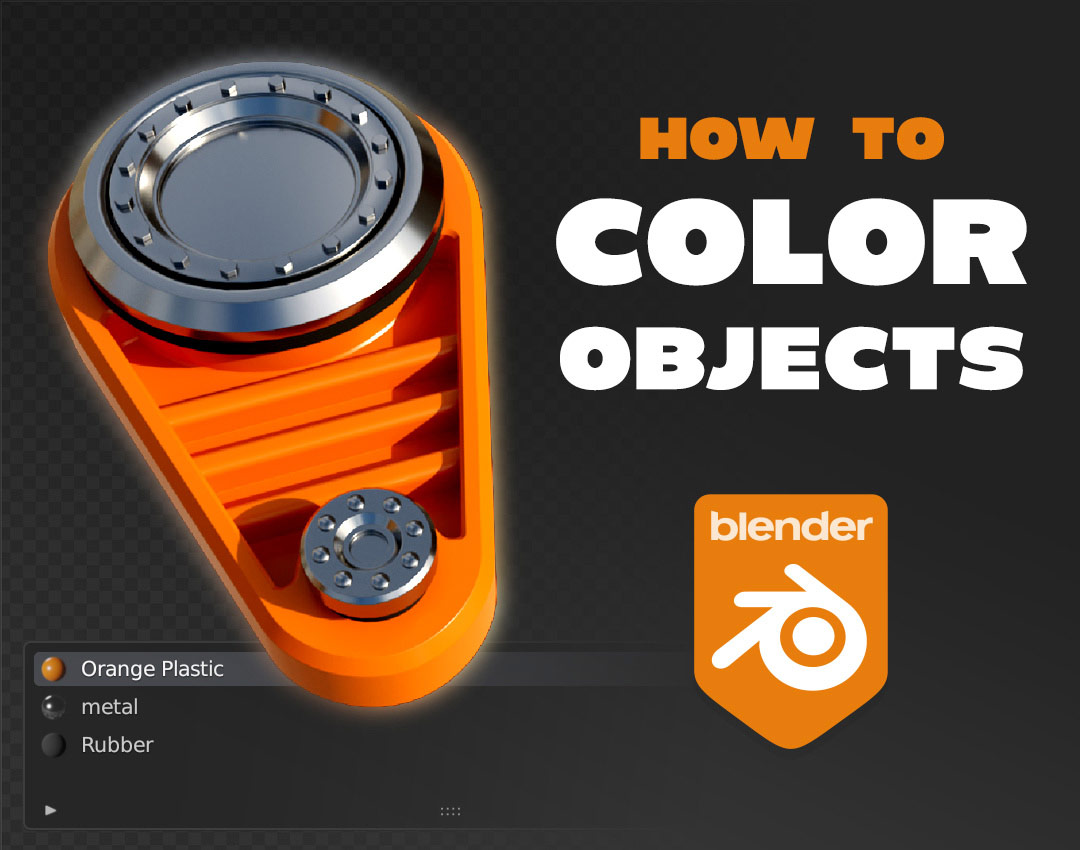
In 3D art, modeling your creations is only half the battle. Assigning Colors or Materials to your projects is important for creating a finished product for a game, film, or render – but when you’re learning 3D for the first time, that can be a confusing task!
With so many different options for colors in Blender, how can you know which one is right for your project?
Well, in this article I’m going to try to answer that question. I’ll go over all the options for coloring objects in Blender, including using materials, coloring objects in the viewport, and using vertex colors – by the end, you should have a solid understanding of exactly how each method works, and when to use them!
Let’s get started!
To start off, let’s take a look at Materials in Blender!
In general, if you want to color objects in 3D for Renders, Games, VFX, or almost anything else, using a Material will be the way to go.
Materials not only allow you to color objects in your scene, but also allow you to change properties such as Roughness, Metalness, Emission (glowing), and a lot more.
Materials can also contain texture images, which can be combined to create extremely realistic looking surfaces!
So, how do we set up a material in Blender?
To add a new material to an object in Blender, first you’ll need to switch to the Shading workspace – at the top of the screen, find the row of workspace tabs, and press Shading!

In Blender, the Shading Workspace is where you’ll be doing most of your work with materials. It allows you to create, edit, and view materials on your model.
To create a new material, select your model by clicking on it, and press the button labeled New.

In Blender, materials are Node-Based – different elements of a material (such as textures, gradients, etc.) appear in different Nodes, and they can be connected together in various ways to form an infinite variety of different materials.
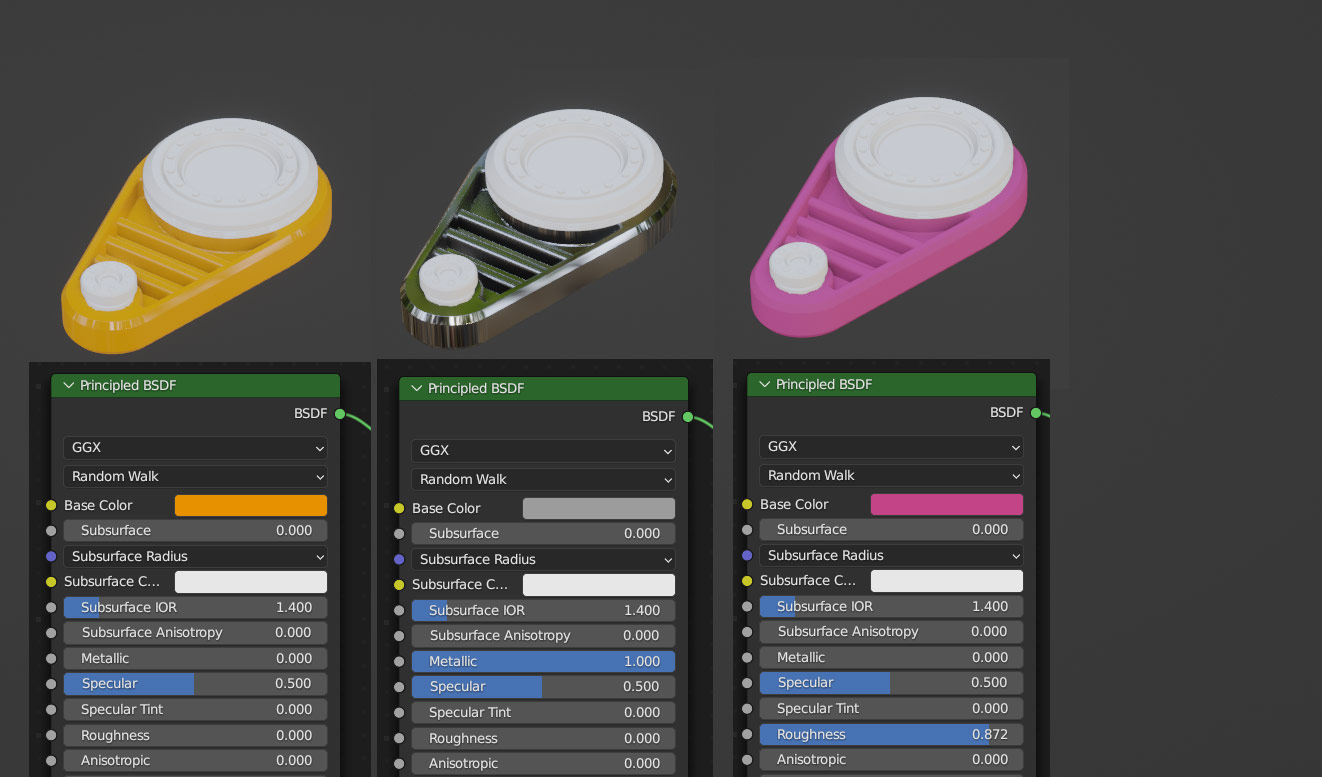
When you create a new material, you’ll see two of these nodes appear in the Material Editor – a Principled BSDF node, and a Material Output node. For this tutorial, we’ll be focusing on the Principled BSDF.
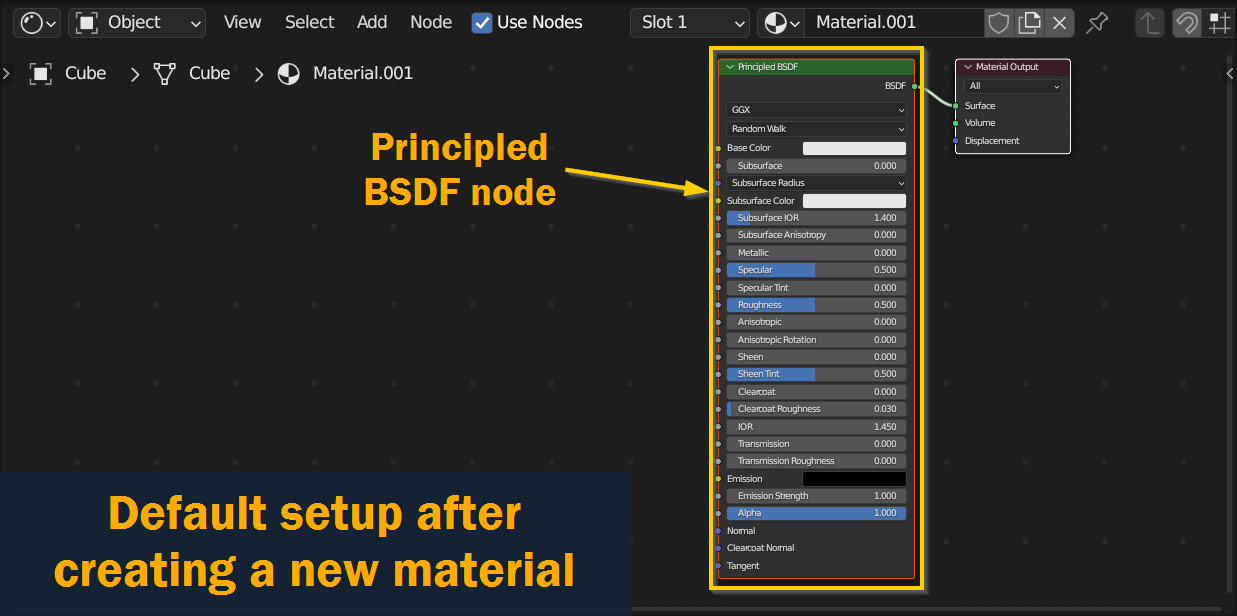
As you can see, you have a lot of options. The ones we’ll be focusing on here, though, are Base Color, Metallic, and Roughness – using these three parameters alone, you can create almost any surface.
For example, here’s how changing those settings influences the result on the model:
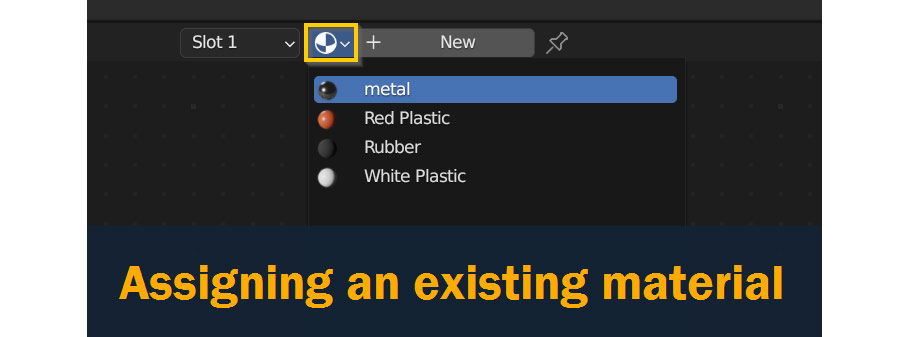
Once you already have a couple different materials in your scene, you don’t have to create new ones for every object – instead, you can simply assign one of the ones you’ve already made!
To do this, select an object and instead of pressing New, click the dropdown to the left with the circular material icon. From here, you can pick any of the materials you’ve created previously.
Once a material is assigned, you can also Rename it by clicking in the black text field, or Remove it by clicking the X icon on the right.

The other buttons are less commonly used, but occasionally handy – the button showing a number (if present) shows how many times the material is used in your scene and allows you to make a unique copy, the Shield icon prevents the material being deleted if it’s not used on any objects, and the Copy icon makes a copy of the material when you press it.
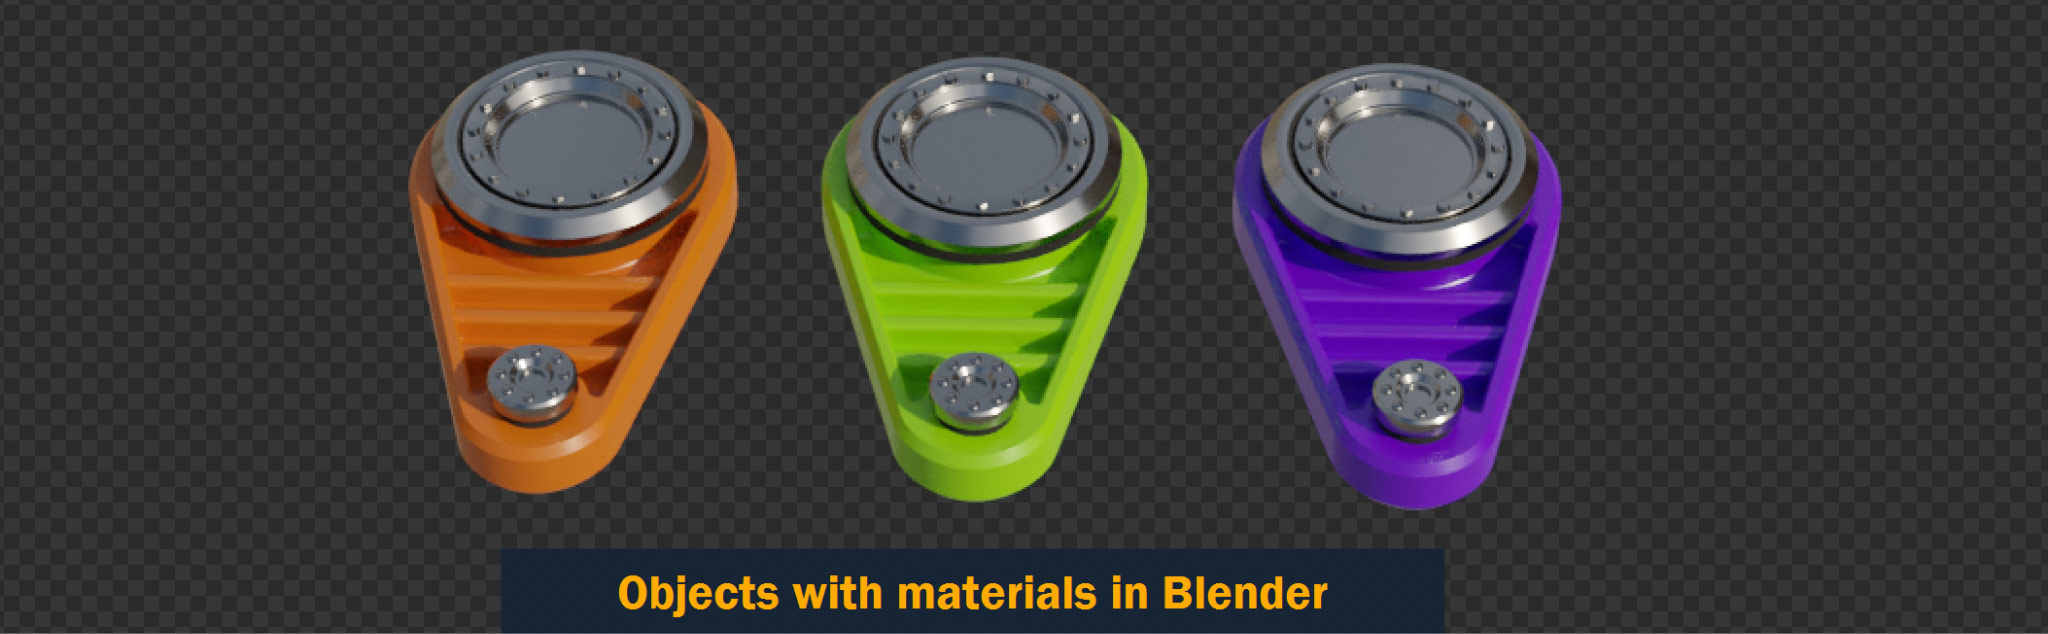
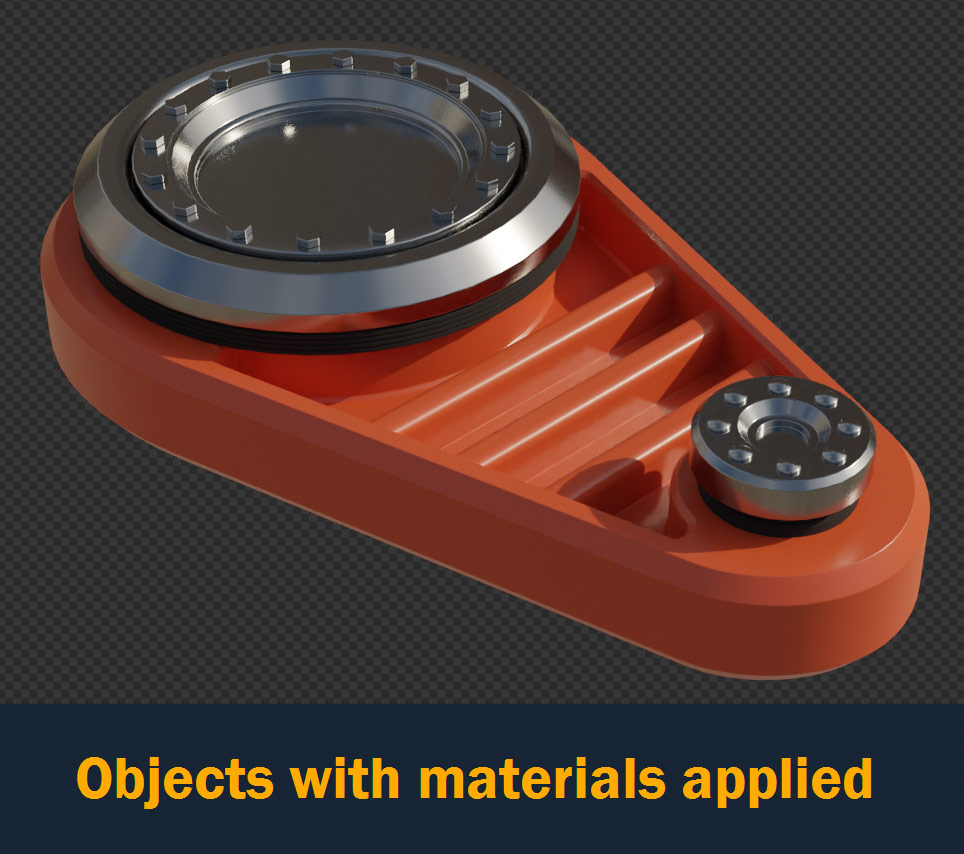
Here’s the final result, with three different materials applied to the objects in the scene!
So, as we’ve seen, assigning materials to objects isn’t too complicated. But what if we want to assign a material to only part of an object?
Well, luckily this is actually fairly straightforward as well!
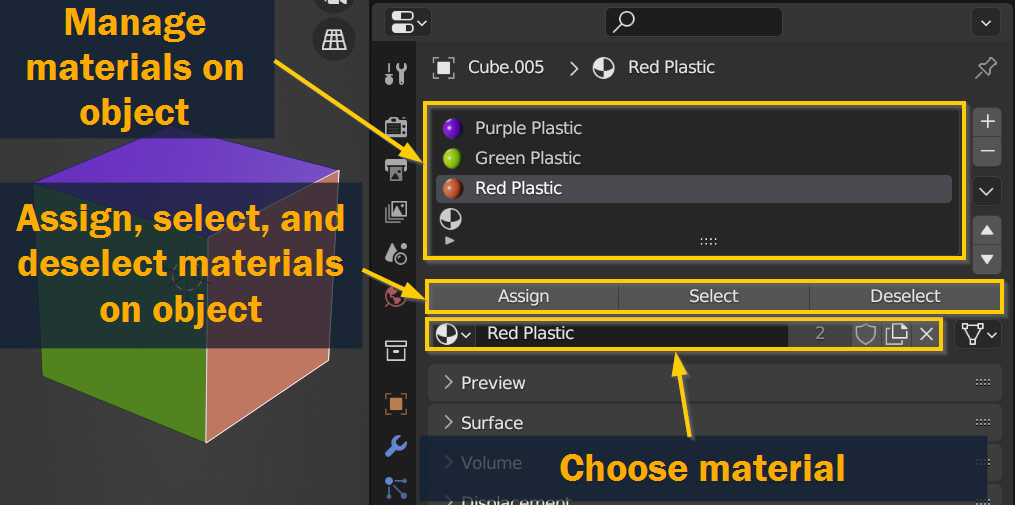
To assign, delete, add, and remove materials, go to the Properties Panel and click on the red Material Properties tab near the bottom.
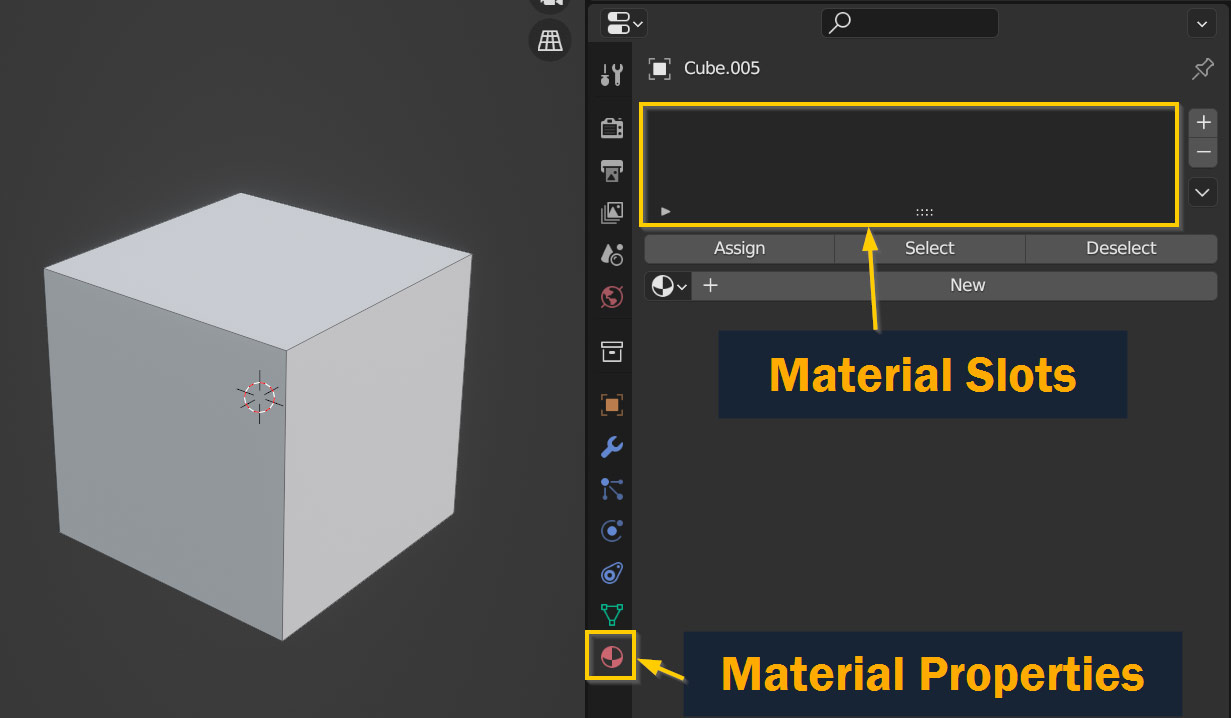
Here, you will see the Material Slots for your object, which is a list of materials currently assigned to that object. Use the + and – buttons to remove material slots, use the Material Bar below (circle with grid symbol) to choose materials for each slot, and use Assign button to assign materials to currently selected faces!
You can also select or deselect all faces with the current material, using the Select and Deselect buttons.
That just about covers coloring objects using materials! There’s a whole lot more that can be done with materials in Blender, like using textures and setting up procedural node systems – but those are topics for another tutorial.
For now, let’s look at a couple other ways to color objects in Blender!
As we’ve seen, if you want to assign colors and materials to objects for renders, games, or animations, using Materials is the way to go. But what if you just want to change the color of an object in Blender, in the viewport?
Well, that’s possible too!
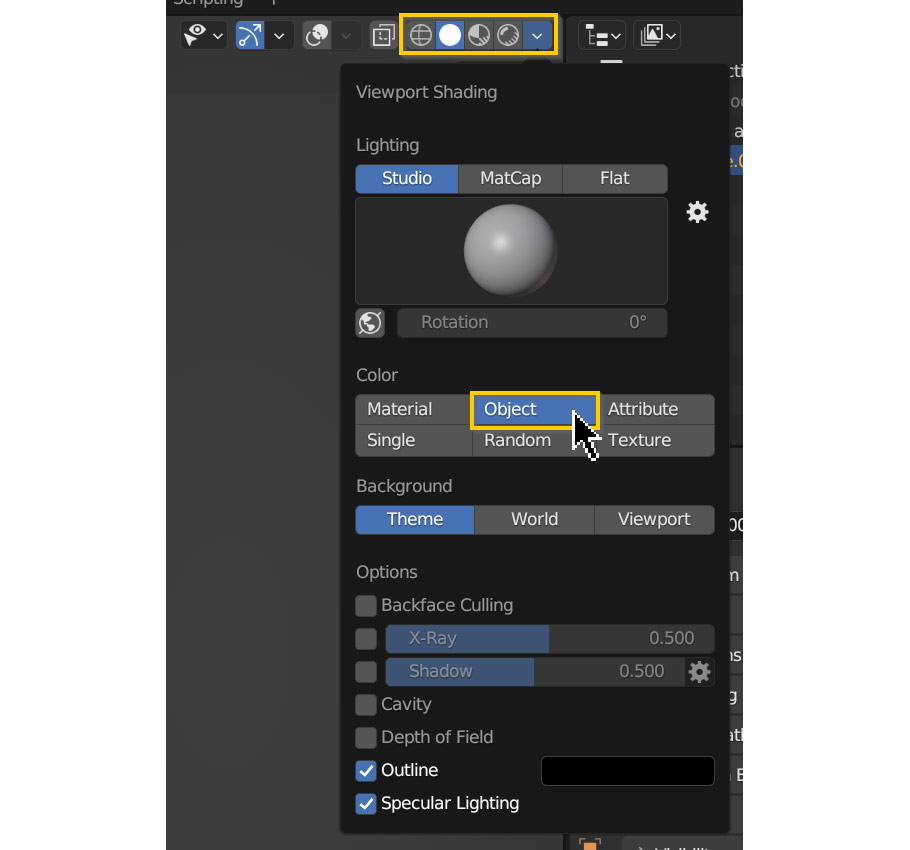
To start with, look at the Viewport Shading menu at the top right of the viewport, and make sure you’re in Solid mode. Next, click on the dropdown arrow to open the Shading options, and under Color select Object. This will allow you to change the colors of individual objects in the scene.
So, to do that, go to the Properties Panel, and look at the Object Properties tab (orange square symbol). With your object selected, go to the Viewport Display section and choose a color!
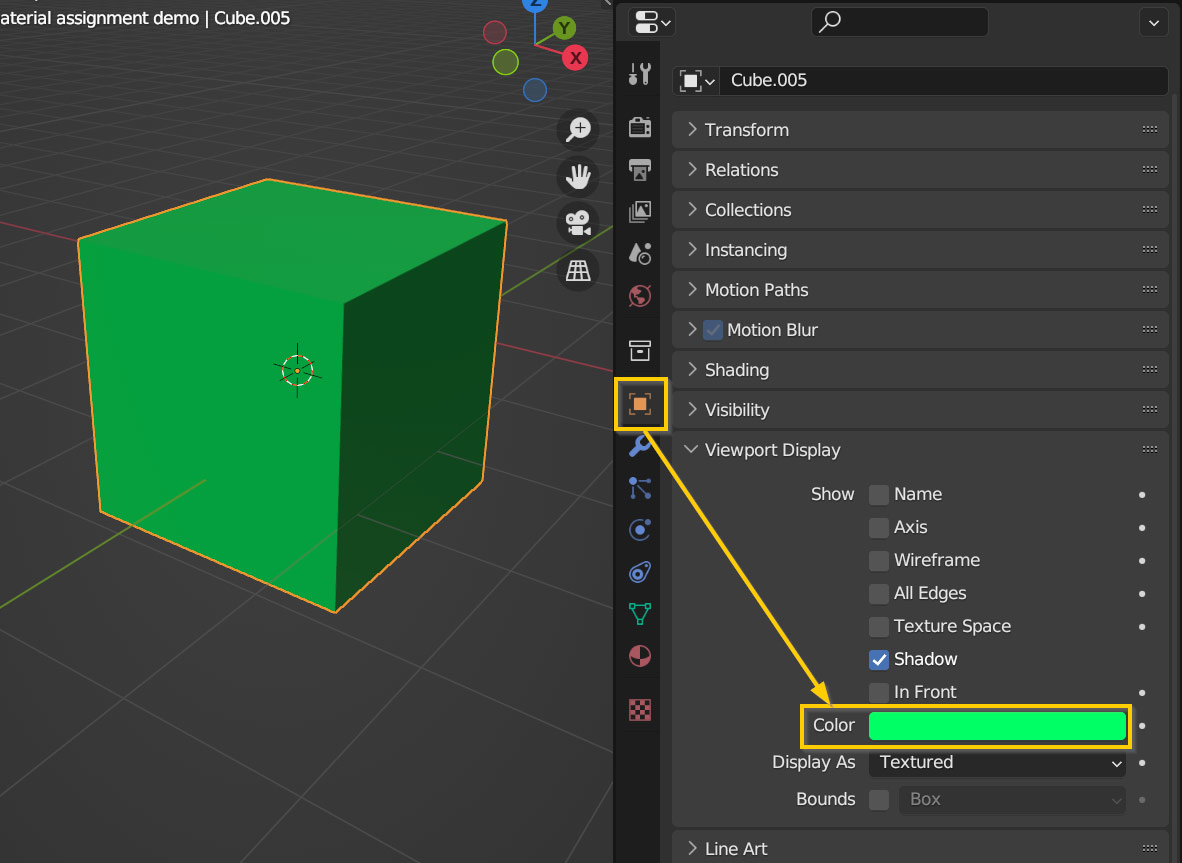
You can also change other handy things from this menu; if you click the dropdown for Display As, you can choose Wire or Bounds, which display the wireframe or bounding box for your object.
But remember, these options will only be visible in Solid view mode – if you switch to cycles or eevee render, the objects will be rendered with whatever material is assigned to them!
The final way to color models that I’ll be covering here is Vertex Painting.
On 3D models, each vertex and face has a Color value assigned to it as part of the data that makes up the object. This is a case across almost all 3D software – usually it’s simply set to white, but in Blender, you can edit these colors using Vertex Painting!
Vertex painting is useful for a variety of purposes, which are often more technical than you’d expect. For example, in game assets, vertices can be painted to designate certain areas of object for material variation and effects to appear in – and for texturing, faces can be painted different colors to determine where different materials will be applied, in software like Substance Painter.
So, how do we start vertex painting?
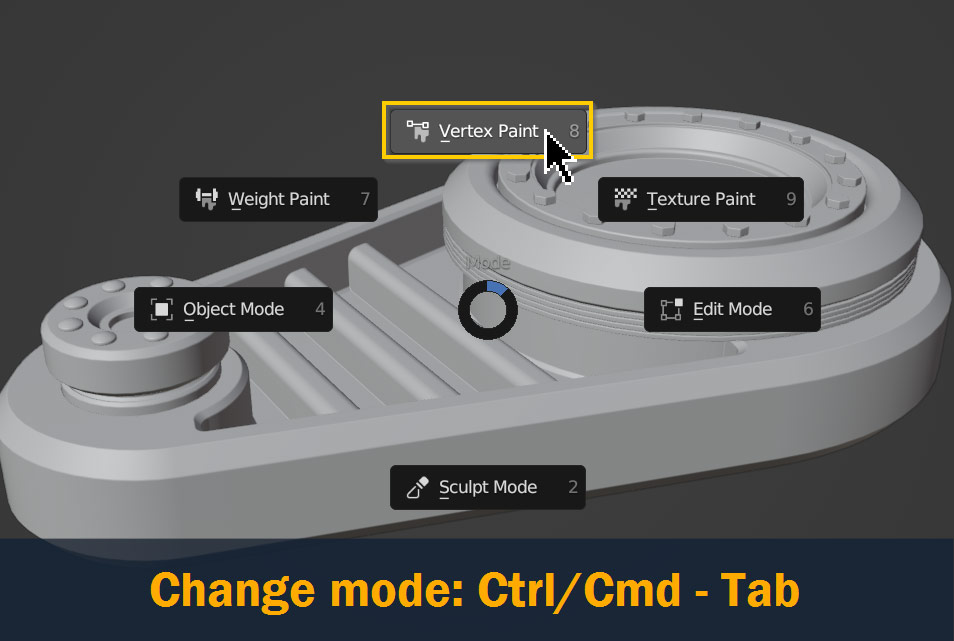
Start by entering Vertex Paint mode, by pressing Ctrl/Cmd – Tab and selecting Vertex Paint!
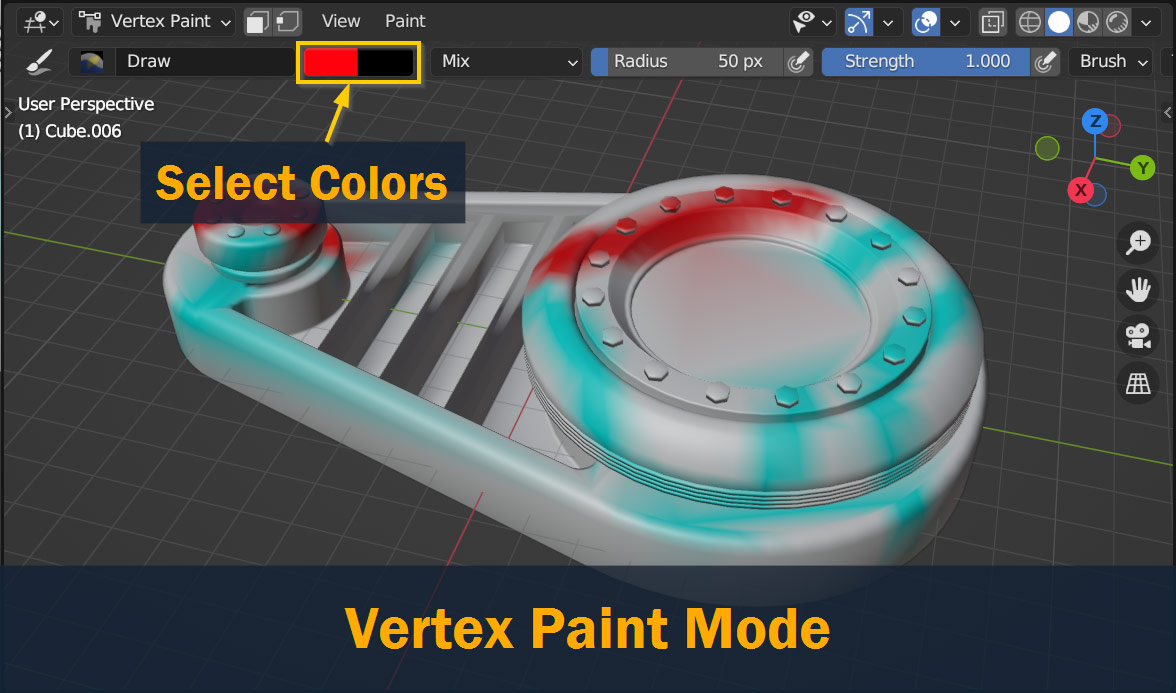
Once you’re in vertex paint mode, you’ll be able to start painting on your model.
But remember, you’re painting directly onto the vertices of your object – so if there aren’t enough vertices in the area you want to paint, it will be hard to control where the color ends up!
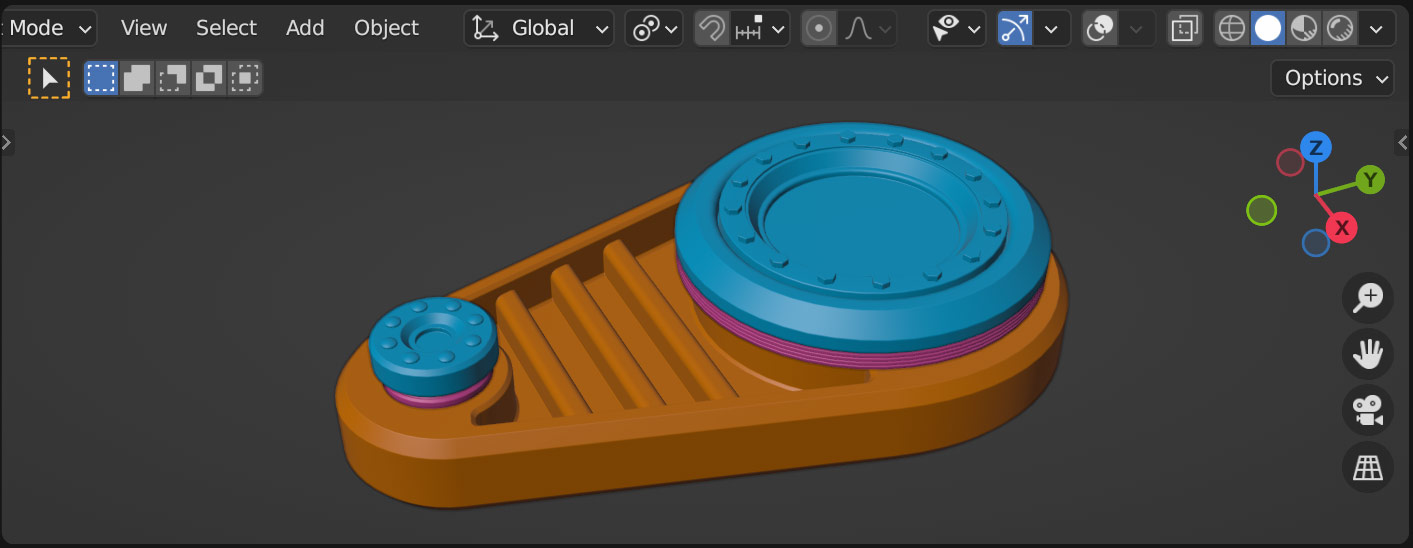
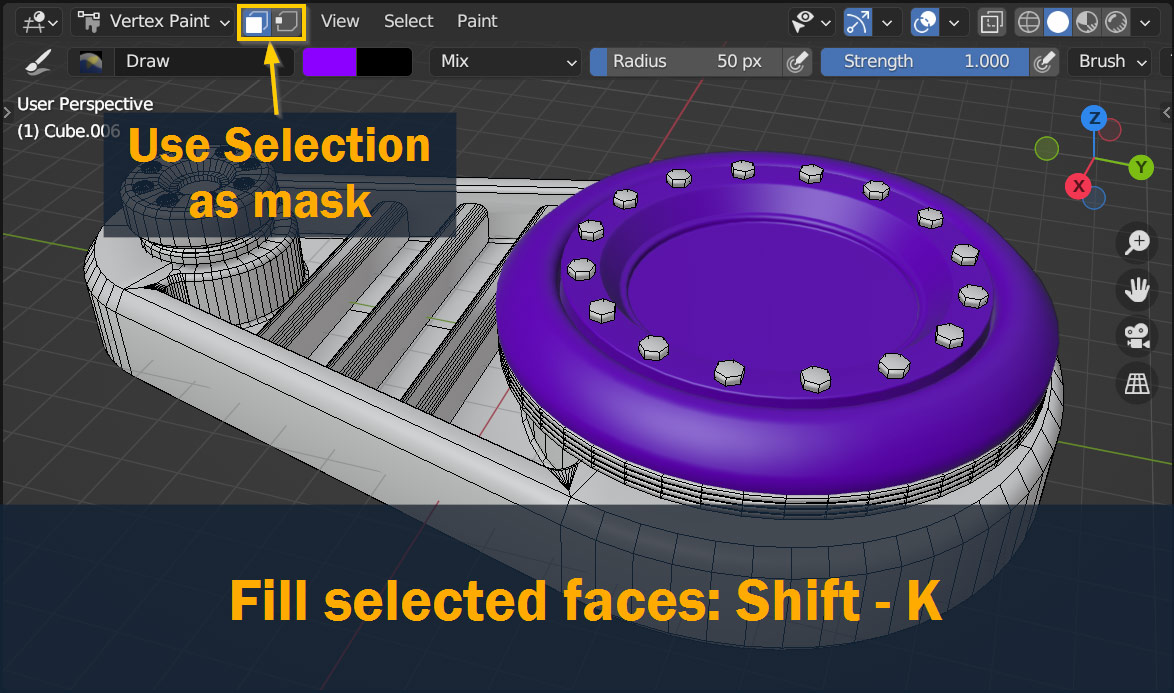
To get a little more control over which areas get painted, you can Select faces or vertices in Edit Mode, and then in Vertex Paint mode, enable Vertex or Face Masking using the two buttons at the top of the viewport (shown below). With these activated, you can press Shift – K to quickly flood fill areas of your mesh with color!
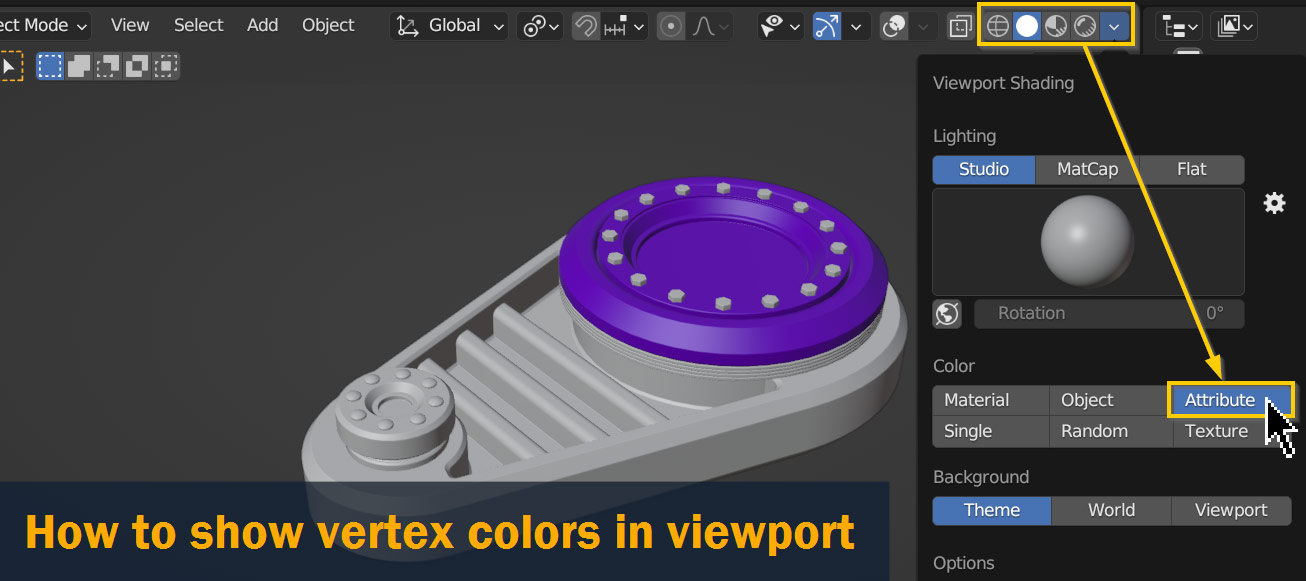
By default, vertex colors are only visible while you’re in vertex paint mode – but to preview them in the solid viewport as well, go to the Shading dropdown at the top of the viewport, and under Color, select Attribute. Now they should become visible!
So, as we’ve seen, there are a few different ways to color objects in Blender – all of them working a bit differently, and used for different purposes.
Whether you’re assigning colors for a game or render using materials, coloring objects in the viewport using viewport display colors, or coloring vertices using vertex painting, knowing which method to use for which task will be a valuable tool for your 3D projects!
I hope this tutorial has been helpful, and that you’ve been able to find whatever you were searching for – as always, feel free to leave your thoughts, questions, or ideas in the comments below.
Best of luck on your 3D projects, and thanks for reading!

Hello! I’m a self-taught 3D modeler and texture artist with experience on a variety of projects, ranging from planet creation to game props, vehicles, and environments. Although I’ve tried out a bit of everything, my main software is Blender. I’m a big fan of sci-fi and fantasy shows and books like The Expanse and Lord of the Rings, so most of my personal work has a fantasy or sci-fi theme – but I also love to experiment and try new things!


Add a comment