

 Autos
Autos
 LKW
LKW
 Busse
Busse
 Motorräder
 Militär
 Elektronik
 Waffe
Waffe
 Gebäude
 Flugzeuge
 Möbel
Möbel
 Charaktere
 Tiere
Tiere
 Raumfahrzeug
 Lebensmittel
 Schiffe
ansehen
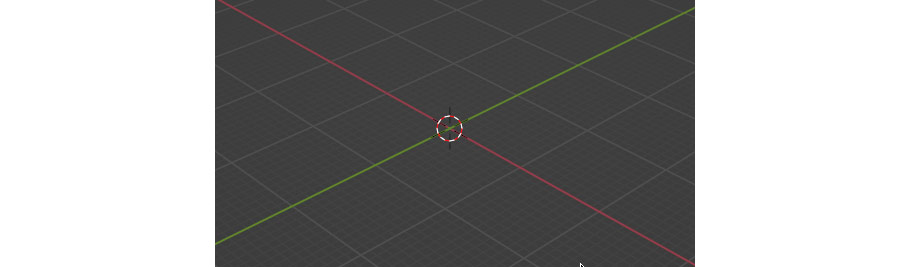
If you’re opening up Blender as a beginner, you’ve probably noticed the 3D cursor sitting somewhere in your scene. It looks like a small red and white life ring with black lines pointing out in each direction, and it appears overtop of other objects in the 3D space. At first it may not seem very useful, and it might be tempting to try to get rid of it – but while hiding the 3D cursor is possible, you might want to hold off on that until you know what it’s for!
Although it can be a confusing concept to get your head around, the 3D cursor is an indispensable tool if you know how to use it properly; and in this article, we’ll go through all the information you need to integrate the 3D cursor into your workflow once and for all.
Sure, so the 3D cursor is useful – but what actually is it?
The 3D cursor is, in essence, just a point in 3D space that can be moved, rotated, and used as a reference point for a number of tasks. It’s not a physical object in your scene, and will never appear in renders, but while working within Blender it’s always present.
Probably the most common use for the 3D cursor in Blender is as an origin point for any objects you add to your scene. When you add an object to your scene using Shift – A, it will always appear at the location of the 3D cursor. By default the 3D cursor is at the center of the 3D world, but when the cursor is moved, new objects you add will appear wherever the cursor is placed.
While this is probably the function you’ll encounter most often, the 3D cursor has many other tricks up its sleeve; in the rest of this article, I’ll cover the most common ways of positioning and transforming the 3D cursor, all the most common uses for it, as well as a few other tricks and common issues.
Before getting into the many use cases for the 3D cursor in Blender, let’s start with the basics: Cursor positioning and rotation. When it comes to moving and rotating the 3D cursor in your Blender scene, you have a number of different options!
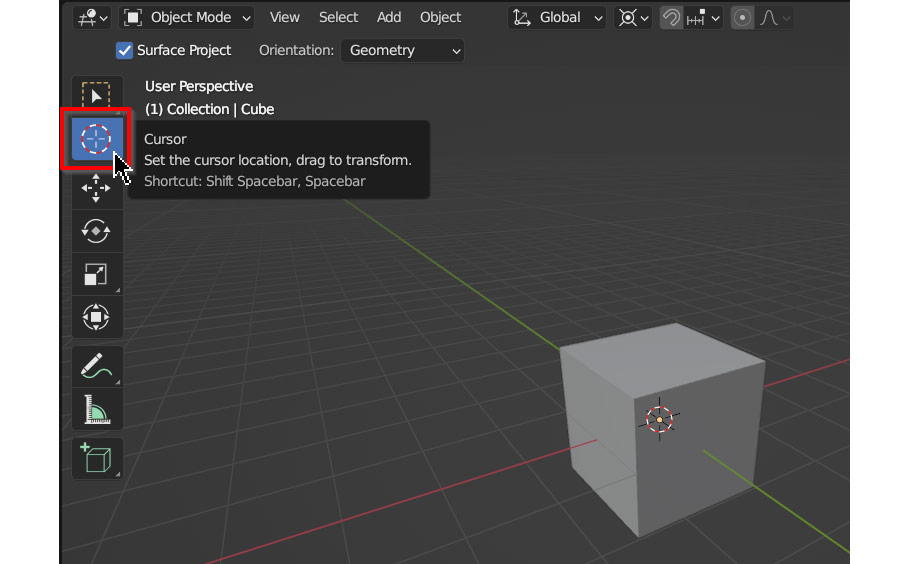
Probably the most obvious option is the Cursor tool. To access this, first open the Tools menu with the T key, and select the Cursor option second from the top – this will allow you to move the 3D cursor by left clicking or dragging anywhere in the 3D scene, allowing you to quickly position it anywhere you want.
Options for this tool appear in the topbar of the 3D view: Surface Project, enabled by default, will position the 3D cursor on the surface of any objects in your scene, and the Orientation dropdown allows you to change how moving the cursor affects its rotation.
A quicker, if more limited, way to access this tool is the Move Cursor shortcut; to use this, simply hold Shift while Right Clicking/Dragging – this allows you to quickly reposition the cursor on the fly, without the extra clicks needed to switch to the cursor tool. Unlike the cursor tool though, this shortcut doesn’t show you any options – but for regular cursor positioning needs, this usually will do the trick!
After moving the cursor around your scene for a while, you might run into a different issue; how do you reset the cursor back to the origin (or center) of the 3D scene? Luckily, setting the cursor back to its normal position and rotation is simple. Just hit Shift – C on your keyboard; the cursor should instantly reset back to the center of the 3D scene!
One of the key functions of the 3D cursor is the option to move the cursor to a selected object (or geometry) in your scene, and vice versa. This opens up many options while 3D modeling, including positioning objects in relation to each other, aligning objects, and much more.
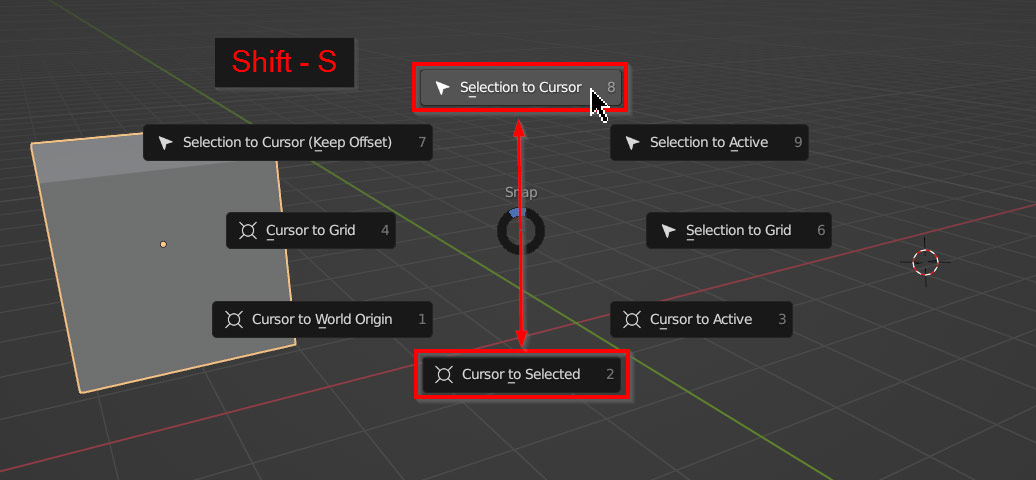
To access this functionality, in either Edit Mode or Object Mode, open the Snap pie menu with Shift – S, and choose either Selection to Cursor or Cursor to Selected. As you’d expect, Selection to Cursor will snap selected objects or vertices to the 3D cursor, while Cursor to Selected will snap the cursor to any objects or vertices you’ve selected.
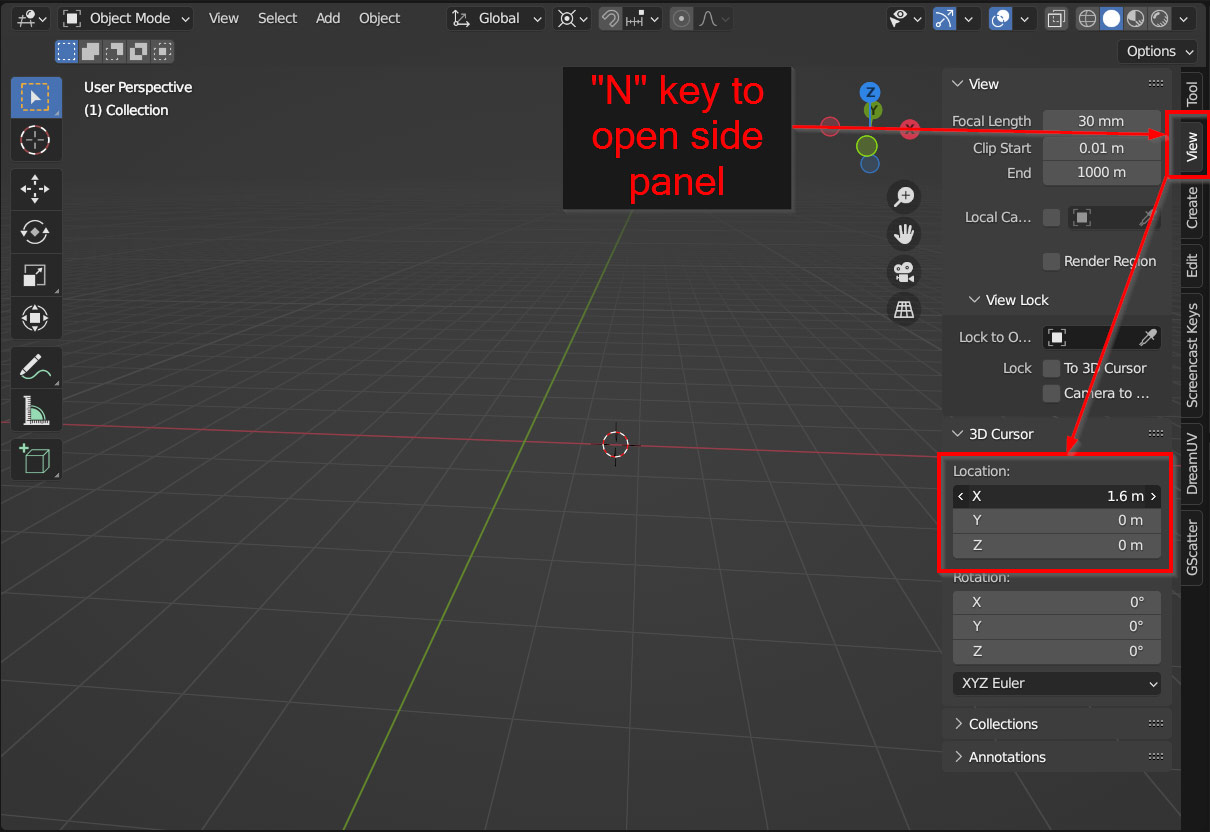
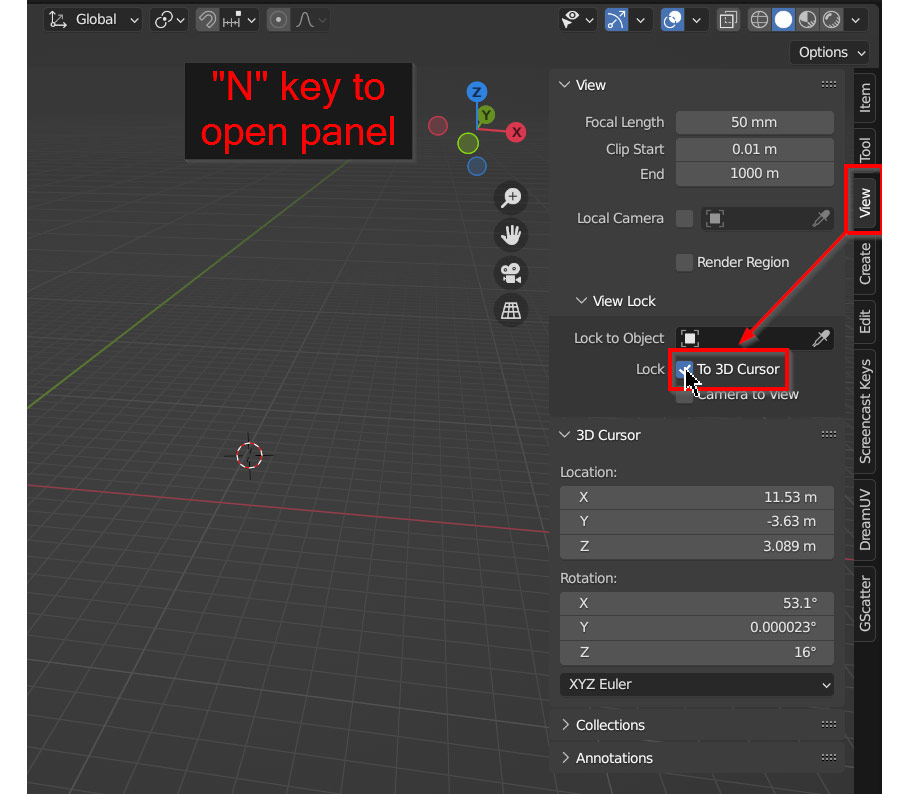
In addition to the other methods mentioned above, the 3D cursor can be manually positioned and rotated via the Sidebar Menu. To open the Sidebar Menu, press N on your keyboard; then navigate to the View tab, and then the 3D Cursor section, where you will see fields to input Location coordinate values as well as Rotation; to move or rotate the cursor, simply adjust these values. This is probably the most inconvenient way to position and rotate the cursor, but it has its uses – in situations where a scene requires precise measurements or locations, this might be your only option, and this is also the only way to manually rotate the cursor!
One of the most important and helpful features of the 3D cursor is its ability to be used as a pivot point (or origin) for rotating and scaling objects and vertices. This is extremely helpful as it gives you the ability to rotate or scale an object around any point in 3D space, instead of being limited to using only the center point of the selection.
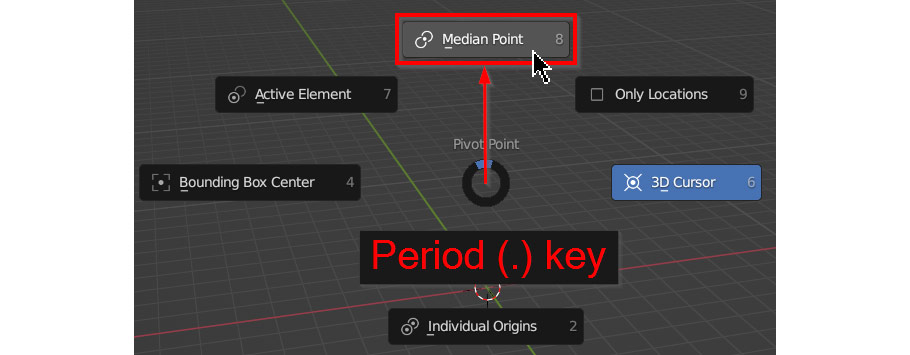
To access this functionality, press the Period (.) key to bring up the Pivot Point pie menu:
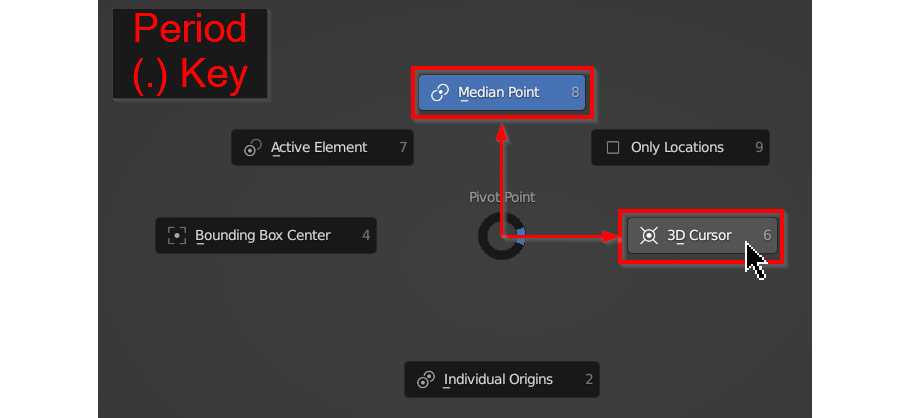
By default, the pivot point is set to Median Point, which will usually be the center of your selection. When you rotate an object or vertex selection in this mode (R key), it will behave as you’d expect, spinning around the center of the selection. Nothing new here!
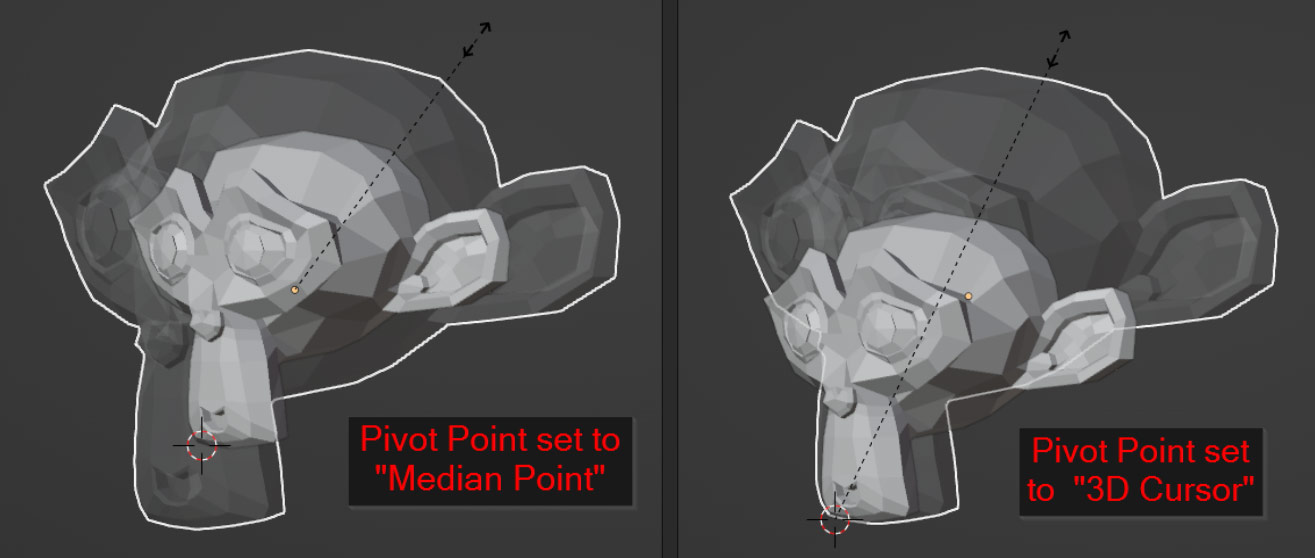
But if instead you choose the 3D Cursor option, things start to get more interesting. Now when you rotate an object with the R key, instead of rotating around its center point, it will now rotate around the 3D cursor!
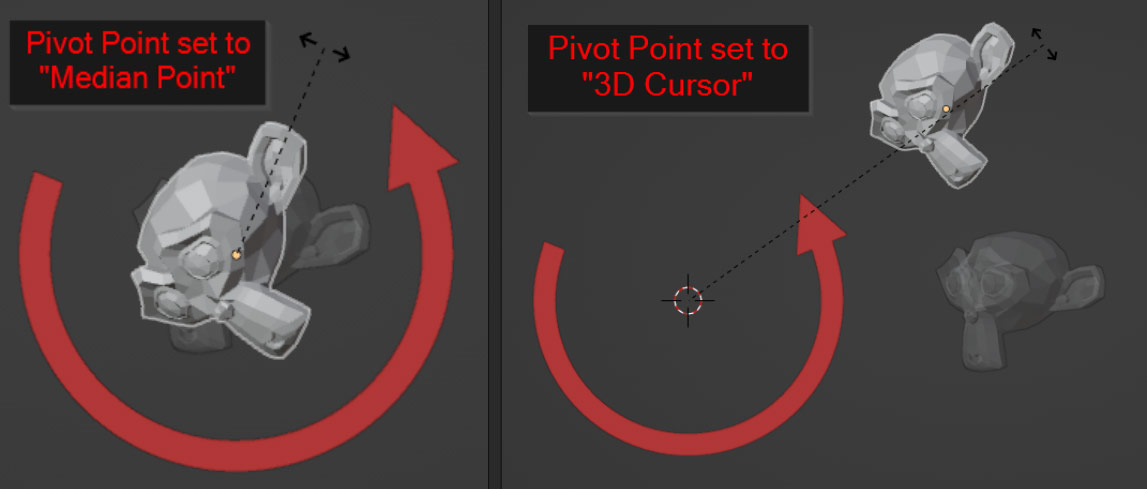
The same thing applies to scaling; with the pivot point set to 3D Cursor, objects and vertices will scale outward from the 3D cursor instead of their center point as they normally would.
Now, useful as the 3D cursor may be, in some situations you might want to get rid of it or temporarily turn it off. Maybe you want to look over your model without the cursor constantly visible, or maybe you just want to make clean screenshots of your project – whatever the reason, there’s an easy way to remove it!
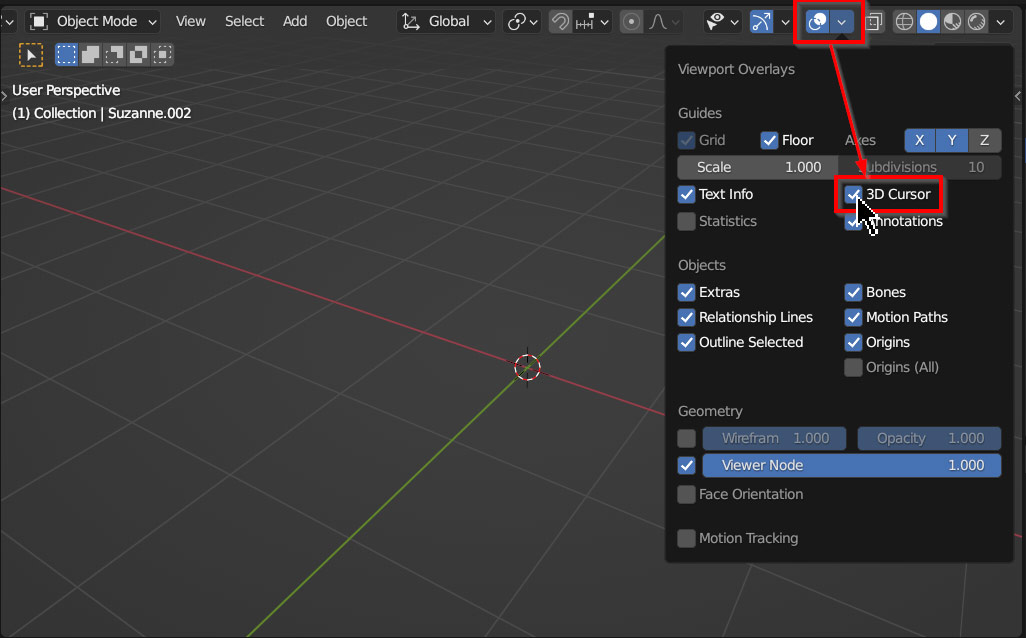
To hide the 3D cursor, open the Overlays dropdown from the top of the 3D viewport, and uncheck 3D Cursor; the cursor should instantly become invisible.
That said, always be sure to re-enable the cursor afterwards, otherwise you might end up with a confusing situation later on!
Another interesting feature of the 3D cursor in Blender is the option to lock the view to the cursor. To do this, open the Sidebar Menu with the N key, and navigate to the View tab; under View Lock, check the box for Lock To 3D Cursor.
With Lock To 3D Cursor checked, the viewport will now rotate around the 3D cursor, and moving the 3D cursor will move the view as well; this can be useful in many situations that require a bit more control over the viewing position!
If you’re coming back to Blender after being away for a while, you might find moving the cursor doesn’t work as expected anymore – before version 2.8, the cursor was moved by left clicking, but after the update the cursor now is moved using either Shift – Right Mouse or by selecting the Cursor tool from the Toolbar.
If the 3d cursor seems to be missing from your 3D scene, it may be that it is simply hidden; to re-enable the 3D cursor, navigate to the Overlays dropdown at the top of the 3D viewport, and see if 3D Cursor is checked; if it’s not, enable it!

Alternatively, it’s possible that the 3D cursor has just ended up somewhere unexpected in the viewport – if this is the case, pressing Shift – C will reset it to the center of the world.
If your objects all seem to rotate and scale around the 3D cursor when you don’t want them to, it’s possible that your Pivot Point may be set to 3D Cursor by mistake. To fix this, press the Period (.) key to open the Pivot Point menu and select Median Point; now your objects should rotate and scale correctly!
Whether you’re rotating models, aligning vertices, or adding new objects to your scene, knowledge of the 3D cursor is essential for fast and high quality work in Blender. With many use cases across all styles of 3D modeling, it’s hard to imagine a project that wouldn’t benefit from using the 3D cursor; so even though it might seem tempting for the new user to ignore or disable it in projects, getting comfortable working with this tool will be well worth it in the long run!

Hello! I’m a self-taught 3D modeler and texture artist with experience on a variety of projects, ranging from planet creation to game props, vehicles, and environments. Although I’ve tried out a bit of everything, my main software is Blender. I’m a big fan of sci-fi and fantasy shows and books like The Expanse and Lord of the Rings, so most of my personal work has a fantasy or sci-fi theme – but I also love to experiment and try new things!


Add a comment