

 자동차
자동차
 트럭
트럭
 버스
버스
 모터사이클
모터사이클
 군용 차량
군용 차량
 전자 기기
전자 기기
 무기
무기
 건축물
건축물
 항공기
항공기
 가구
가구
 캐릭터
캐릭터
 동물
동물
 우주선
우주선
 음식
음식
 선박
선박
보기
In most styles of 3D art, detail is key. No real-life surface is totally smooth, so having tiny bumps, holes, and cracks is critical. But in most 3D projects, modeling every little detail to this scale would be impossible – most games have polygon count limitations, and even for VFX workflows, modeling every tiny scratch would be impractical. So, what’s the solution?
Introducing: Normal maps!
In practical terms, a normal map is a way to add small, realistic-looking details to your model using a texture instead of geometry. It gives your model details that look 3D at a glance, but that don’t add any additional faces or vertices to calculate – essentially, normal maps are a way to fake detail.

But how does this actually work? Well, what normal maps do is modify the angle light bounces off surfaces. When a light beam encounters a normal map on a surface, the normal map essentially is telling the light beam to bounce off the surface at a different angle than it ordinarily would – and in doing this, normal maps are able to fake slopes, curves, and bumps that aren’t really there. And most critically, this means that normal maps react to different lighting conditions in different ways; when you move a light around over an object with a normal map, the reflections, highlights, and shadows all move along with it just like they would on an actual 3D object. This is what makes normal maps so powerful!
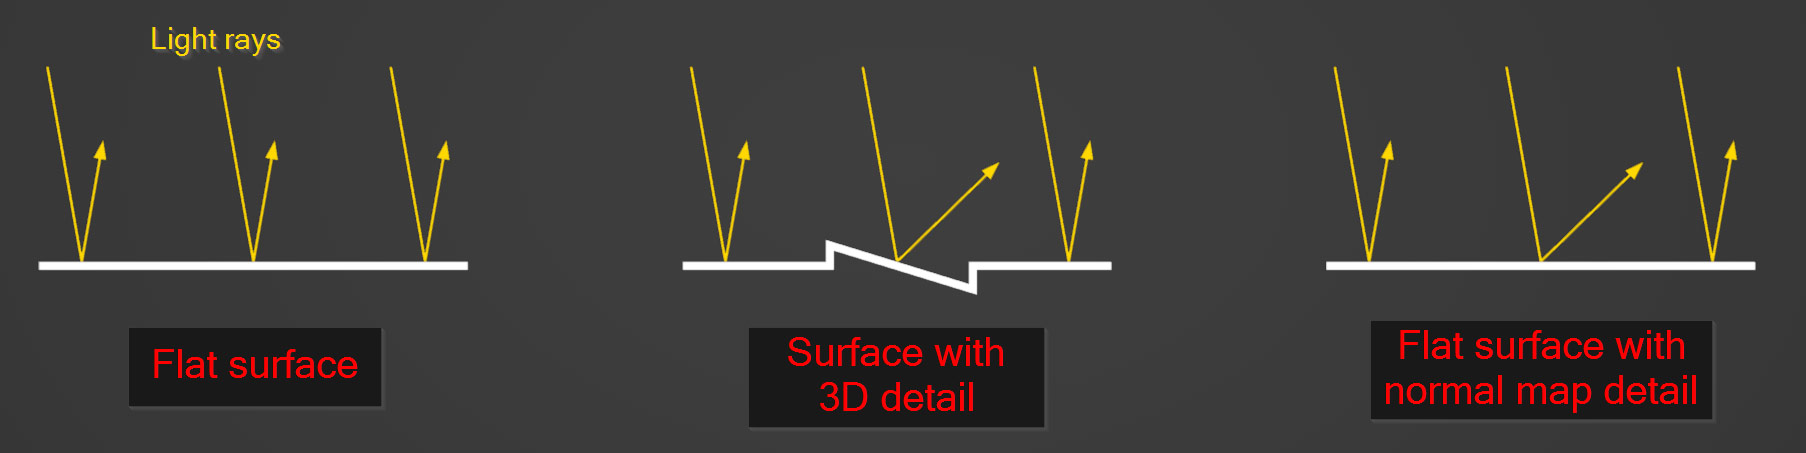
And if you’re wondering why normal maps are always such a strange selection of colors, that’s because they’re actually storing the angle data of each pixel as a color, with each value for red, green, and blue coordinating with a different axis. What you’re seeing isn’t actually colors at all – it’s data.
Now that we know what normal maps are, let’s put them to use!
To start with, you’ll need to find a material that includes a normal map – I’d recommend polyhaven.com as an excellent free resource! Once you’ve found a material you like, download it and save it somewhere easy to remember on your computer.
Next, load up your 3D model in Blender. For this example, I’ll use the default Suzanne Monkey model, but any model will do as long as it’s UV unwrapped.
Now, navigate to the Shading workspace in the topbar. Select your model, and click New in the Shader Editor on the left side of the screen to create a new material. Feel free to change the name to something more memorable by clicking in the text field that appears!
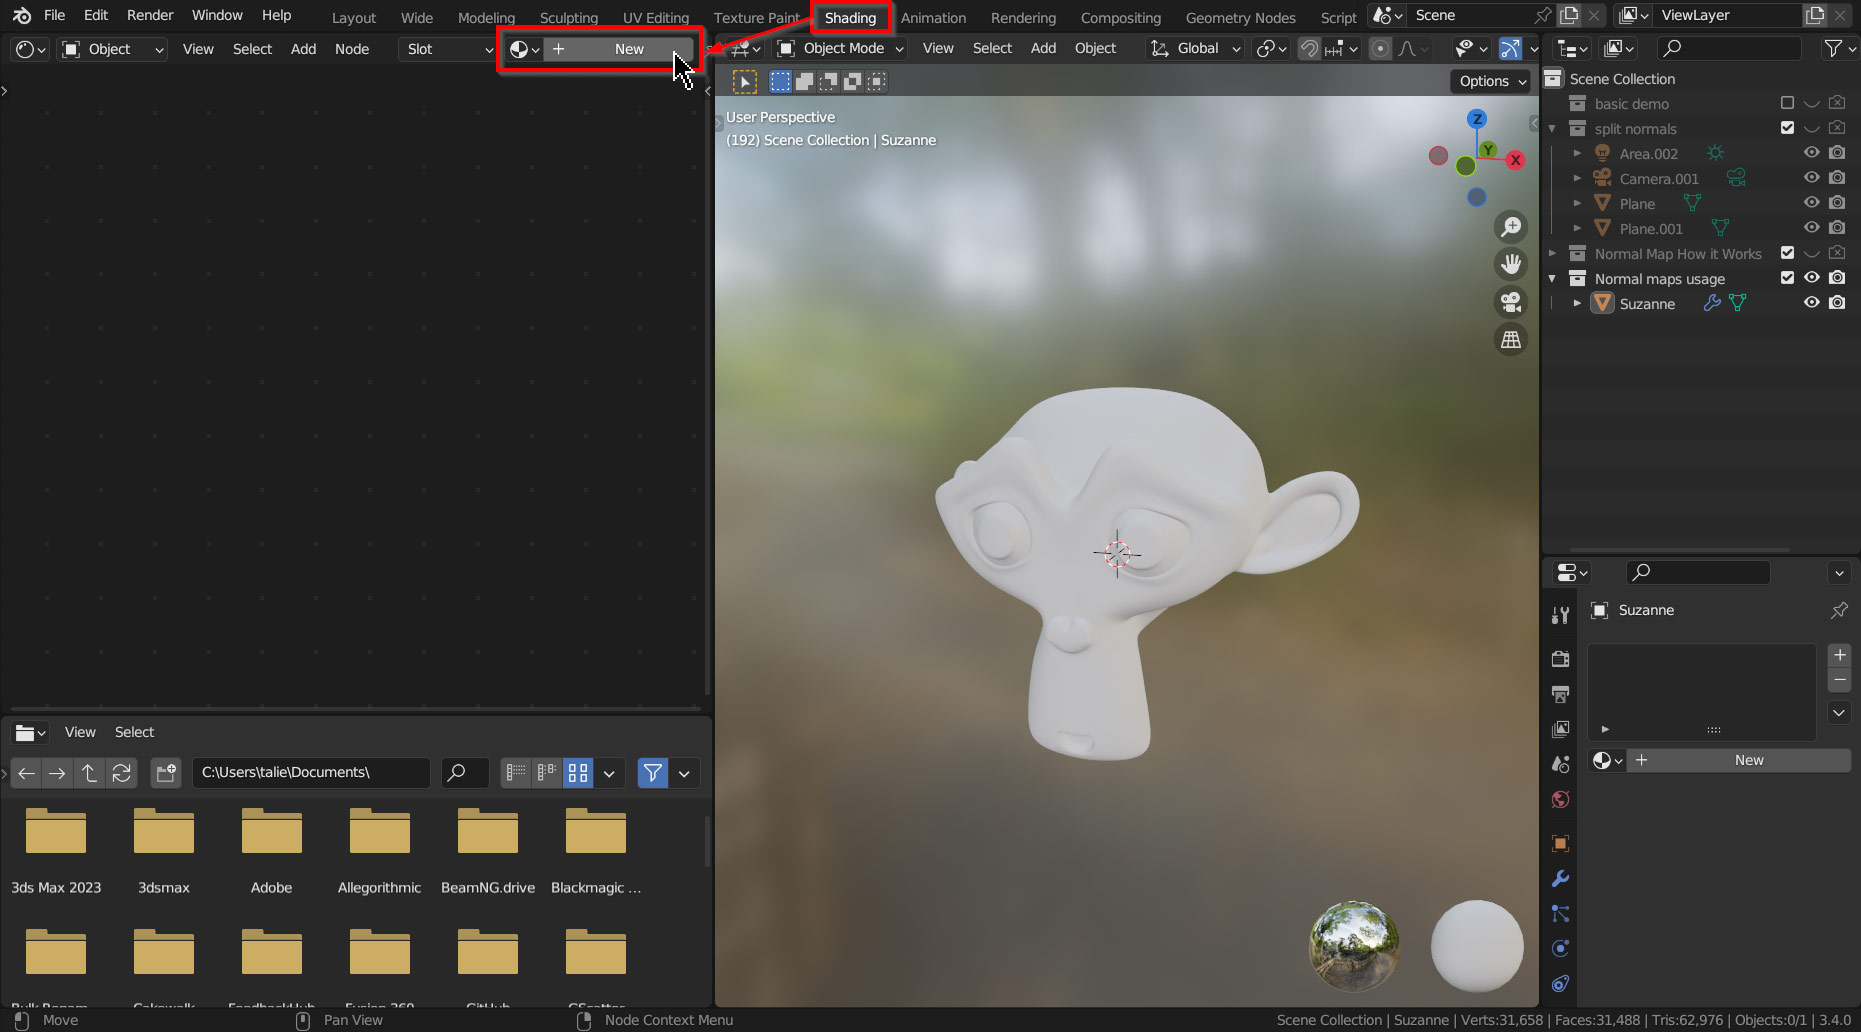
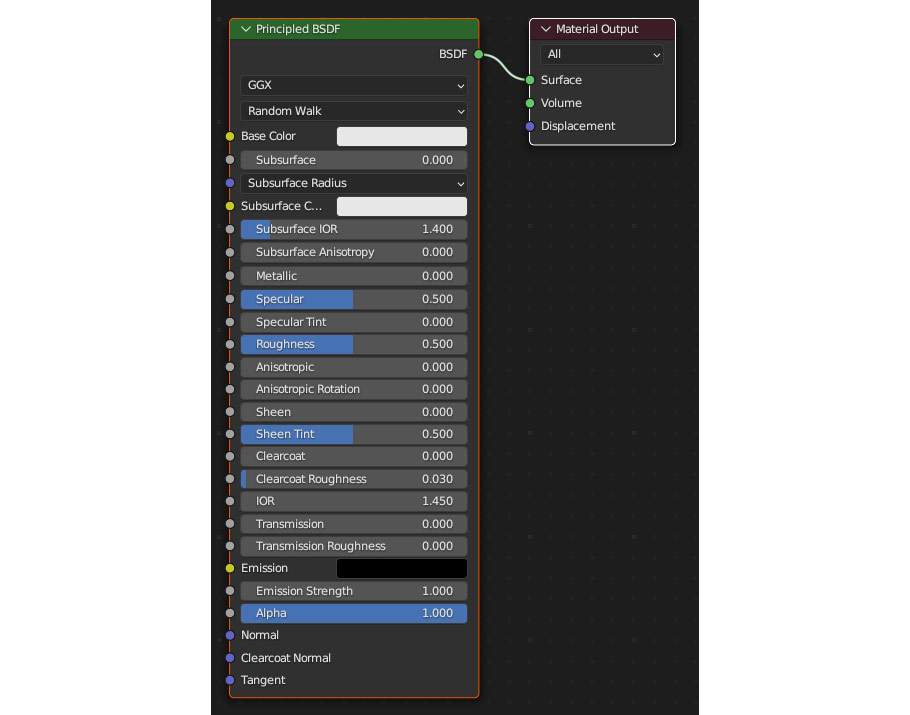
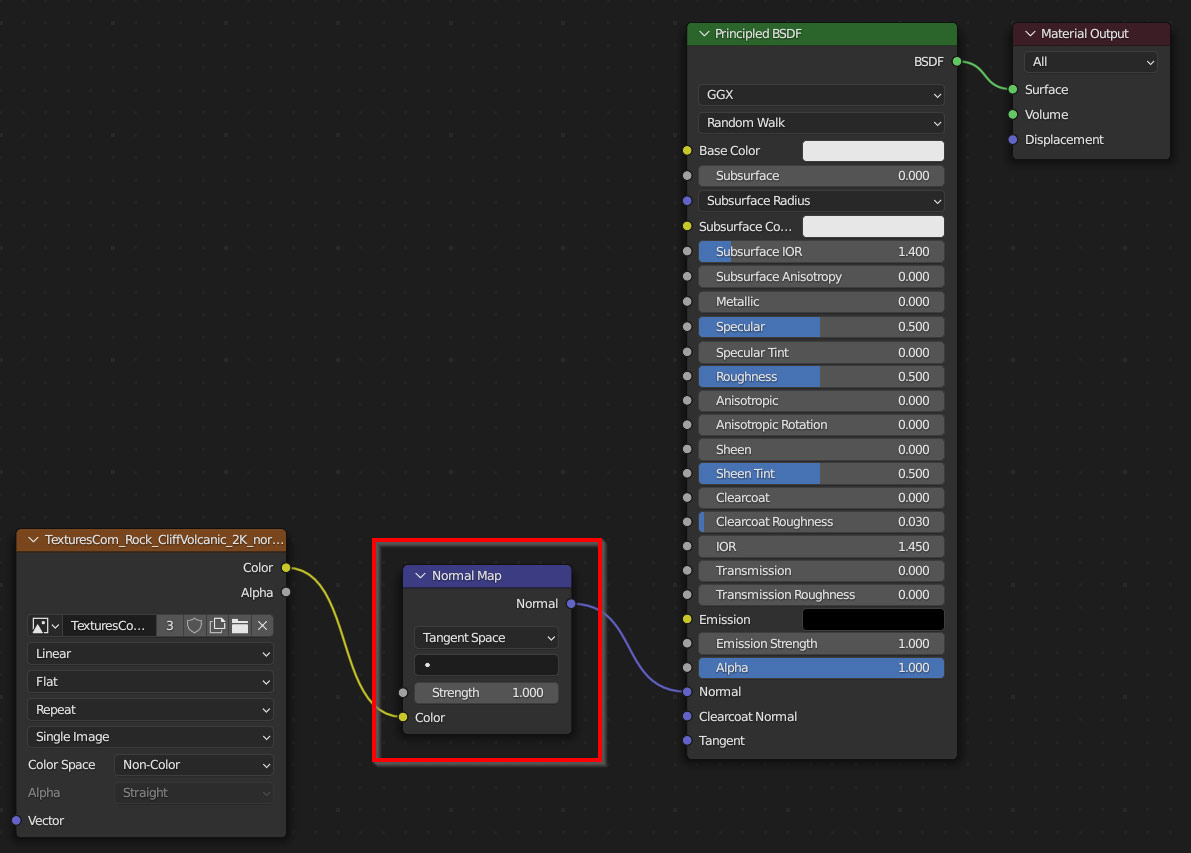
Once you’ve created a material, you should see a Principled BSDF node as well as a Material Output node. On the Principled BSDF, you’ll notice a variety of inputs. But don’t worry; for this tutorial, all you’ll need is the one labeled Normal.
Next, open up your file browser, navigate to where you downloaded your textures, and find the one labeled normal or nor. To add it to your project, drag it into the material editor window and drop it down.
Once the texture is added, you’ll need to add a Normal Map node as well. To find that, press Shift – A to open the Add menu, and look for Normal Map in the Vector section. Drop that down in between your texture and your Principled BSDF, and connect the nodes as shown in the screenshot!
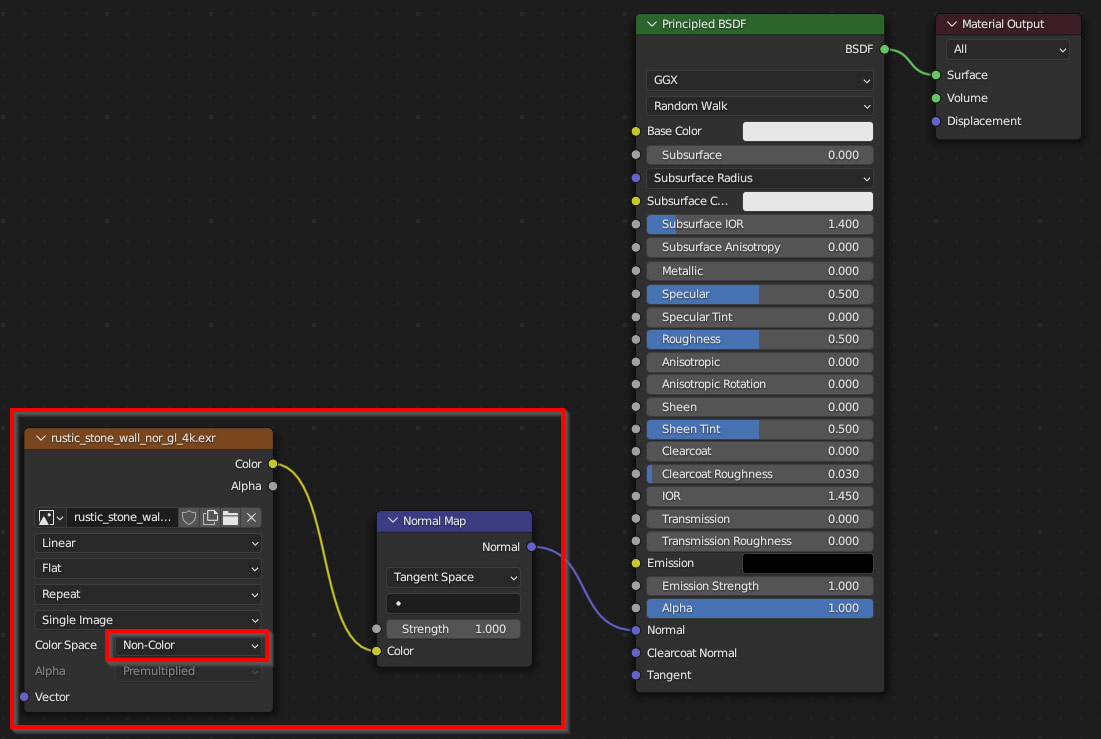
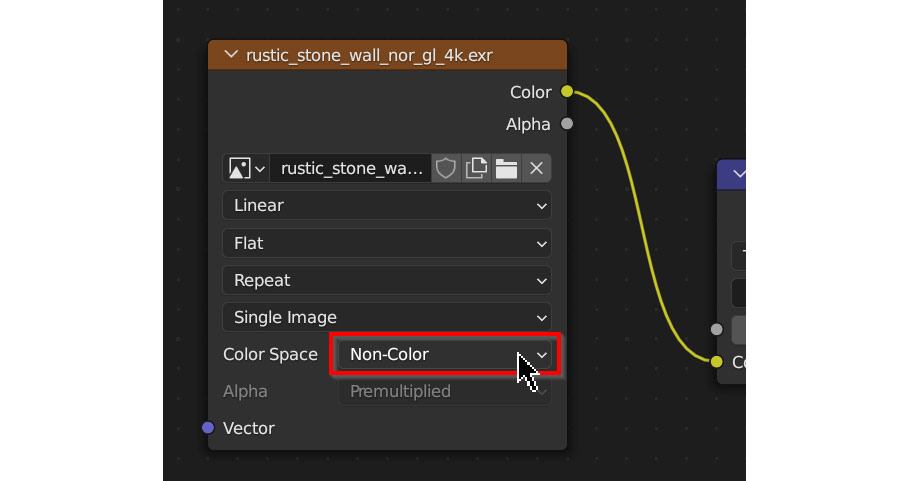
You’re almost done! Last but not least, under Color Space on the Image Texture node, be sure to select Non-Color instead of sRGB. This is important because it tells Blender to interpret the texture as information instead of colors.
With that, you’re finished! With practice, applying normal maps like this should become an easy and regular part of your 3D workflow. If you run into any issues, see the Troubleshooting section at the end of the article.

If you’ve looked through 3D forums online or watched a few tutorials, you might have seen people mentioning Bump maps and Height maps as well as normal maps. Along with normal maps, Bump and Height maps have been a critical part of standard 3D workflows for a while, and like Normal maps, they’re both different ways to add detail to models using a texture. So what is the difference between them?
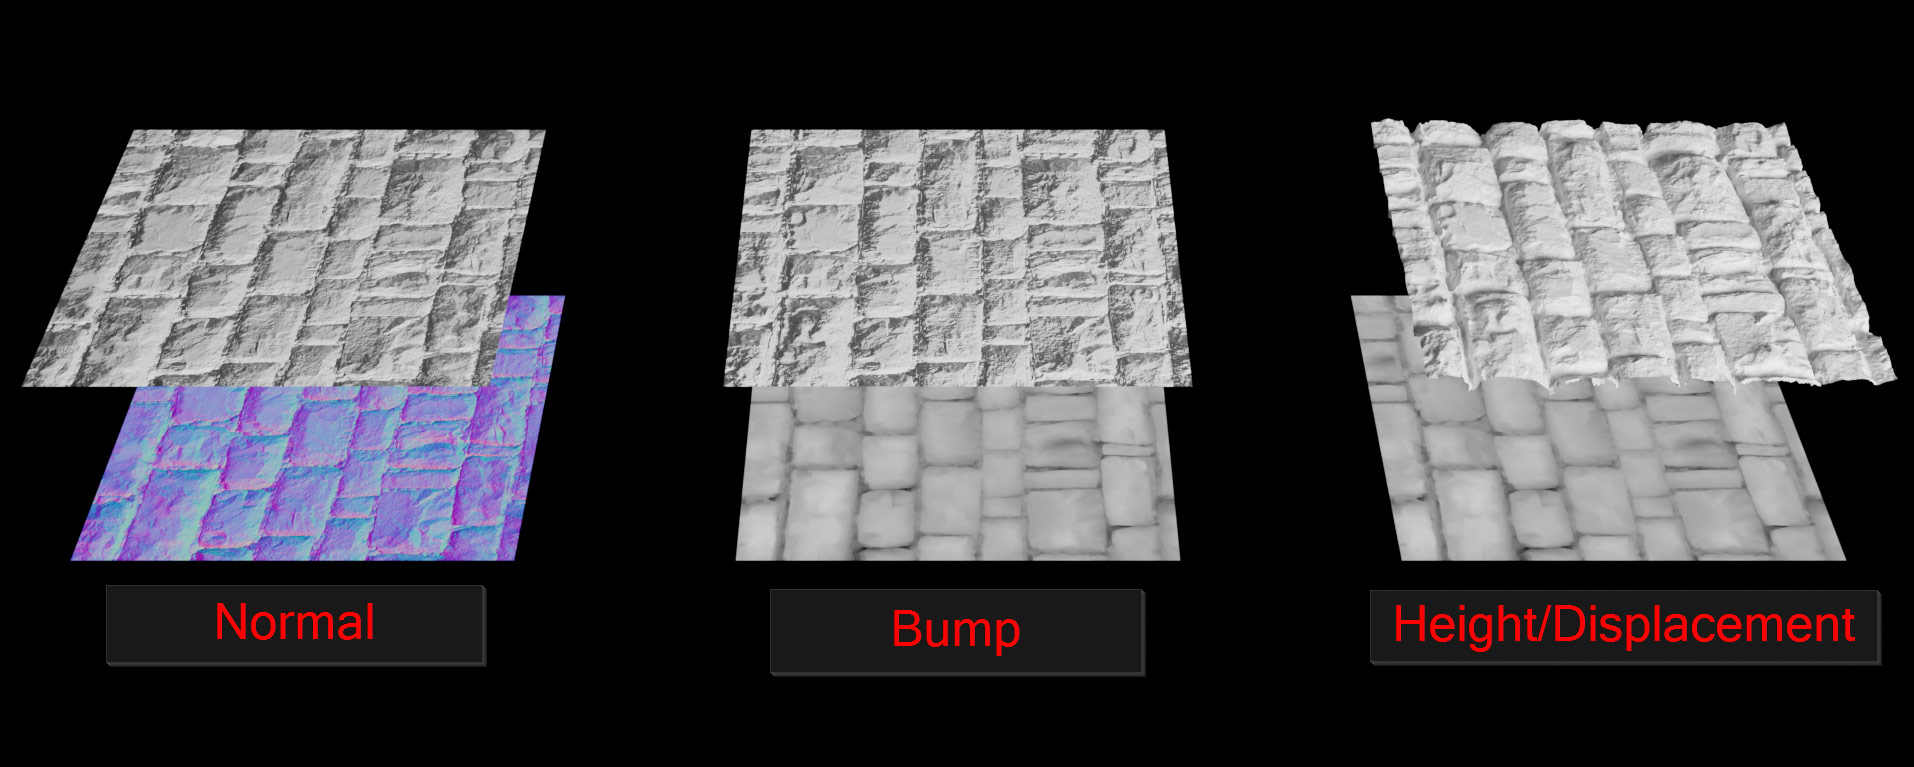
In Bump maps, the rendering process works in a similar way to normal maps – both bump maps and normal maps are used to essentially “fake” detail by making light paths bounce in different directions than normal. In normal maps, as we’ve seen, this angle is stored directly in the colors of the texture, while in bump maps, the angle information is derived from black and white Height information. While results are similar to normal maps, normal maps do tend to produce slightly cleaner details than bump maps. For this reason, normal maps have mostly replaced them in modern 3D workflows – so you won’t see many bump maps around these days!
Height maps (also called Displacement maps), are an entirely different beast. Unlike normal and bump maps, height maps act directly on the geometry of your model, pushing vertices up and down depending on the brightness values of the pixels on the texture. No fakery here – when you’re using heightmaps, the details added physically exist in the 3D scene! But for this reason, using heightmaps has traditionally been restricted to VFX work and still images. Because heightmaps operate on actual geometry, they require very high polygon counts far out of reach for most games.
In 3D workflows, two types of normal maps are commonly used: DirectX, and OpenGL (sometimes shortened to DX and GL or OGL). Although the difference between them is minor, knowing how to tell them apart and how to convert between the two formats is very useful!
So, what’s the difference? Just one thing: In DirectX, the Green channel is inverted compared to OpenGL – so if a pixel on a DirectX normal map has a value of 1 in the green channel, the same pixel on an OpenGL normal map will have a value of 0, and vice versa. The difference is simply in what code various programs use for rendering – programs that use DirectX will be compatible with DirectX normal maps, and OpenGL programs will be compatible with OpenGL normal maps. Blender takes OpenGL by default, but as we’ll see, you can make DirectX work in Blender too without much trouble!
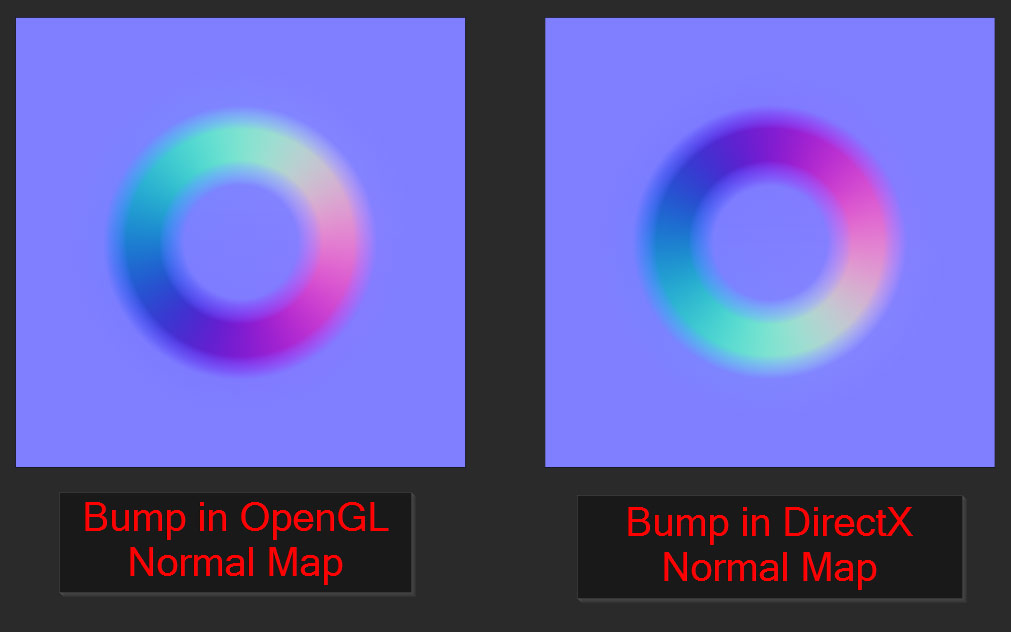
To tell the difference between DirectX and OpenGL normal maps, simply look at the texture itself. On OpenGL maps, the “lighting” on surface features appears to come from the top, with “shadows” appearing on the bottom, while with DirectX maps the “lighting” appears to come from the bottom of the image.
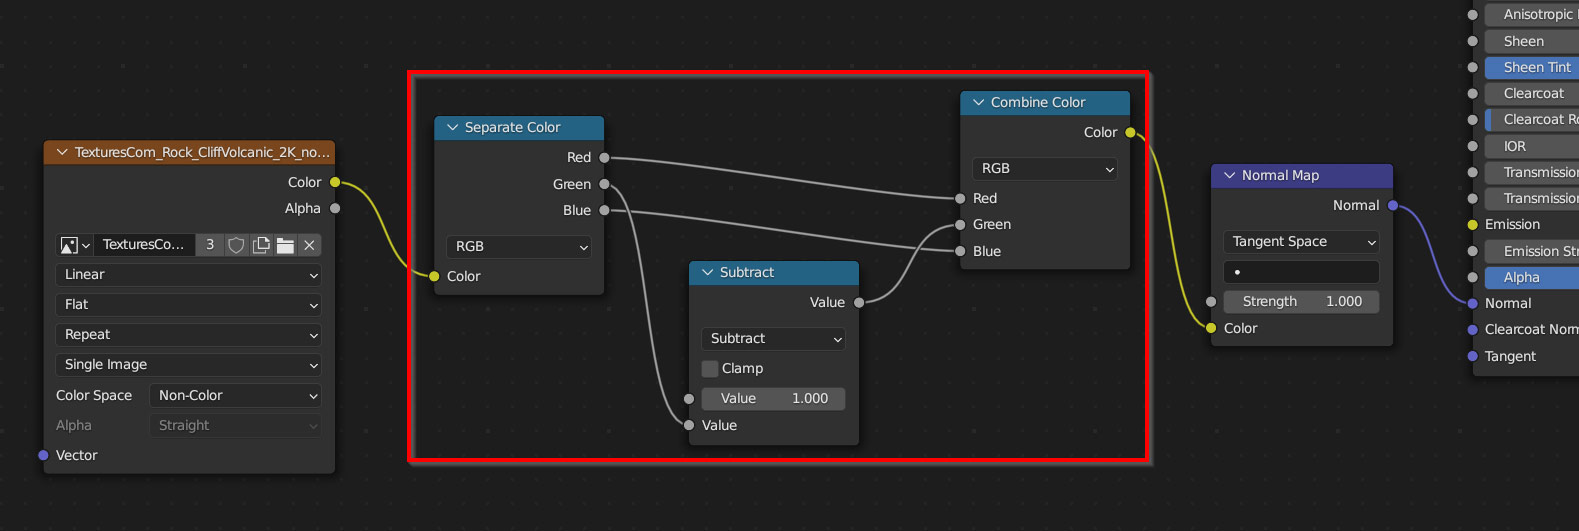
If you ever end up in a situation where you’ve got the wrong format of normal map, there’s an easy way to convert one to the other – all it takes is three nodes added to your material in Blender. To convert DirectX to OpenGL (or vise versa), add a Separate Color, Subtract, and Combine Color in the arrangement shown below!

If you’re feeling especially industrious, selecting those three nodes and pressing Ctrl/Cmd – G will group them together into a custom node group, which can be easily copied into other materials in your project.
If shadows and highlights seem to be appearing in odd places on your model after applying your normal map, it might be an issue with the Color Space. To check this, navigate to the Image Texture node for your normal map, and for Color Space, make sure that Non-Color is selected. If sRGB is selected instead as it is by default, Blender will interpret the data in the image wrong, causing issues!
If bumps on your normal map are appearing as holes, and holes appearing as bumps, it likely means that your normal map is in the wrong format (DirectX instead of OpenGL). Luckily, fixing this is a simple matter of inverting the Green Channel on the texture. To do this, you’ll need to add three nodes in between the Image Texture and the Normal Map node, set up as in the screenshot below! An Invert node can also be used instead of the subtract node, but the subtract node is slightly faster to process.
If your model appears white or unchanged after adding a normal map, make sure that you’ve included the Normal Map node in your node setup, in between your Image Texture and the Principled BSDF – this is an important middle step to convert the texture into usable information for Blender!
Also make sure that you’re using Normal Map and not the Normal node – the names can be confusing if you’re not used to working with them!
If some parts of your model have odd shading or obvious seams in unexpected places, it may mean that certain faces on your model are reversed, or flipped inside out. If this is the case, solving the problem is simple: Press Tab to enter edit mode, press A to select your entire model, and press Alt/Option – N to open the Normals menu; then select Recalculate Outside to automatically fix the orientation of all the faces in the model!

In summary, normal maps are a fantastic way to add detail to models when you need to avoid using many polygons, and in general are a great resource to bring up the realism in your texturing workflow. Normal maps are a very powerful tool, and standard across the game and film industries – and with the steps I’ve outlined in this article, you should now have all the information you need to start using them in your own projects!
And if you ever run into issues with your normal maps, refer back to the Troubleshooting section of this article – chances are, there’s an easy fix.
Thanks for reading!

Hello! I’m a self-taught 3D modeler and texture artist with experience on a variety of projects, ranging from planet creation to game props, vehicles, and environments. Although I’ve tried out a bit of everything, my main software is Blender. I’m a big fan of sci-fi and fantasy shows and books like The Expanse and Lord of the Rings, so most of my personal work has a fantasy or sci-fi theme – but I also love to experiment and try new things!


Add a comment