
 자동차
자동차
 트럭
트럭
 버스
버스
 모터사이클
모터사이클
 군용 차량
군용 차량
 전자 기기
전자 기기
 무기
무기
 건축물
건축물
 항공기
항공기
 가구
가구
 캐릭터
캐릭터
 동물
동물
 우주선
우주선
 음식
음식
 선박
선박
보기
For modern visual effects work, realism is paramount. Modern blockbuster movies sometimes take days to render single frames to boost the visual quality by tiny amounts, and when it comes to polygon counts, the sky’s the limit!
But even with these huge productions, time is precious. 3D artists can’t afford to spend weeks meticulously sculpting tiny details that only appear in the shot for milliseconds – and even when that’s possible, storing and processing that much 3D data is impractical even for today’s best workstations.
So, what can we do about this?
Well, that’s where Displacement Maps (also called height maps) come in. In this article, I’m going to go over everything you need to know about this technology, and all the steps you need to start using it in your own projects!
If that sounds interesting, read on!
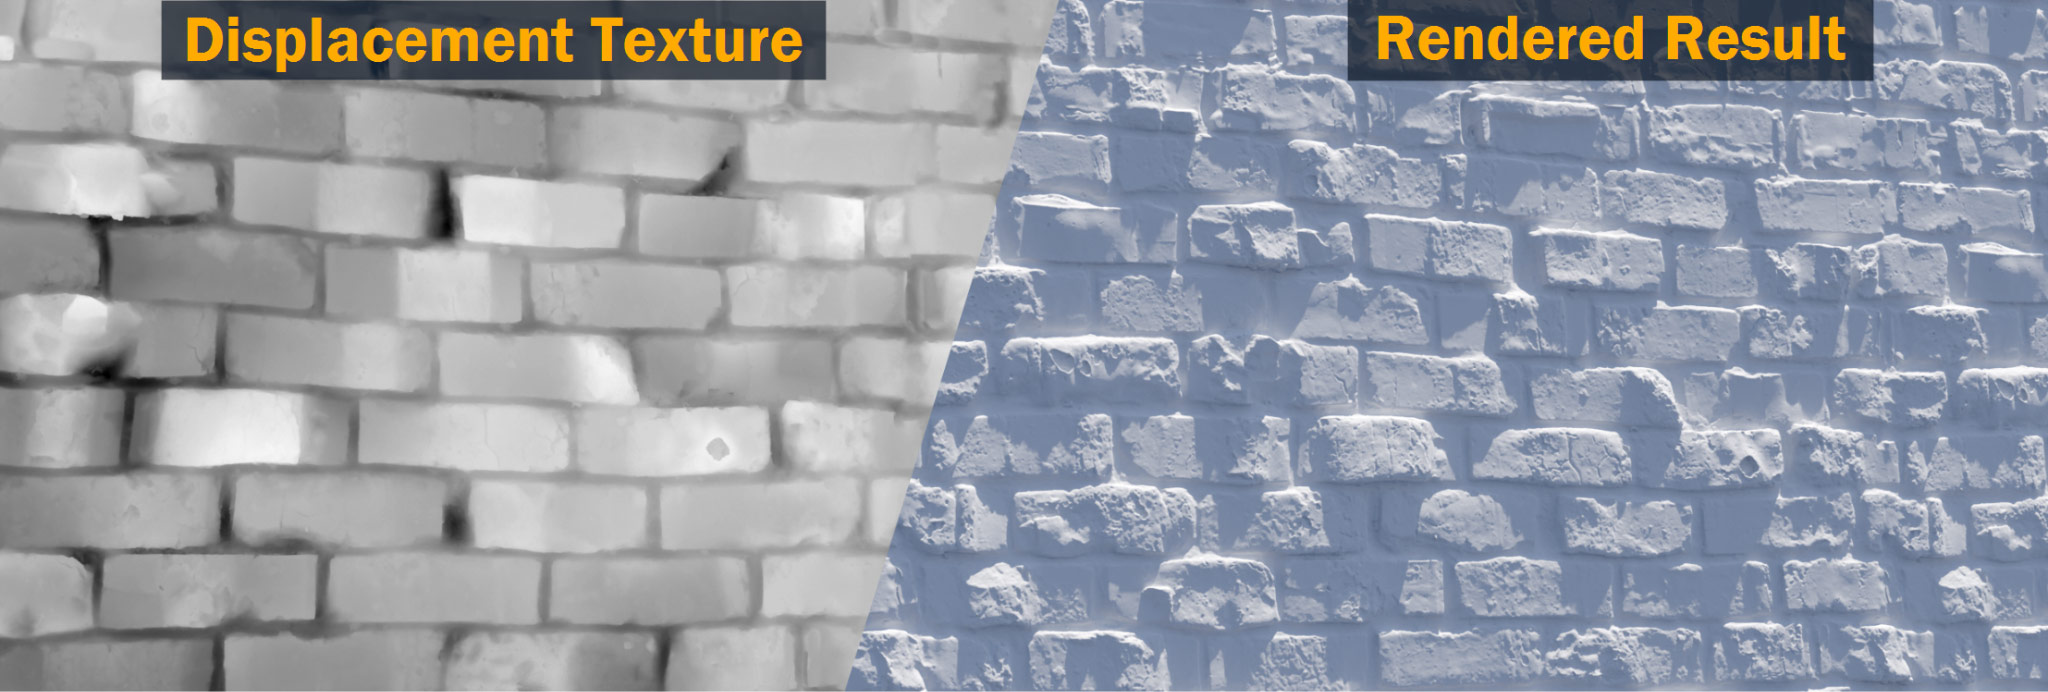
For many years now, Displacement Mapping has been a standard in VFX and animation – and more recently, it’s sometimes even used for games as well. When displacement maps are used, instead of details being baked into the 3D model, they’re stored separately as a white and black Texture; and then when it comes time to render, the model is subdivided and the displacement map is used to add detail by displacing the subdivided polygons.
That means that instead of storing many millions of polygons of 3D data, simple PNG images can be stored instead – which saves a whole lot of space.
And if tileable, 3D scanned displacement materials are used instead of meticulous hand-sculpted details, a lot of time can be saved as well!
So, how do you get displacement maps? Well, if you’ve ever downloaded a complete PBR texture set before, you might already have one or two of them – texture resources like polyhaven.com and textures.com all include them in their sets of PBR textures.
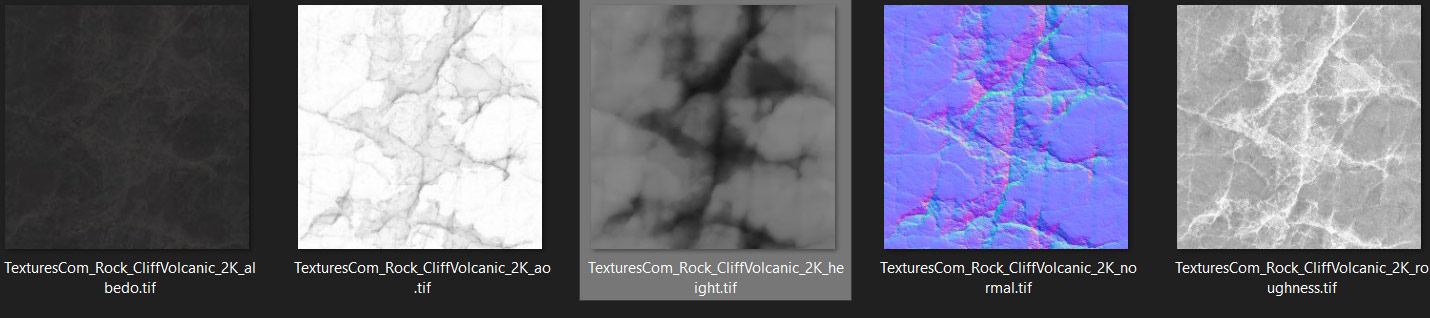
Here’s a displacement map, as seen alongside the standard Albedo, Ambient occlusion, Normal, and Roughness maps of PBR texturing:
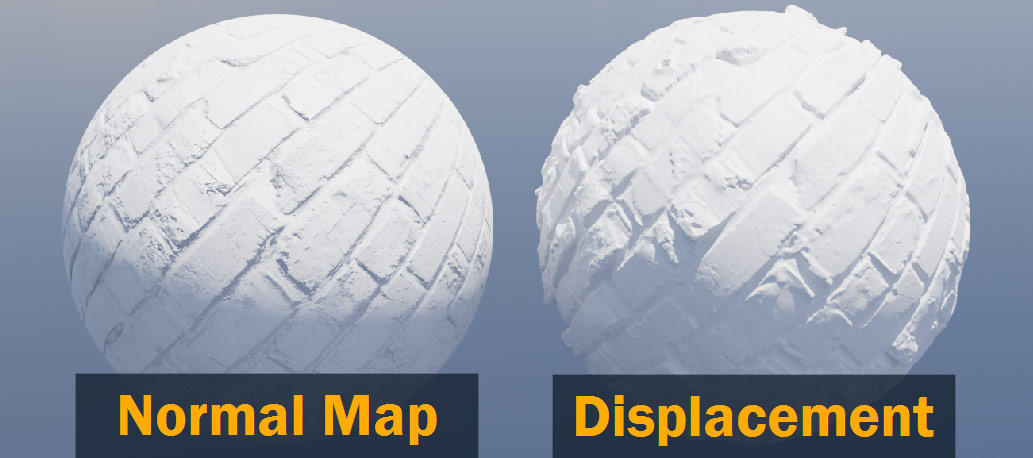
Speaking of normal maps – what’s the difference between them and displacement maps?
Normal maps are textures that are used to add detail to models in a similar way to displacement – but unlike displacement maps, normal maps don’t require subdivided geometry to function allowing for much faster render times. But with that said, normal maps also don’t physically displace the geometry – they essentially “fake” the bumps, making them much less realistic!
For more on normal maps, like how they work and how to use them, see our guide to normal maps in Blender.
Now that we have a good idea of what displacement maps are and why they’re important, let’s take a look at how we can put them to use!
In Blender, we have a couple of different ways to use displacement – You can either apply displacement as part of a Material using the Displacement Node, or you can apply a Displacement Modifier.
Using the Displacement node is probably the most common option – it’s more complex to set up and a bit trickier to render, but it’s very powerful.
The displacement modifier is simpler and more flexible to use in a 3D scene, but it’s also more limited in what you can do with it.
In this article, I’ll cover both methods – starting with using the Displacement node!
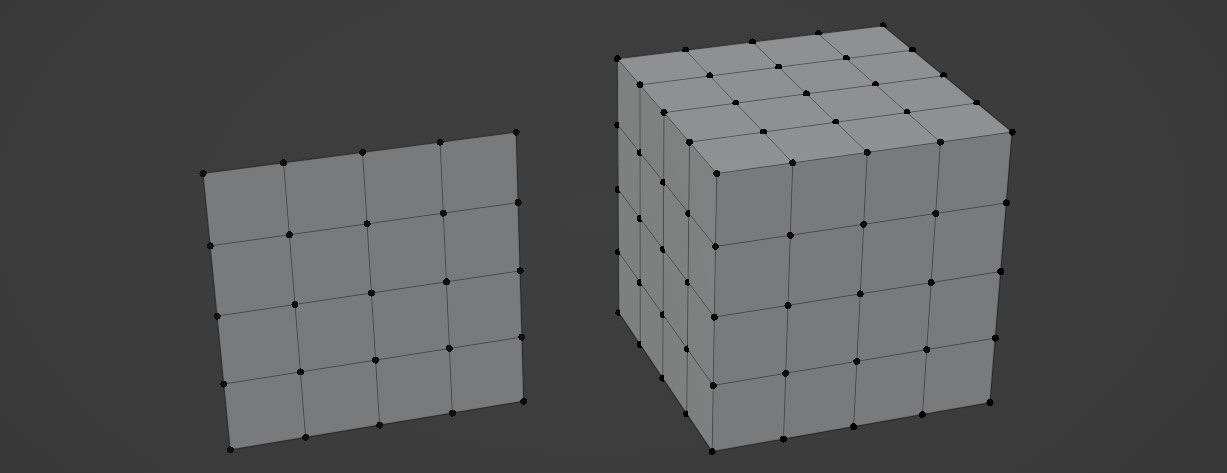
To use a Displacement node in Blender, you’ll need an object with UVs, subdividable geometry, and a material. For the sake of this tutorial, a cube or plane with some loop cuts will work fine!
You’ll also need to make some quick changes to the Render settings, Material Settings, and Modifiers – I’ll cover those below, but first let’s take a look at our Material.
To set up your material with displacement, you’ll need to add two shader nodes using Shift – A – a Displacement node connected to the Displacement input on the Material Output node, and an Image Texture node connected to the Displacement node.
Use this image for reference:
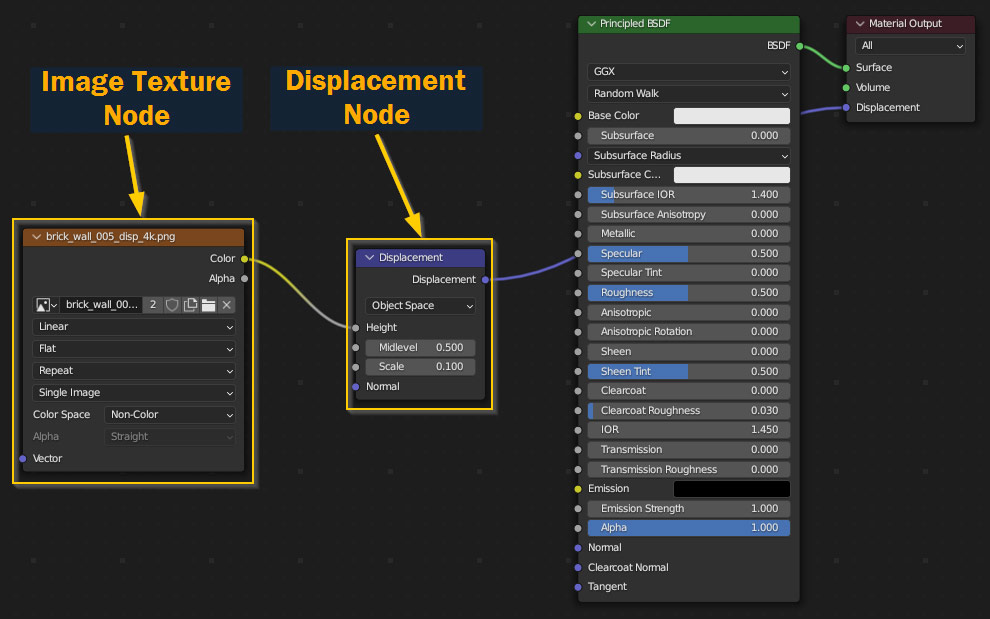
Once you’ve added those two nodes, in the Image Texture node, be sure to set Color Space to Non-Color – and in the Displacement node, you’ll probably want to set Scale to something lower (like 0.1) to stop the effect being too extreme.
If you look at the rendered viewport now, you’ll already be able to see the texture showing up – but right now it’s being used as a Bump Map instead of actually displacing the vertices. We’re not quite done yet!
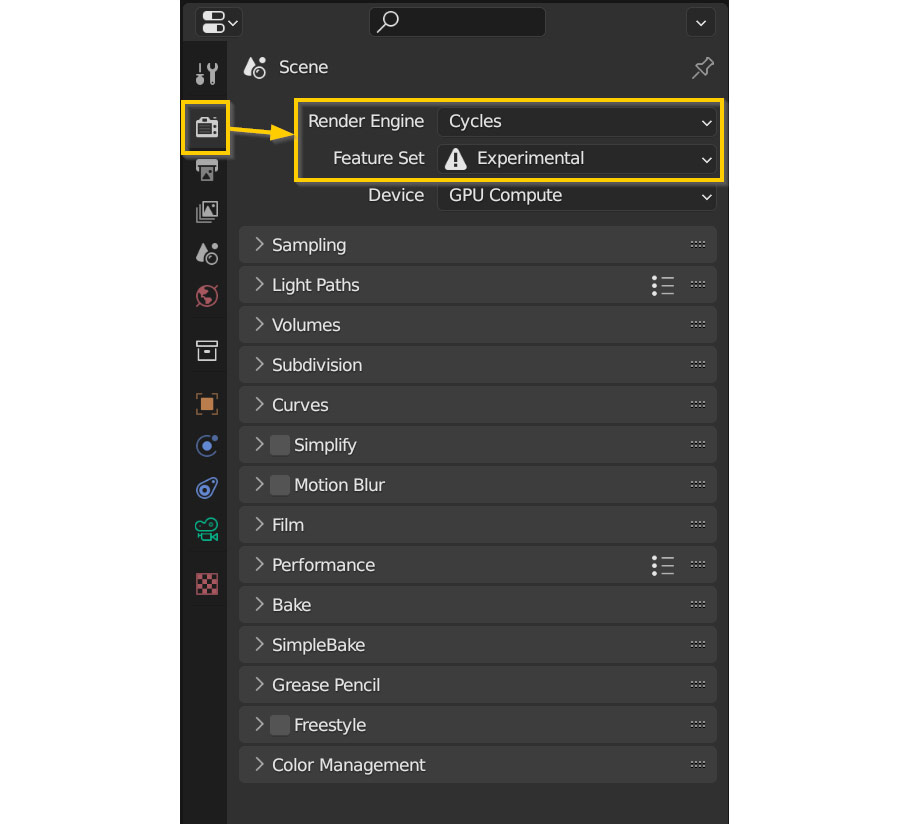
First, go to the Properties Panel, and open the Render Properties tab – to use displacement, you need to set the Render Engine to Cycles.
Next, to enable us to use a feature called Adaptive Subdivision later on, we need to change another setting. Under the Render Engine option, you’ll need to change the Feature Set to Experimental. For some reason, using adaptive subdivision has been an experimental feature for years, so this is the only way to access it!
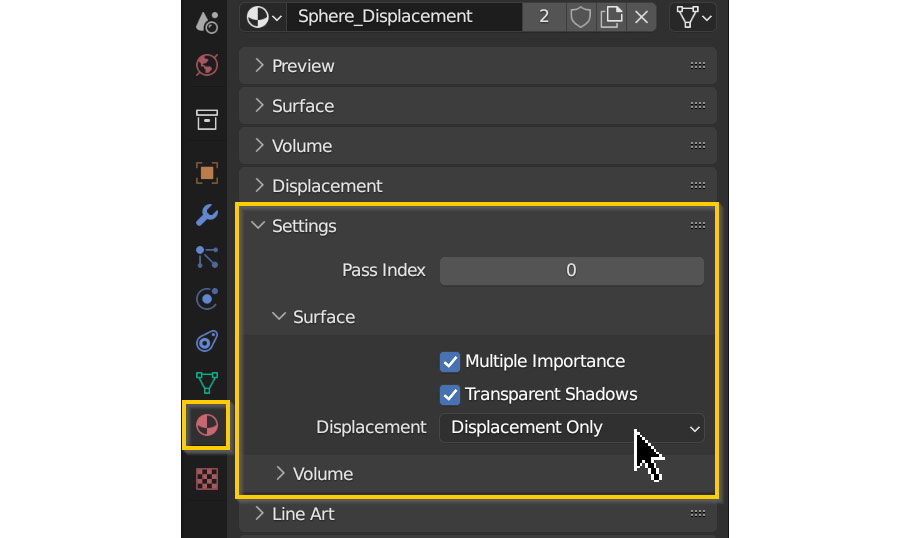
Next, we need to enable displacement for the individual material we’re using. With your material and object selected, go to the Properties Panel once again – this time, open the Material Properties tab near the bottom, and look under Settings > Surface. For Displacement, choose Displacement Only as shown.
This tells Blender that you actually want to displace your mesh using your displacement texture, instead of just using it as a bump map!

At this point you’ll probably see some of the vertices on your model shift a bit – but to really see some results, you’ll need to add a subdivision modifier to your model!
Now that everything else is set up, we can finish up by adding a Subdivision Modifier. Go to the Modifier Properties tab in the properties panel, press Add Modifier, and choose Subdivision Surface.
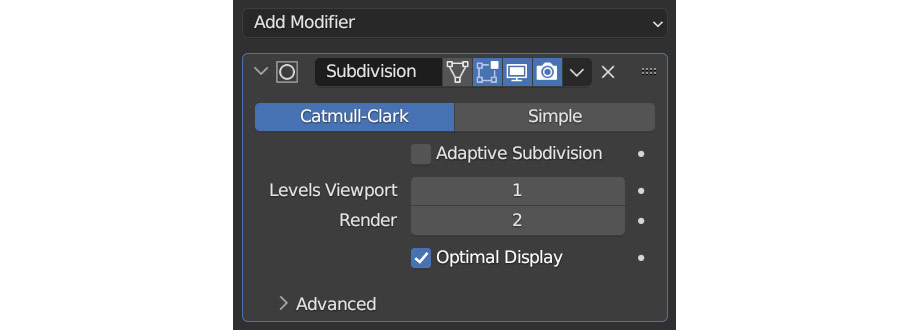
Now if you increase Levels Viewport up a bit, you’ll start to see the shapes of your displacement texture taking form! You also might notice that it takes a lot of subdivisions to get anything that looks good – and that’s why, when using displacement maps, you’ll usually want to enable Adaptive Subdivision.
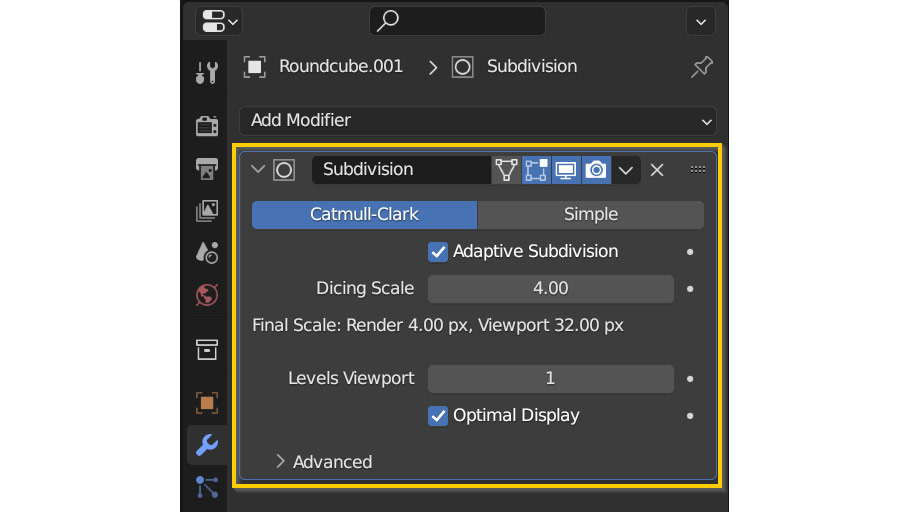
Instead of dividing your mesh by a certain, fixed amount, adaptive subdivision splits up the geometry based on how large it appears on your screen, or how many pixels it takes up. You can change this Dicing Scale – a dicing scale of one means that for every one pixel in the final render, a new polygon will be created. For many cases that’s a bit extreme, so to avoid problems while rendering it’s probably a good idea to set it to 3 or 4! You can always reduce the number later on if you need more detail.
If you’re not seeing any difference to your model, make sure you’re in Cycles rendered view – displacement doesn’t do anything in eevee or workbench renderers!
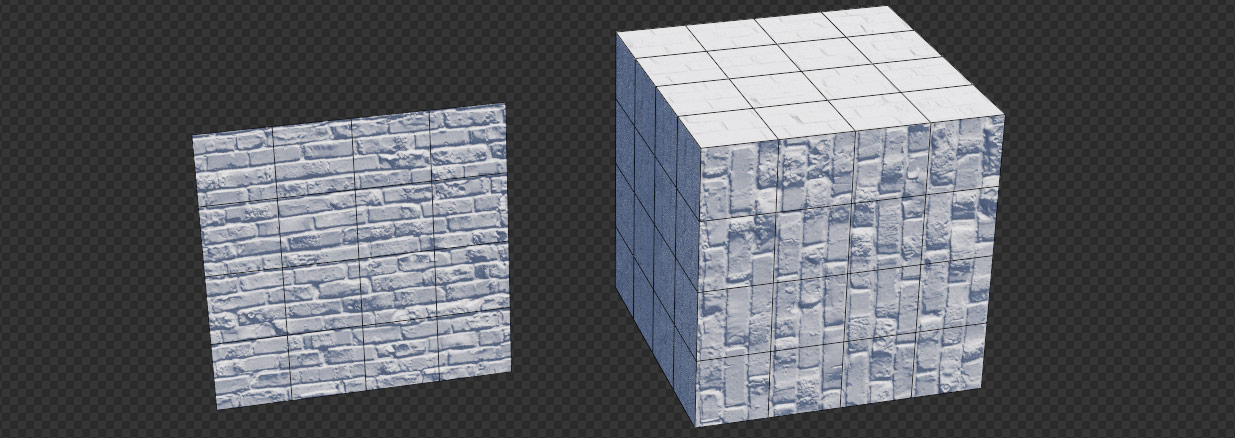
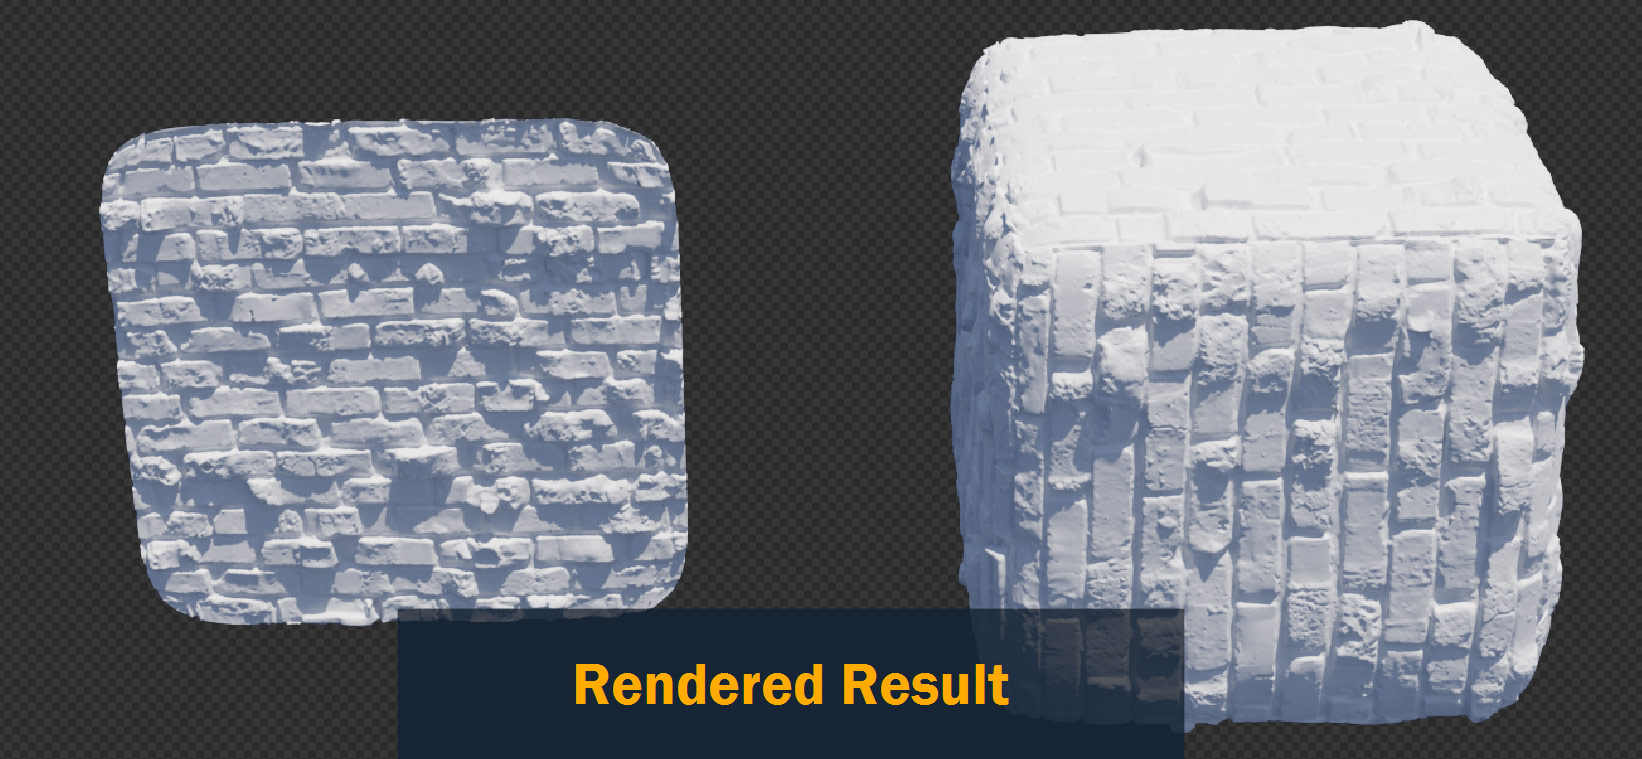
With those four steps complete, here’s the final result as seen in Cycles rendered view!
So that covers displacement in materials – now I want to briefly talk about the Displace Modifier.
The Displace modifier is great for cases where you just need a simple pattern, noise, or texture displacing the vertices of your model. Unlike the displacement node we saw before, the modifier moves the vertices in all view modes – and unlike the displacement node, the modifier can be applied to your mesh to make the change permanent at a vertex level.
Although that all sounds pretty great, the Displace modifier has some pretty big downsides too – for image textures, you’re limited to only using a single image with no options for scaling or rotating, and it doesn’t allow using adaptive subdivision; meaning that when it comes to getting the best quality renders, sticking with the displacement node is usually best.
Still, the Displace modifier does have many valid uses – so let’s take a look at how to set it up!
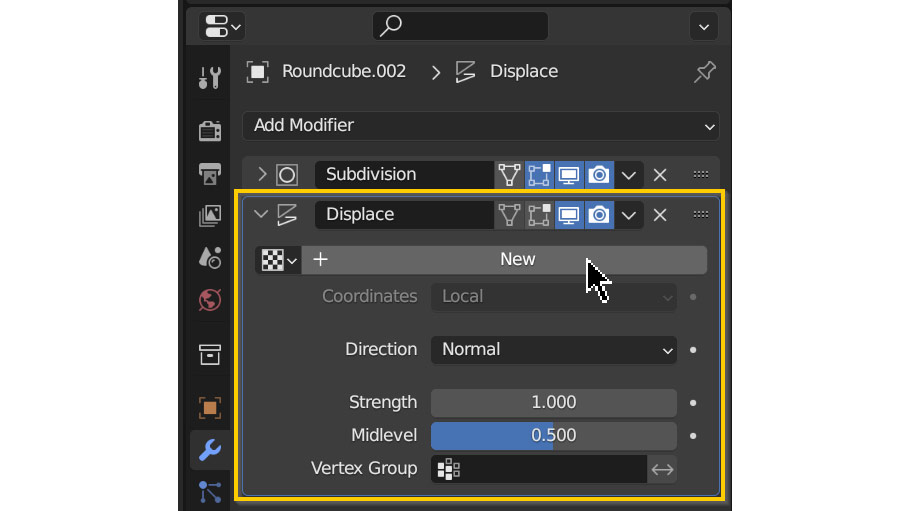
To set up a displacement modifier, you’ll need to go to Modifier Properties and add a Displace modifier to the stack.
To get any interesting results, you’ll need to add a texture as well. Press the big New button to add one:
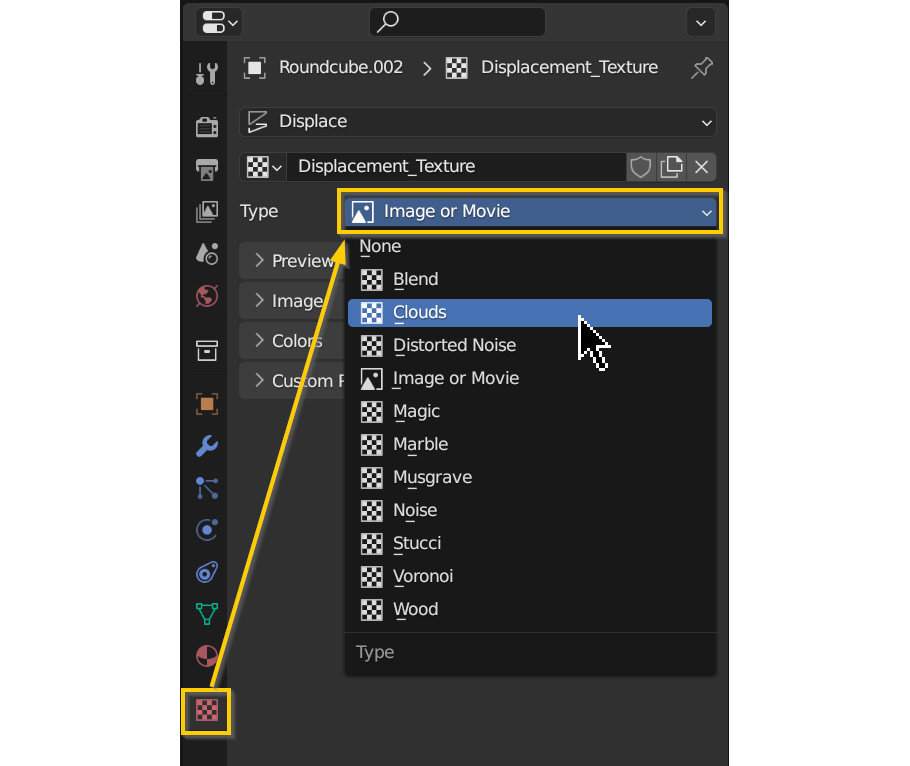
Next, go to the Texture Properties tab at the bottom of the list. Here, you can either select a texture from your computer to use with the displacement modifier, or choose one of the procedural options from the Type dropdown. For my example render, I used a procedural Clouds texture.
Before we move on to troubleshooting, I wanted to mention one last great use for the displacement node!
While using displacement image textures is a very common workflow for 3D, you don’t actually need to use an image texture for displacement at all – you can also do it Procedurally.
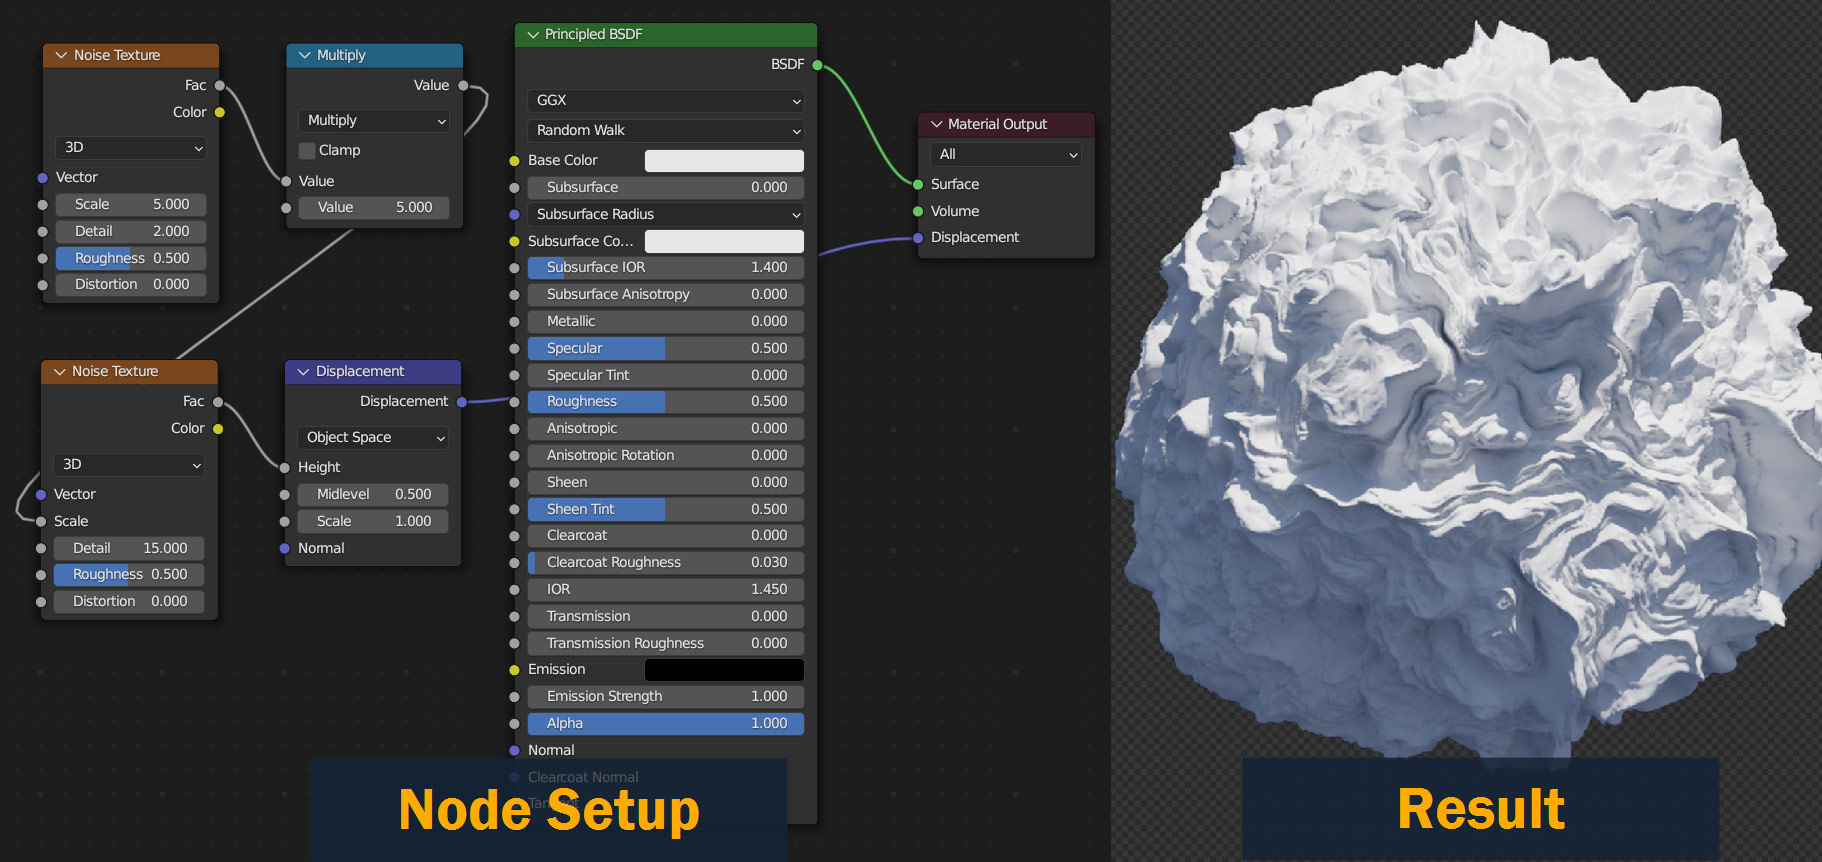
A displacement node can be connected to any black and white pattern, including things like Noise textures, Voronoi textures, or anything else in the Blender node tree – allowing you to create very detailed and complex procedural patterns!
For this example, I’m using a noise texture to drive the Displacement node – and to spice things up, I connected another noise texture and a Math node set to Multiply to the Scale input of that first noise texture. The result is the wild, ridged pattern seen on the right!
Like anything in Blender, there’s plenty that can go wrong when dealing with displacement – so in this troubleshooting section, I’ll go over a few common issues that you might encounter!
If the results of your displacement node aren’t showing up in the 3D viewport, try switching to the Cycles render engine and looking in Rendered view. The displacement node doesn’t work in Eevee or Solid view mode.
To change the render engine for your project, go to Properties Panel > Render Properties, and look at the top for the Render Engine setting.
Alternatively, if using Cycles isn’t an option, you could try using a Displace modifier instead (see “Displace Modifier” above).

If the displacement node isn’t resulting in 3D detail on your model in cycles rendered view, make sure that you’ve got the right displacement setting on your material. To check/change this, go to Properties Panel > Material Properties > Settings, and under Surface make sure Displacement is set to Displacement Only.
If the results of your displacement node appear low-poly or blocky, make sure that you have a Subdivision Modifier on your mesh – displacement requires adequate geometry to work on! If the results still aren’t crisp enough for your liking, you may need to increase the subdivision Level or enable Adaptive Subdivision. See the article above for more detail on how to do this!

So in summary, displacement is an awesome way to add detail and realism to your model, while saving on storage and time. Although it’s a bit complex to set up, the results are well worth it. With the steps I’ve outlined here, you should have everything you need to start using displacement in projects!
And if anything goes wrong, take a quick look at the troubleshooting section above; you might find a solution there!
Hopefully you found this article helpful – if you have any thoughts, ideas, or suggestions, feel free to leave them in the comments below!
Best of luck with all your future projects, and thanks for reading.

Hello! I’m a self-taught 3D modeler and texture artist with experience on a variety of projects, ranging from planet creation to game props, vehicles, and environments. Although I’ve tried out a bit of everything, my main software is Blender. I’m a big fan of sci-fi and fantasy shows and books like The Expanse and Lord of the Rings, so most of my personal work has a fantasy or sci-fi theme – but I also love to experiment and try new things!


Add a comment