
 자동차
자동차
 트럭
트럭
 버스
버스
 모터사이클
모터사이클
 군용 차량
군용 차량
 전자 기기
전자 기기
 무기
무기
 건축물
건축물
 항공기
항공기
 가구
가구
 캐릭터
캐릭터
 동물
동물
 우주선
우주선
 음식
음식
 선박
선박
보기
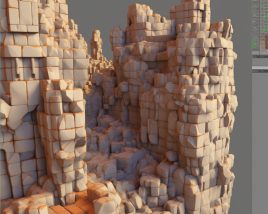
Say you’ve been working on a big, complex 3D model in Blender. It has a few different materials, several textures, and even some custom node setups to get the colors and textures just right. No problem, right?
Well, that depends.
In Blender, something like this is just fine – since your materials were made in Blender in the first place, everything works as it’s meant to and there are no issues! But if you wanted to export materials like this to a game or other 3D software, you’d start to run into problems. And that’s where texture baking comes in – baking allows you to convert custom node setups, multiple materials, and texture combinations into a single, simple set of PBR textures compatible with any software.
In this article, I’ll go over the various options available for texture baking in 3D, explain two ways of baking textures in Blender, and finally go over a few common issues that can occur with texture baking!
To preface, I want to start by saying that Blender is not a very good program for most traditional texturing tasks. Blender excels in modeling, rendering, and animation, but no 3D program can do everything – and sadly for Blender fans, the truth is that you’ll have a much easier time texturing in something like Substance Painter or Quixel Mixer. In these programs, different textures are combined in the same material from the beginning, so “baking” as it’s done in Blender isn’t needed at all – and texturing tasks in general are made much, much easier.
However, this is an article about Blender – and for baking textures in Blender, you have two options:
Out of these two, SimpleBake is far superior. The default baking process in Blender is outdated, overcomplicated, and prone to errors, but the SimpleBake addon simplifies it to just a few clicks.
In this article, I’ll go over both methods, starting with Blender’s default baker – So strap in, because this is going to get complicated!
So, you’ve got an object with a few different materials that you need to bake, and, for whatever reason, your only option is to use Blender’s built in tools. Where do you begin?

To start with, before any kind of baking process can start, you need to set up your UV Maps properly.
To bake multiple materials into a single texture set, it is very important that the UVs for your model are not overlapping each other; if they are, textures will end up baked onto the wrong faces. But if you’ve already set up your textures and UV maps how you want them, changing the UV map will mess up the work you’ve already done. So how do you get around this?
Luckily, Blender actually allows you to make multiple different UV maps for a single model – so you can keep the UV map you’ve already got, and simply add another one to use for the final, baked model.
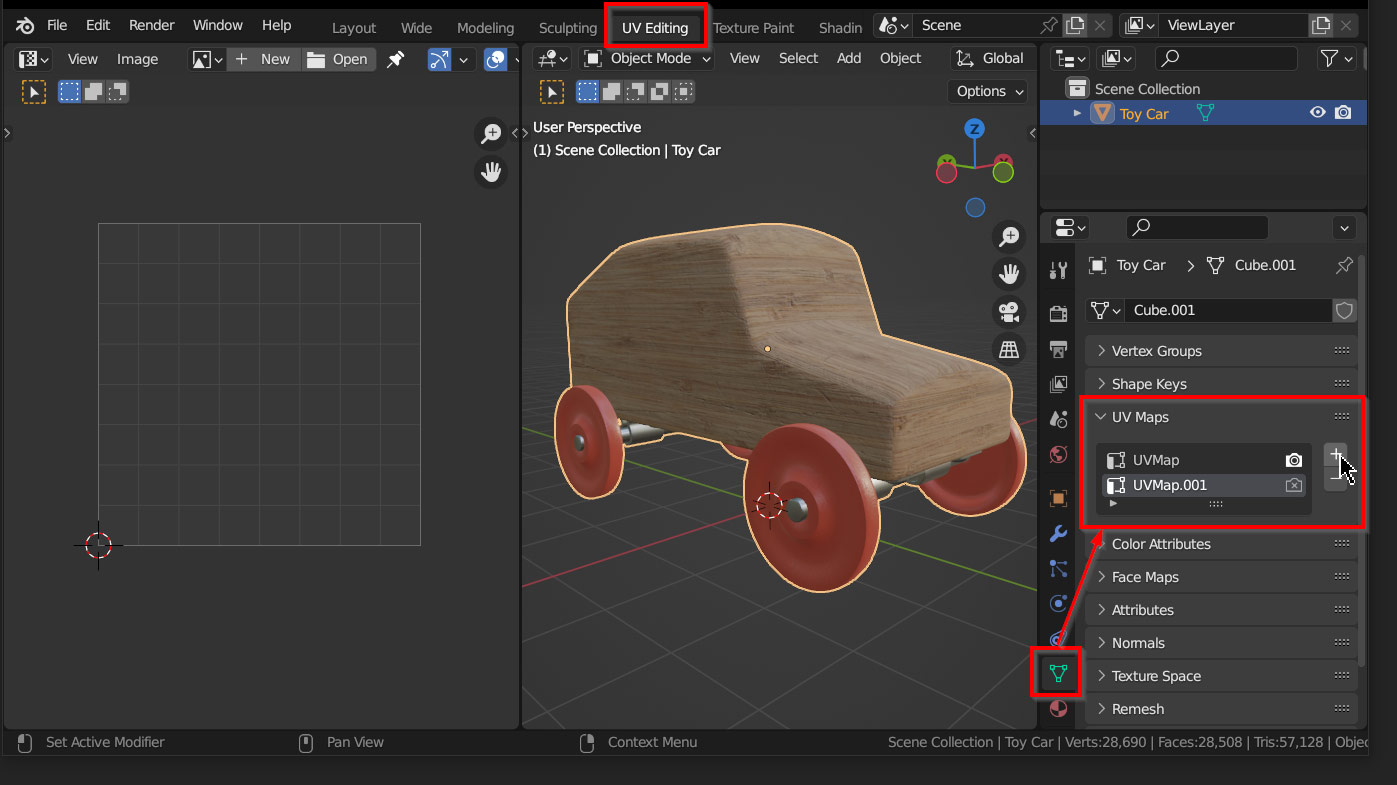
So, to start with, navigate to the UV Editing workspace; go to Object Data Properties, and under UV Maps, press the + button to add a new one. Make sure your model is selected for these steps!
Once you’ve added a new UV map, make sure the new UV map is selected, and then enter into Edit Mode, and adjust the UV map so that none of the islands are overlapping.
For a quick fix, hover over your model, press U to bring up the UV Mapping menu, and select Smart UV Project – this will create a quick, rough UV map without any overlap.
Alternatively, if your model is already unwrapped into UV islands, pressing Ctrl/Cmd – P in the UV editor pane will automatically pack your islands without overlap – but you may want to correct their scale first by selecting Average Island Scale in the UV dropdown at the top of the editor.

Once you’re done creating the new UV map, double check your UV Maps menu. For baking, the original UV map should be visible (Camera Icon highlighted), and the new UV map should be selected. This way, Blender will bake the texture data from the original UV map to the new one!

In addition to setting up UV maps, baking in Blender will require a few changes to your node setup. Because of how baking in Blender works by default, you will need to make the same changes in every material on your model.
To start with, navigate to the Shading workspace. Here, you’ll need to create a new image to bake your texture onto – eventually you’ll need to create a separate image for every texture channel you use (eg. roughness, normal, etc.), but for now we’ll just start with the Color channel.
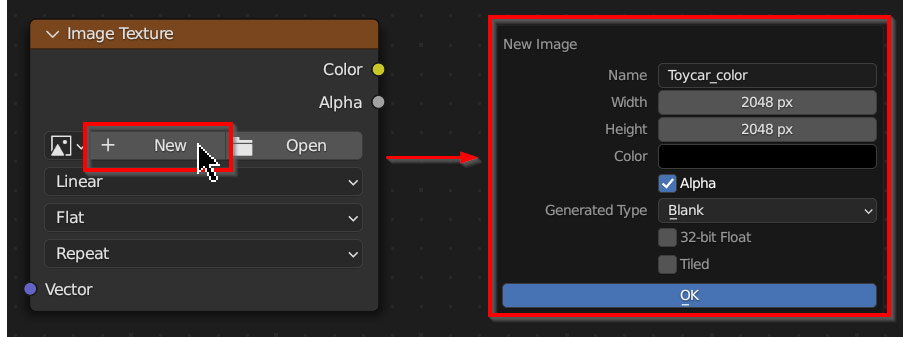
To create a new image, press Shift – A in the shader editor, and under Texture, select Image Texture.
On the Image Texture node, press New. This will bring up an image creation menu. Select a name that includes the texture type that you’ll be baking – I went with ToyCar_color for my example. You’ll also be able to select a resolution here.
Once the image is created, it doesn’t need to be connected to anything – for baking, having it sitting somewhere in the material is enough!
Once you’ve created the image in one of your materials, copy it to all of the other materials on your model – every material that needs to be baked should have a copy of this baking image!
In addition to creating a new image, you’ll also need to make some small adjustments to your other nodes.
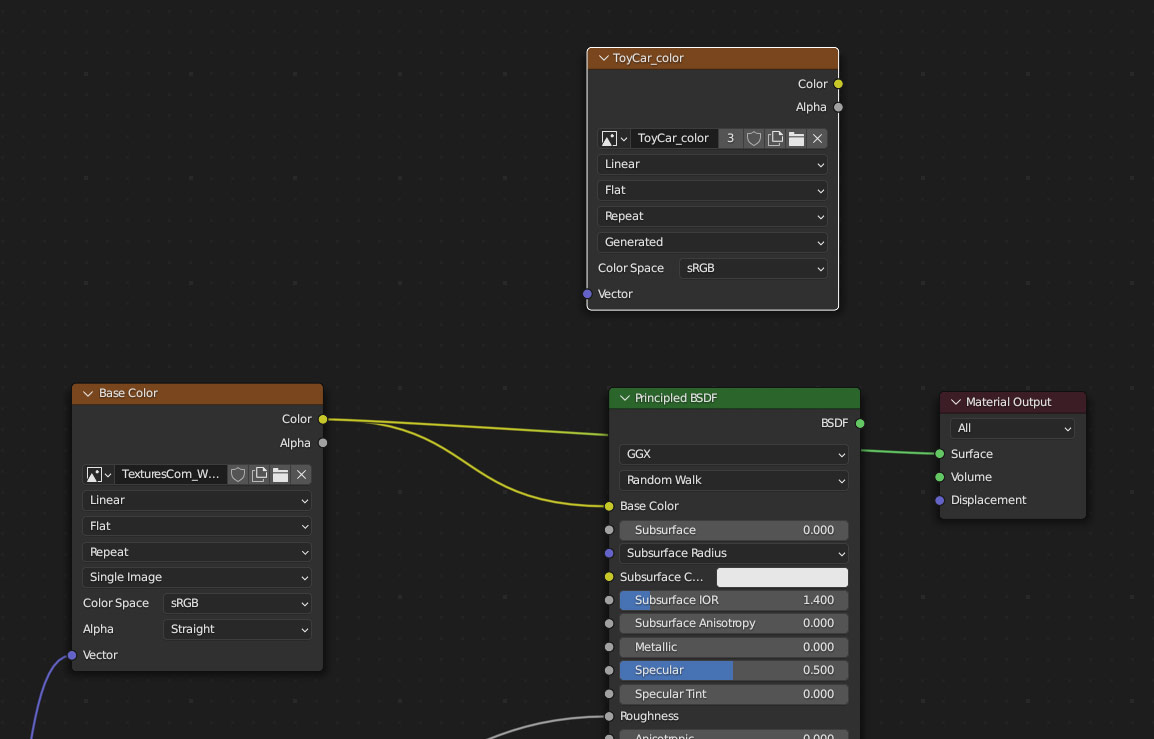
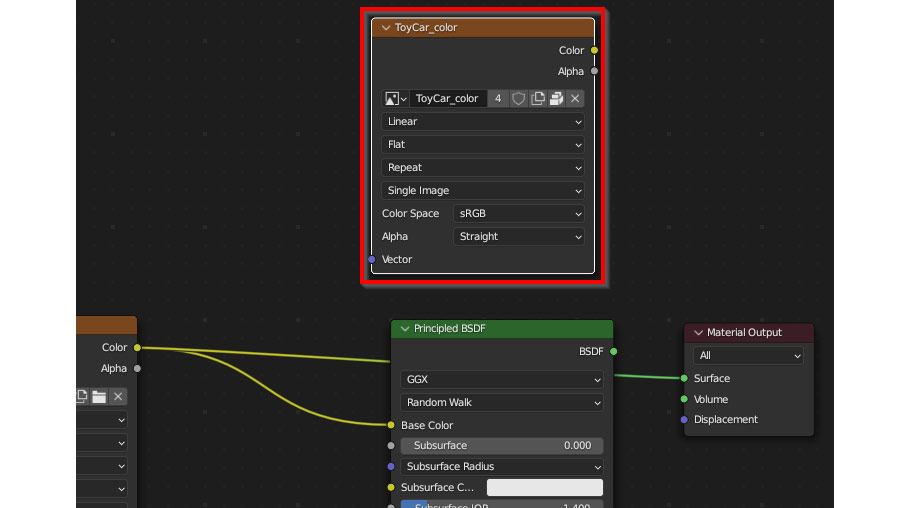
To bake the Color channel of your materials, you’ll need to take whatever color output you have in your node graph and connect directly to the Surface input on the Material Output node, instead of whatever shader you’re using – and you’ll need to do this in every material that you intend to include in the bake.
Connecting it in this way will automatically be interpreted as an Emissive shader, which is what we’ll be baking from later on!
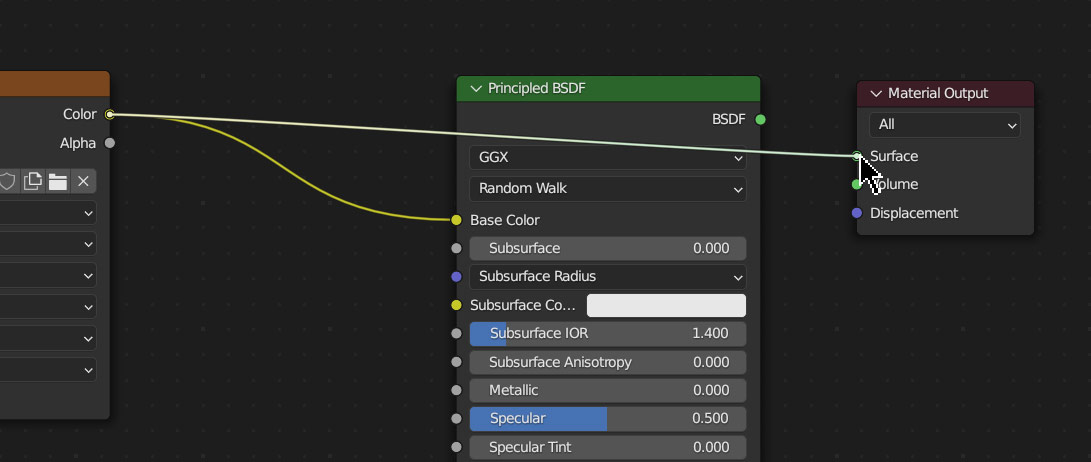
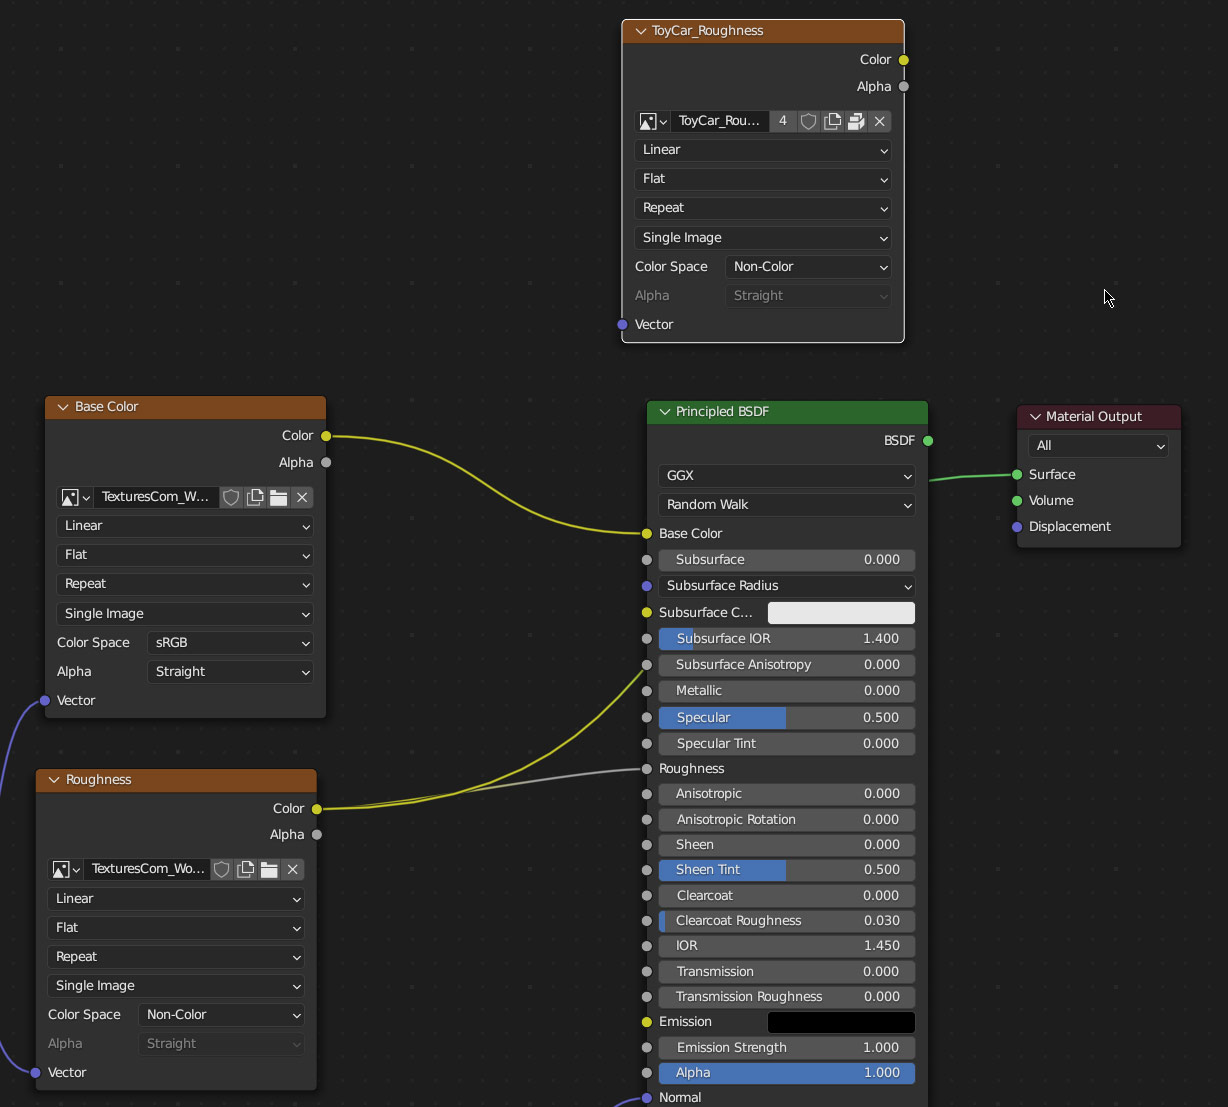
In the end, in preparation for baking, every material on your model that you want to bake should have the Color channel connected directly to the Material Output node, and have a copy of the new texture you created sitting selected in the node graph – something like this:
Finally, we get to the stage of actually baking! Luckily, this is simpler than both of the previous sections.
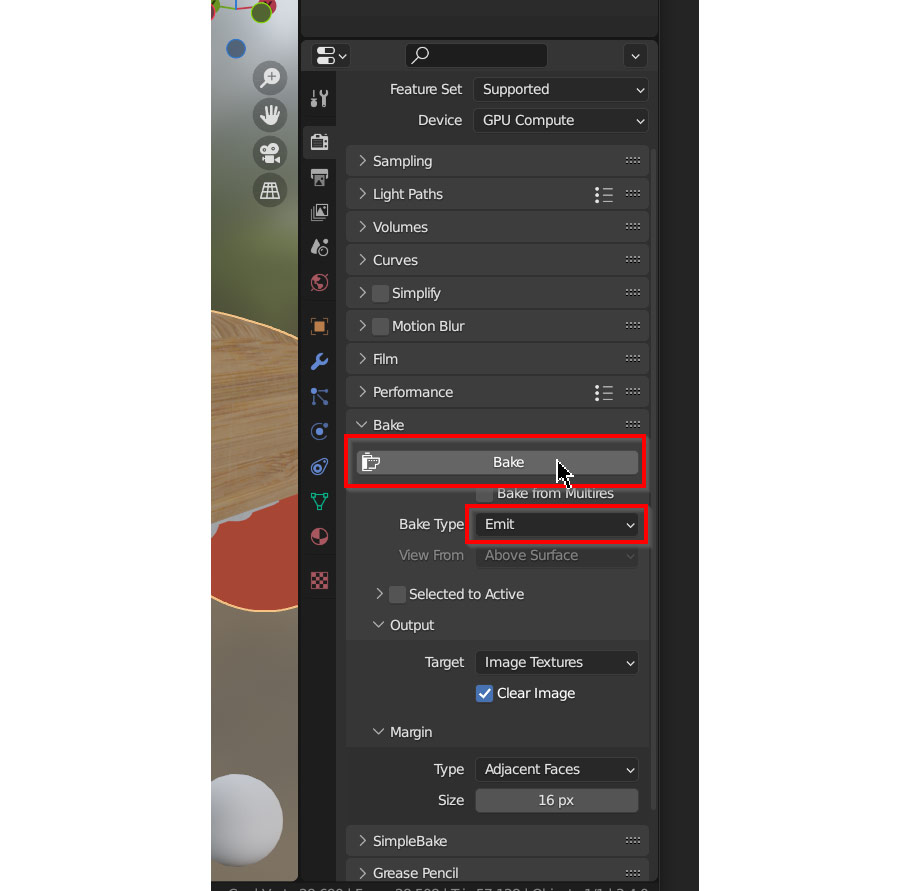
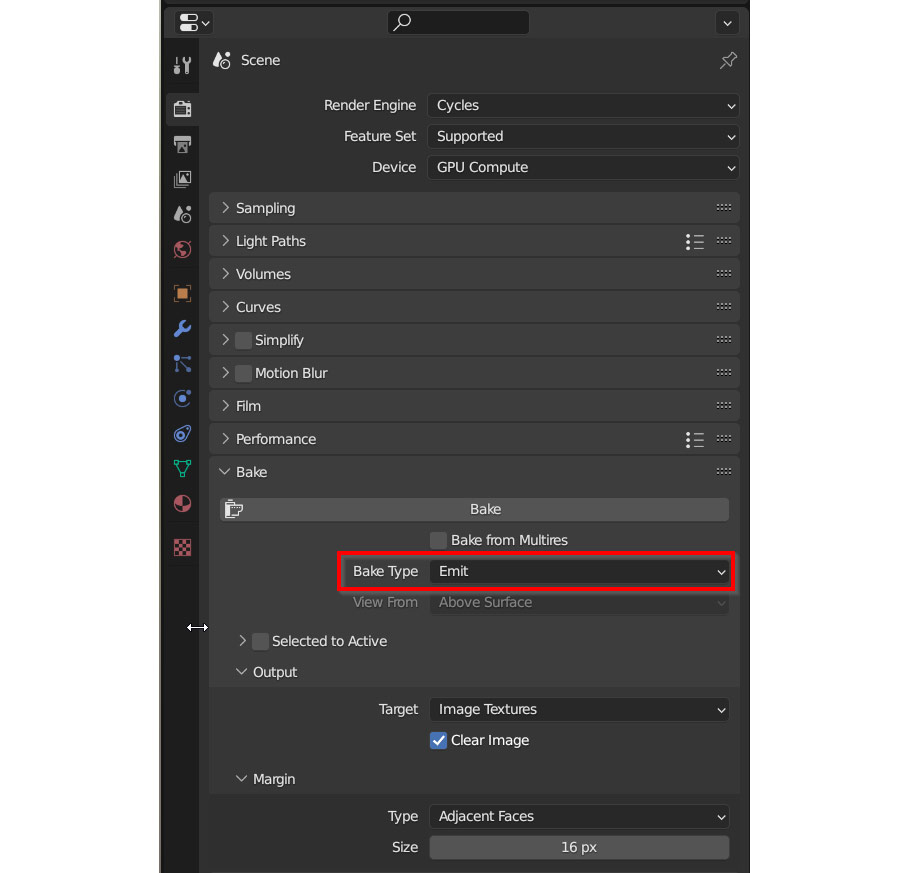
To begin baking your model, first navigate to the Properties panel and select the Render Properties tab. To begin with, make sure that the Render Engine is set to Cycles – baking unfortunately doesn’t work in Eevee.

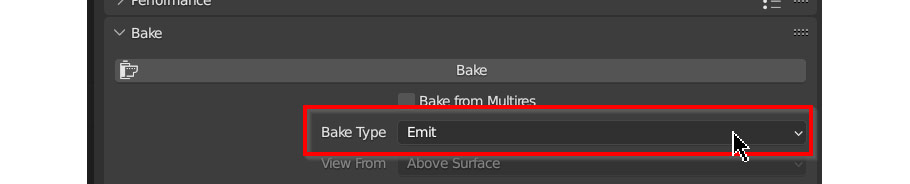
Next, again in the Render Properties tab, navigate to the Bake section. For Bake Type, select Emit (short for Emissive). Now you’re finally ready to bake!
But before pressing the big, tempting Bake button, it’s a good idea to double check that everything’s set up properly – otherwise you may end up waiting a while for a bake that doesn’t work in the end!
Check that:
If everything is in order, go ahead and press the Bake button!
After pressing the button, you may need to wait a while, depending on your computer and the size of the texture.
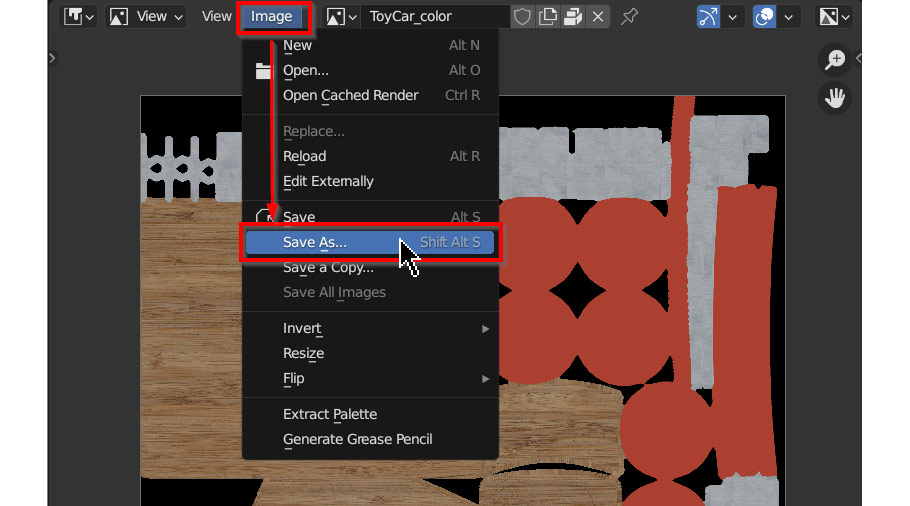
To view the baked image and save it, first you’ll need to switch one of your panes to an Image Editor using the dropdown at the top left of every pane in Blender.
With an image editor open, navigate to the topbar and load in the baked image. To save it as a texture on your computer, open the Image dropdown and select Save As, select a location, and hit Save As Image. This step is important – if you don’t save the image after baking, you might lose it!
So, we’ve covered baking the Color channel. Thank goodness! But usually, 3D materials have more than just a color texture – and we need to bake those as well. But luckily, baking the other channels works the exact same way as baking color.
The only difference between baking the color channel and other channels is that you’ll need to set the Image Texture nodes for the other channels to Non-Color, just like when setting up a PBR texture.
For each new channel you bake, you’ll need to repeat the following steps:
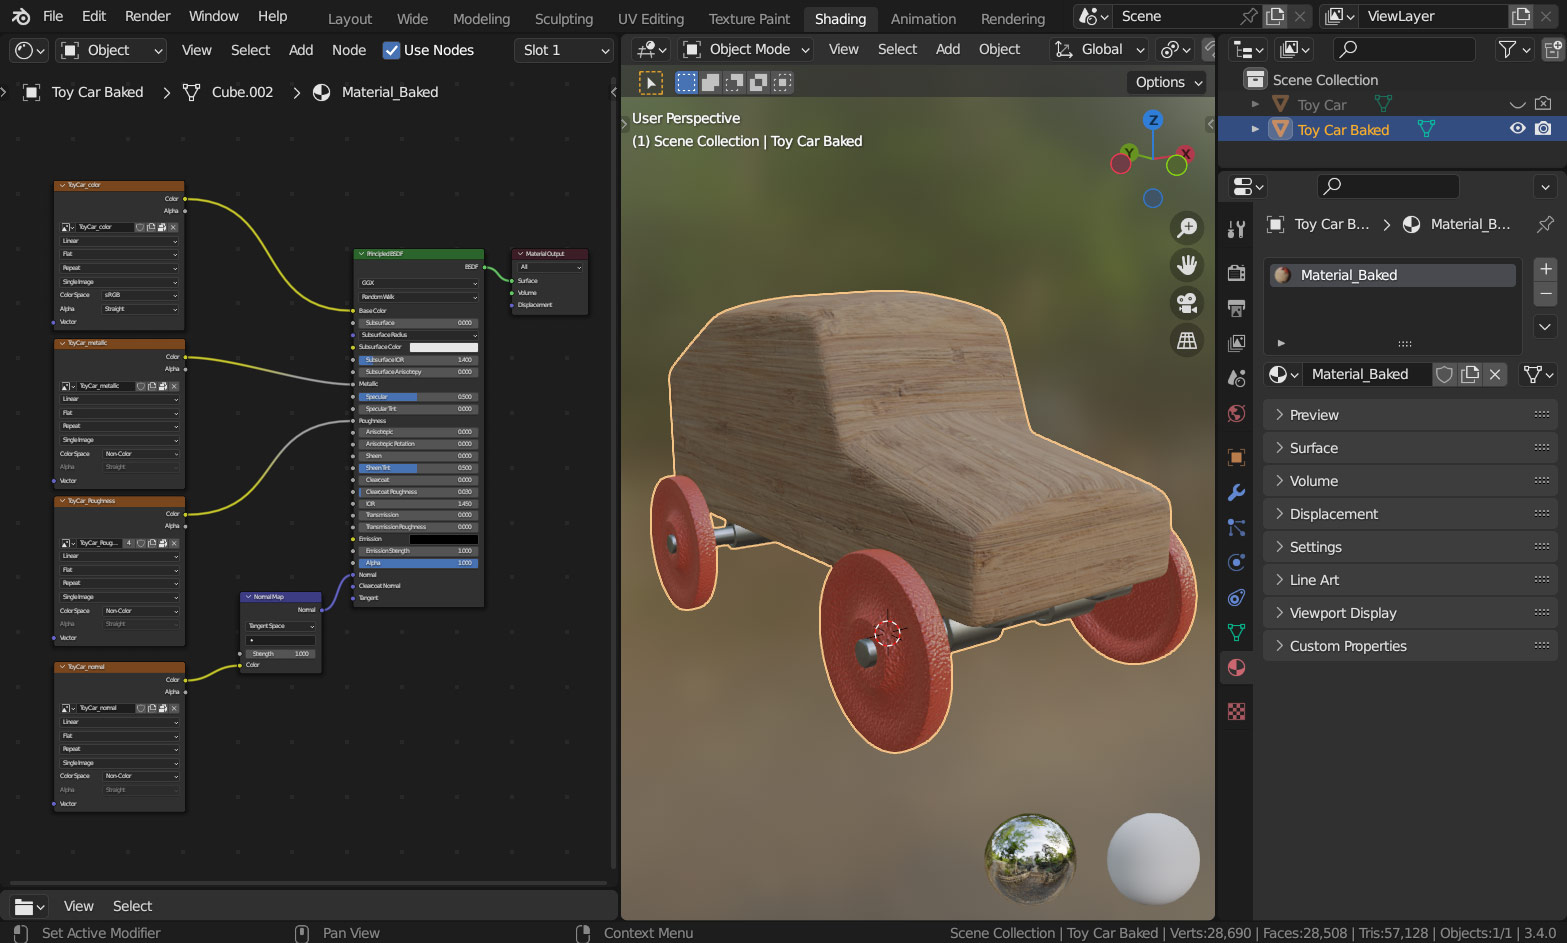
Once all the images are baked and saved, you’re finally finished! If you did everything right, you should now be able to set up your new, baked material on your model, just like you would with any other PBR material – just make sure that first you set the new UV map to be visible instead of the old one!
So as we’ve seen, while it’s not easy, it is very possible to bake textures in Blender by default; but if your workflow requires regular baking, Blender’s built-in baking system just isn’t going to cut it.
That’s where the SimpleBake addon comes in. Although it isn’t free, it’s very cheap at only $16 USD – and it’s well worth any penny, even if you only occasionally bake textures in Blender!
To start, purchase and download SimpleBake from Blendermarket.
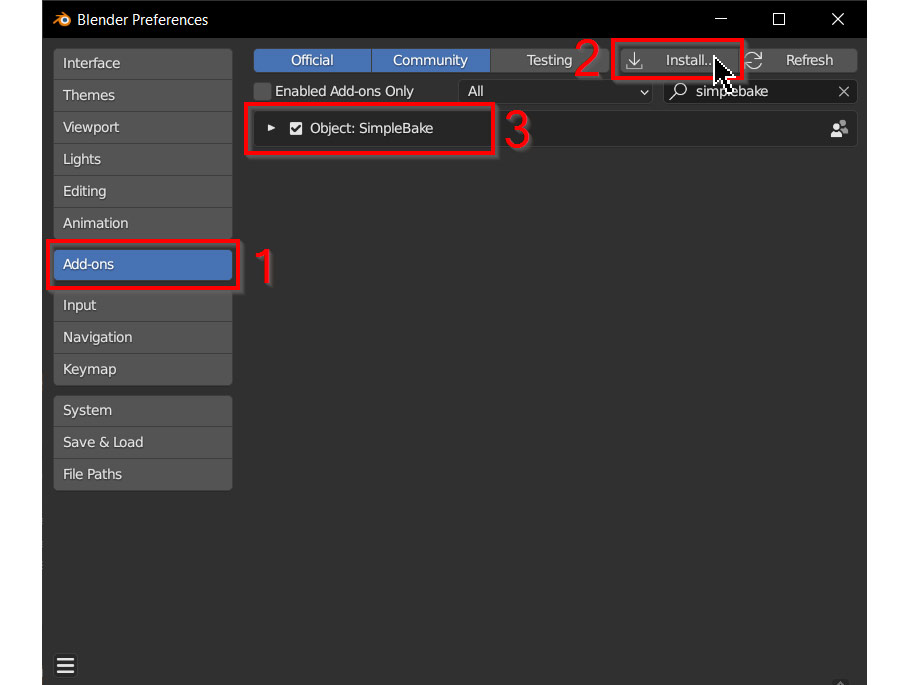
Install it like any other addon; in the topbar, open the Edit dropdown and select Preferences. In the preferences window, go to Add-ons and press Install – select the SimpleBake addon wherever you saved it on your computer, install it, and activate it by checking the box on the addon once it shows up in the list.
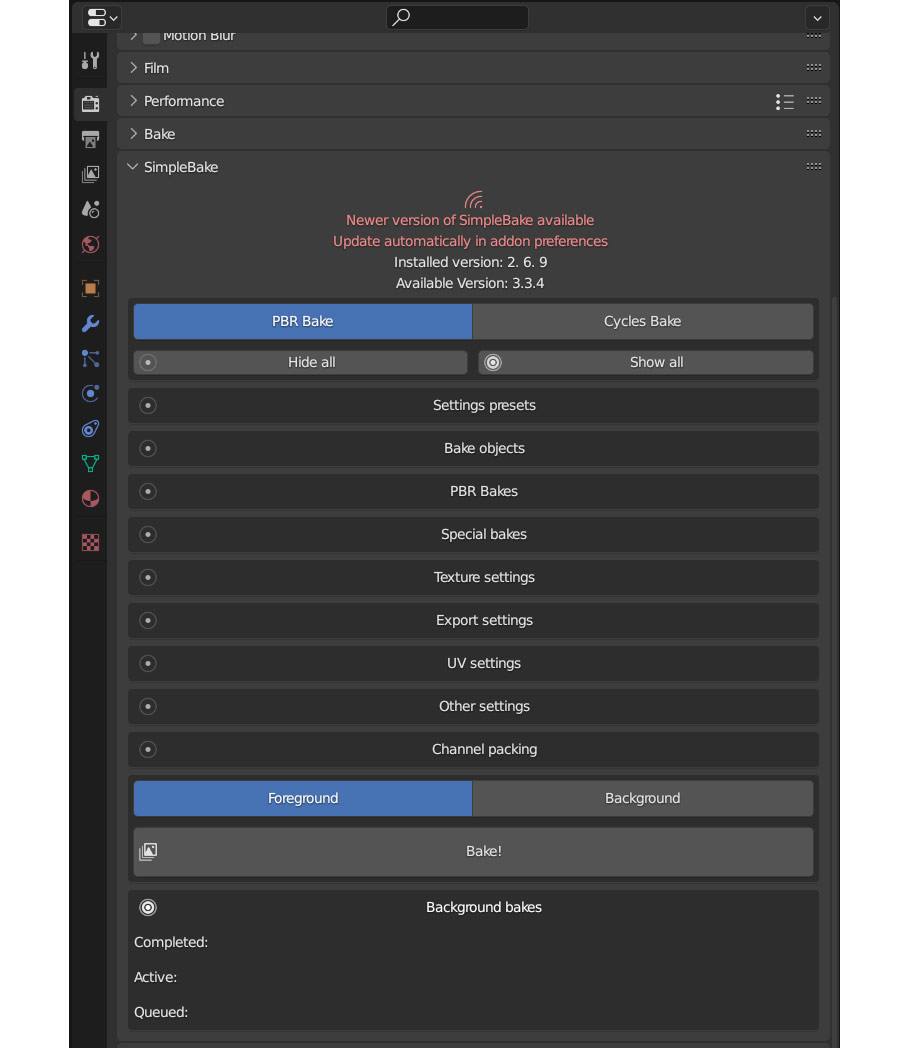
Once it’s installed, you’ll find the SimpleBake options in the Properties panel, in the Render Properties tab, under SimpleBake.
Before getting started in SimpleBake, you’ll need to set up your UV map – This part is the same whether or not you use the addon, so refer to the UV Map Setup section above for instructions!
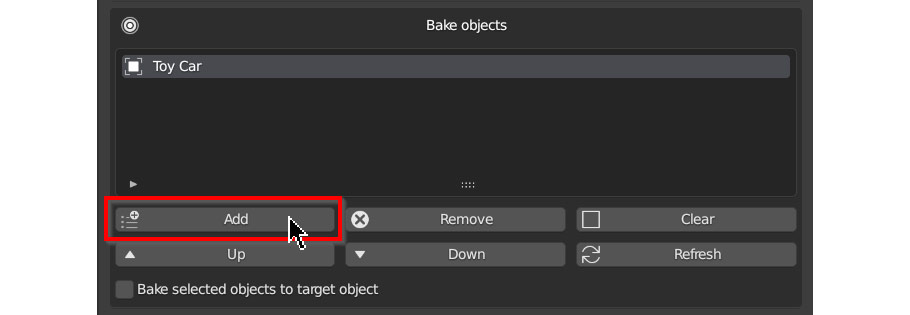
Once your UV map is set up properly, navigate to the SimpleBake section in Render Properties (as mentioned above). To start with, open Bake Objects, select your model, and press Add.
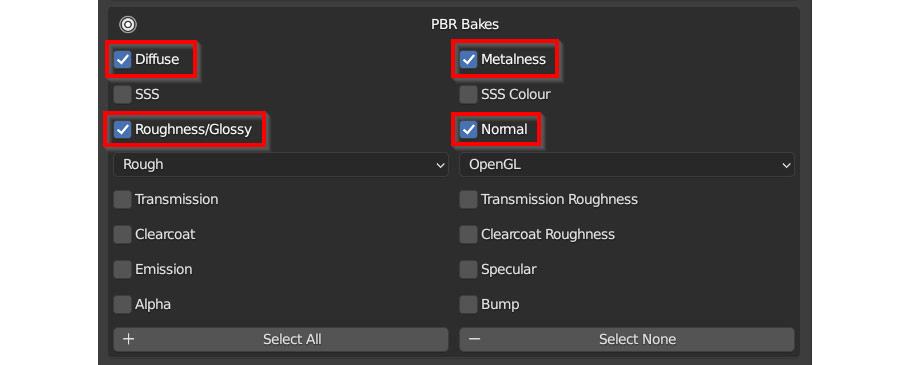
Next, open the PBR Bakes section, and enable all the texture types you want to bake – usually the main ones you’ll need are Diffuse, Roughness/Glossy, Metalness, and Normal for the normal map, but this depends on your project.
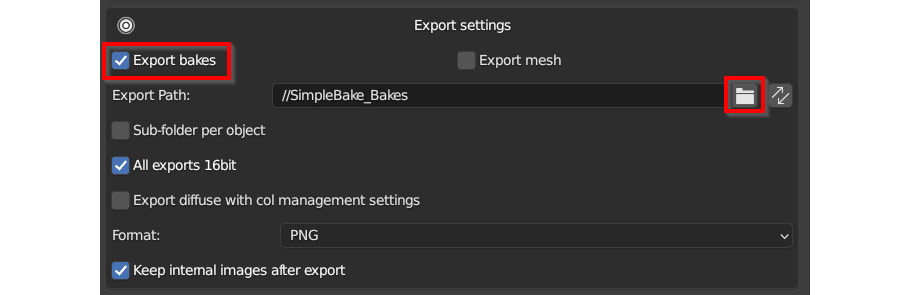
Finally, although this is optional, it will save you having to export each texture manually; under Export Settings, enable Export Bakes and choose a location to save the baked textures.
Now, just press Bake!
Blender will take a moment, and then the textures will appear in your Blender file, available in the Image Editor and in Image Texture nodes just like any other texture. If you’ve selected an export path, they will also be visible in that location in your file browser.
If you’re getting a message saying No Valid Selected Objects, make sure that the object you’re trying to bake is Selected and active in the viewport when you press Bake.
If some materials are appearing as black in your texture after baking when they shouldn’t be, double check that you have a copy of the Bake texture in every material you intend to bake – if it’s missing, the material won’t bake properly.
If you’ve set up the baked textures on your model, and the materials are showing up in the wrong places, make sure that the correct UV map is visible under Properties Panel > Object Data Properties > UV Maps.

Also, make sure that prior to baking, the original UV map is visible and the new UV map is selected.
If metallic materials are appearing as black in your bake, make sure that your Bake Type is set to Emit and not Diffuse. While Diffuse would seem like the logical choice, it is designed to work with Specular/Glossy workflows instead of Metallic/Roughness, meaning that it renders all metallic materials as black. Using Emit instead lets us manually plug in whatever channel we want, which in this case is easier than working around Blender’s outdated baking system!
Finally, we’ve reached the end! I hope this article has been helpful – Baking in Blender is a complex, and at times frustrating subject, but as with everything, once you’ve done it a few times it does get easier. And of course, using the SimpleBake addon will help you enormously!
Best of luck with your 3D projects, and thanks for reading!

Hello! I’m a self-taught 3D modeler and texture artist with experience on a variety of projects, ranging from planet creation to game props, vehicles, and environments. Although I’ve tried out a bit of everything, my main software is Blender. I’m a big fan of sci-fi and fantasy shows and books like The Expanse and Lord of the Rings, so most of my personal work has a fantasy or sci-fi theme – but I also love to experiment and try new things!


Add a comment