

 Autos
Autos
 LKW
LKW
 Busse
Busse
 Motorräder
 Militär
 Elektronik
 Waffe
Waffe
 Gebäude
 Flugzeuge
 Möbel
Möbel
 Charaktere
 Tiere
Tiere
 Raumfahrzeug
 Lebensmittel
 Schiffe
ansehen
Edges are a key part of the 3D workflow; every modeling task requires working with edges, and just like with vertices, sometimes you need to merge them together! But in Blender, that can be a confusing task. There’s no hotkey for it, and no “merge edges” option – so how do you do it?
Well, if that question is on your mind, you’ve come to the right place!
In this tutorial, I’ll go over exactly how to merge edges once and for all, as well as how to remove overlapping edges, how to merge edges to a point, how to bridge edges using faces, and finally, how to dissolve edges.
Let’s get started!
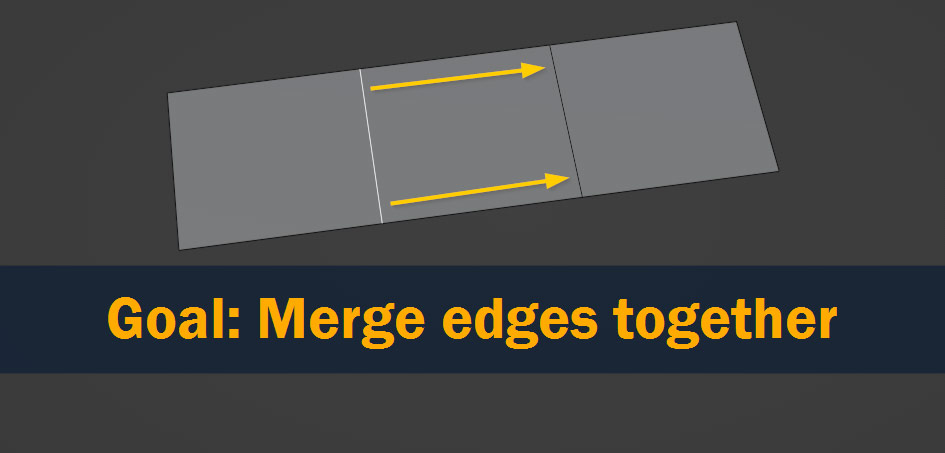
To begin, let’s start with one of the most common cases for merging edges.
Say you’ve got two edges on an object, and you want to merge them into one – how do you do it?
Well, the most obvious solution might be to merge the vertices making up the edges instead – to do this, go into Vertex Select mode, select a pair of vertices, and merge them together by pressing M and selecting either At Center, At First, or At Last!
But often this isn’t ideal – if you have many edges that need to be merged, doing it like this would take forever.
So instead, often the best solution is actually to slide the edges together, and then merge them afterwards – so let’s take a look at how to do that!
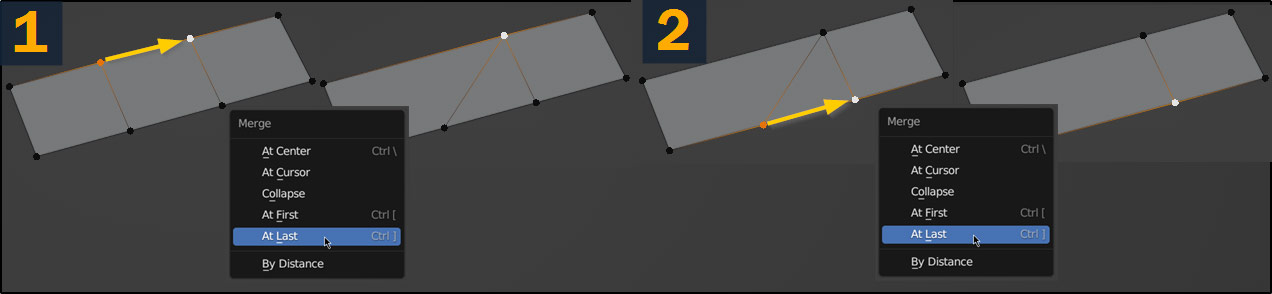
In Edit Mode, first select one or more edges that you want to merge, either by left-clicking, or by Alt/Option – clicking them to select a loop of edges.

Next, we need to slide these edges into the ones we want to merge with – to do this, double-click G, and slide the edges together!

Select All by pressing the A key.

Final step – press M to open the merge menu, and choose By Distance.
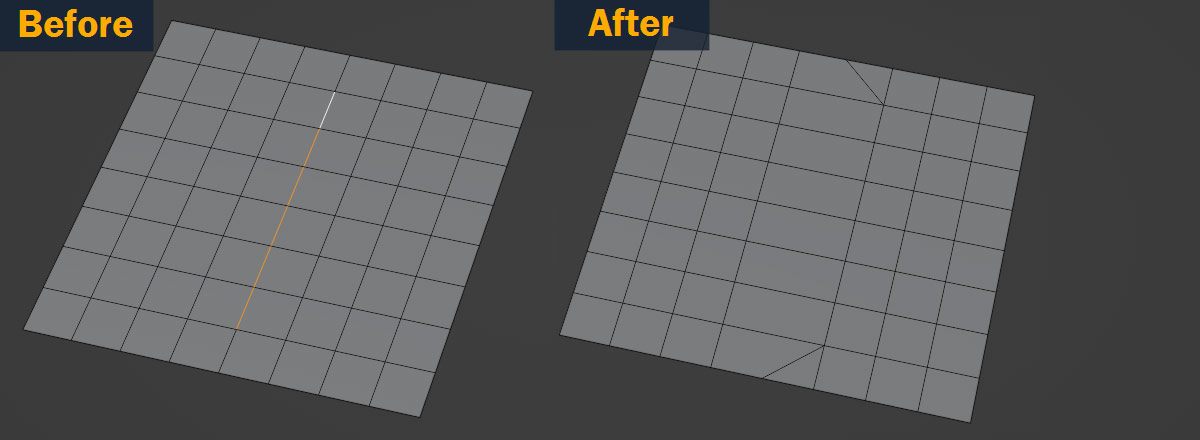
With that, the edge-merging process is complete! Here’s a graphic version:

With practice, this process will become very quick.
Where this method really shows its strength is when you’re merging multiple edges together at once, as you can see here:
If you were merging individual vertices like I mentioned above, something like this example would take a while – but using the edge slide method, merging six edges is as easy as merging one!
Usually the method outlined above will work fine – but if you’re doing a lot of merging on a model, there’s another trick that can help speed up the process!
In the top-right corner of the 3D view, you can enable Auto Merge Vertices:

This does the same thing as the Merge By Distance tool, but automatically – essentially, every time you make a change to your mesh, Auto Merge Vertices will merge anything that’s touching/overlapping, potentially allowing you to save time on large projects.
So, we’ve covered merging an edge into another edge. Easy enough! But what if we want to merge an edge to a point instead?
This is actually even simpler!
To start with, select one or more edges that you want to merge to a point:

Then press M to open the merge menu, and select At Center to merge the selected edges to a point.
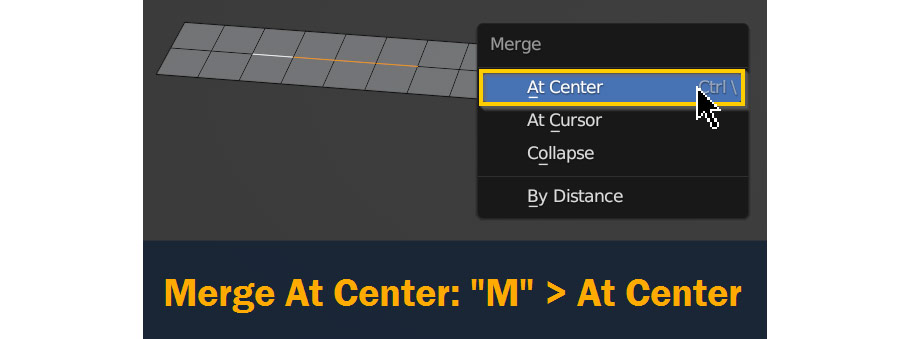
Here’s the result!
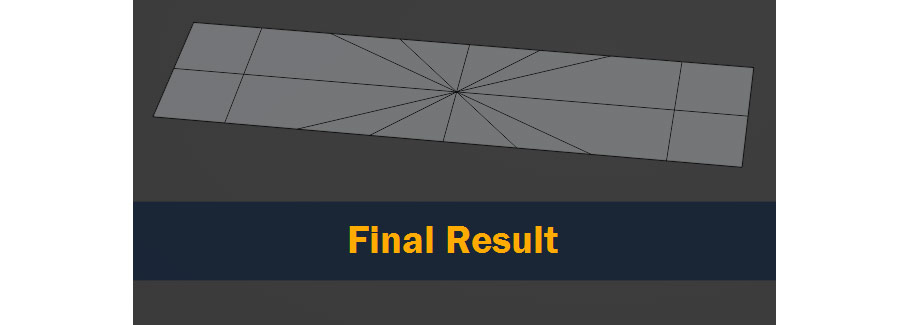
Instead of At Center, you can also select At Cursor – this will merge the edges to the location of the 3D Cursor.
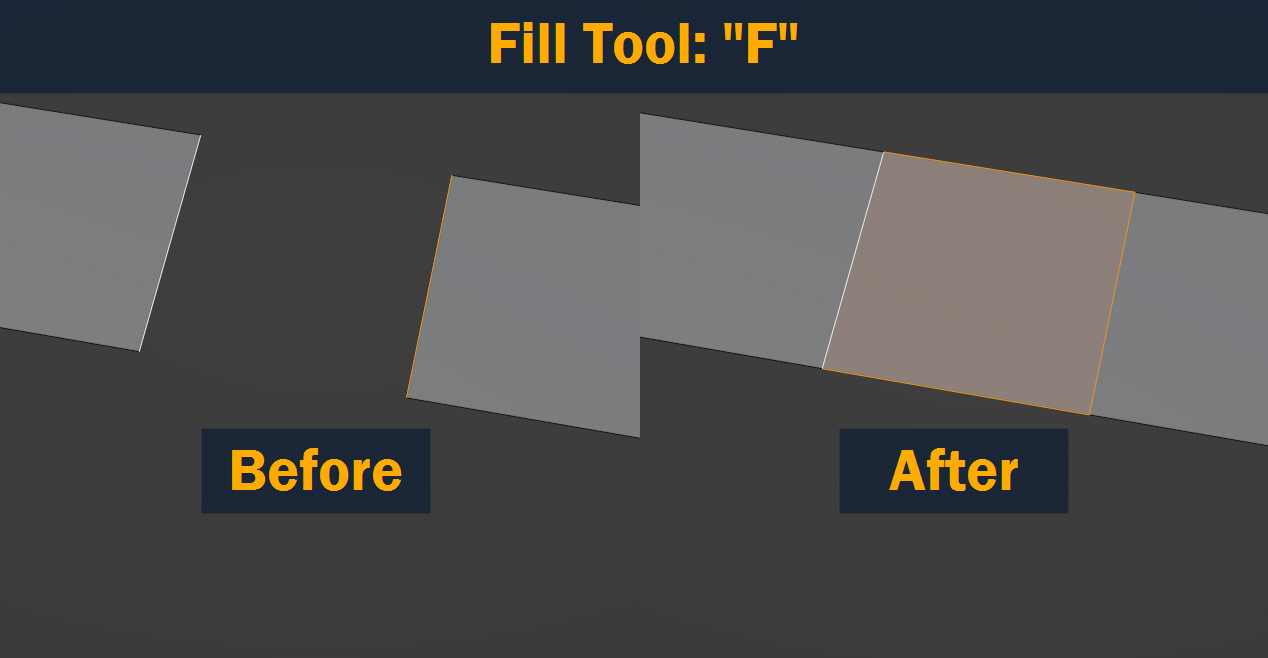
Now, we’ve covered a few different ways to merge edges together. But instead of merging them, what if we want to connect them using faces?
In Blender, there are a couple different common ways to do this!
The simplest way to do this with two edges is to use the Fill tool. Just select two edges and press F – a new face will be created between them, connecting them!
But the fill tool is limited – if you want to bridge more than one edge at a time, it won’t get you very far. That’s where the Bridge Edge Loops tool comes in.
To use Bridge Edge Loops, select two sets of edges of equal number:
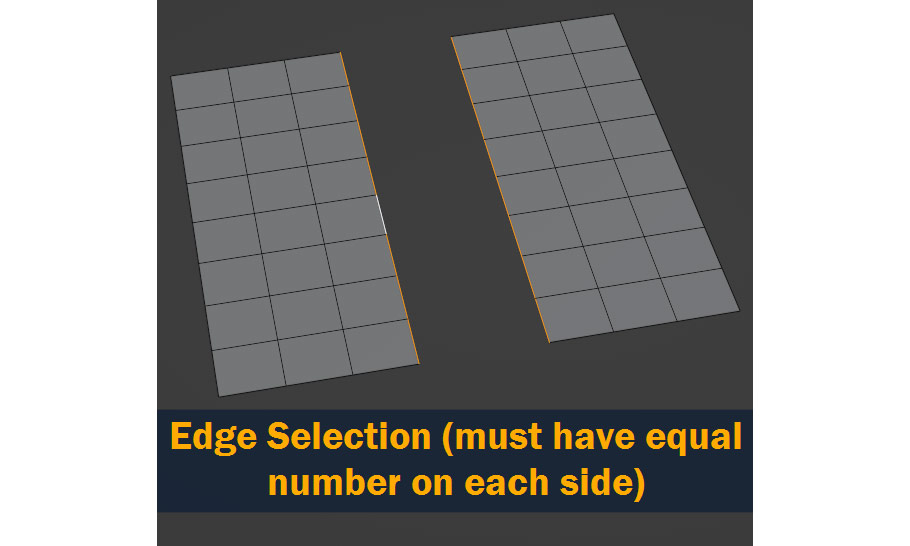
Right click, and select Bridge Edge Loops:

This is the result!
Merging edges is a great way to manage the topology of your model. And as we’ve seen, it’s not too hard to do! However, in certain situations, merging might not actually be the best tool for the job.
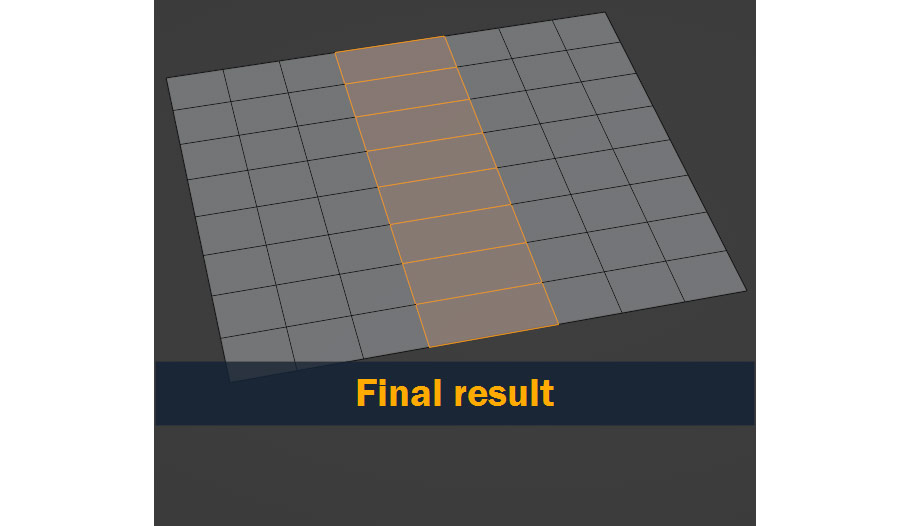
If you want to get rid of an edge or row of edges across your model, you can merge it into the surrounding edges to get rid of it, as we’ve seen – but a quicker method might just be to Dissolve it.
Dissolving edges and vertices is a lot like deleting – but instead of removing the element and leaving a gaping hole in the mesh, the Dissolve tool instead removes the element without affecting the surrounding geometry. It’s basically a softer version of Delete!
So, how do we use this tool?
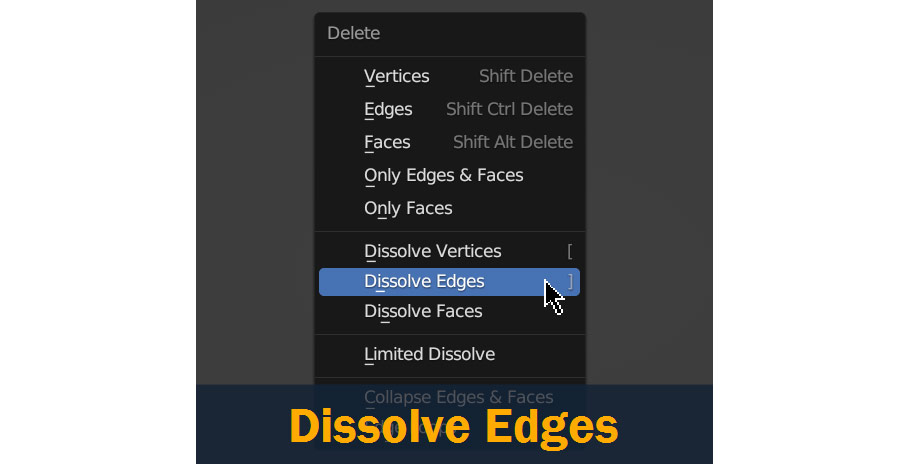
To dissolve an edge, Select the edge, press the Delete or X key, and select Dissolve Edges – or just press Ctrl/Cmd – Delete.
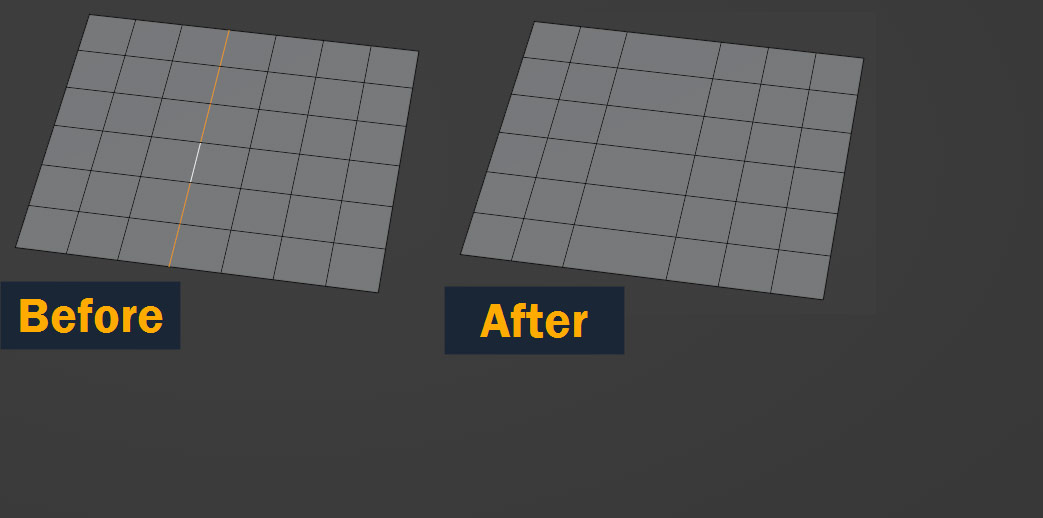
Easy as that! Here’s the before and after results:
3D modeling is complicated – and with so many steps, tools, and shortcut keys, even simple actions like merging an edge can feel overwhelming! But with a bit of practice, you’ll soon be using all of these tools on your day-to-day modeling tasks without even thinking.
Before we finish up, let’s review what we’ve covered in this article:
I hope you were able to take something useful from this article – if you have any thoughts or ideas, feel free to leave them in the comments section below!
Best of luck on your future projects, and thanks for reading!

Hello! I’m a self-taught 3D modeler and texture artist with experience on a variety of projects, ranging from planet creation to game props, vehicles, and environments. Although I’ve tried out a bit of everything, my main software is Blender. I’m a big fan of sci-fi and fantasy shows and books like The Expanse and Lord of the Rings, so most of my personal work has a fantasy or sci-fi theme – but I also love to experiment and try new things!


Add a comment