

 자동차
자동차
 트럭
트럭
 버스
버스
 모터사이클
모터사이클
 군용 차량
군용 차량
 전자 기기
전자 기기
 무기
무기
 건축물
건축물
 항공기
항공기
 가구
가구
 캐릭터
캐릭터
 동물
동물
 우주선
우주선
 음식
음식
 선박
선박
보기
Very often while 3D modeling, you have two or more objects that you need to make one; somehow, you have to merge them together. But in Blender, there are a couple of ways to go about this, and they both work a bit differently. Blender has both a Join function, as well as the option to merge objects using a Boolean operation – and while they might seem similar at first, they both do very different things!
In Blender, the simplest way to merge multiple objects or curves together into one is the Join function. To use this, select two objects and press Ctrl/Cmd – J (or Right Click them and select Join). Once you do this, the two objects will now be considered one in Blender – even if they’re not physically connected to each other in the 3D viewport, Blender now recognises them as a single object!
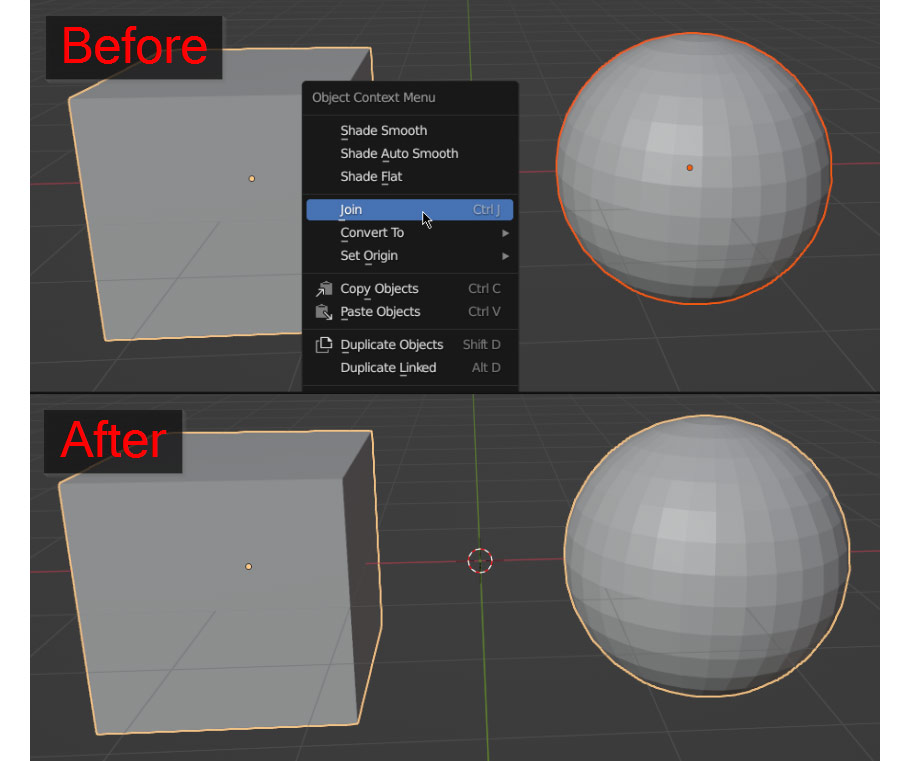
Now, something that may be confusing to new users is that even though the objects are Joined together, none of their vertices or faces change at all. In fact, even if you join two objects that are overlapping, you can go into Edit Mode and move them apart – even though they’re “Joined”, the original faces, vertices, and edges are unaffected. This is because in Blender, all you’re doing when you Join objects is telling the software to consider their faces and vertices as part of the same object – so it doesn’t affect the actual model at all.
But what if you DO want to join objects in a more physical, permanent sense? Well, that’s where Boolean Operations come in!
In 3D art, Boolean Operations allow you to merge objects in a much more powerful way than the using Join function; and they’re not just limited to merging objects together, either! But before we get into the many ways booleans can be helpful in modeling, we need to start by setting up a Boolean Modifier.
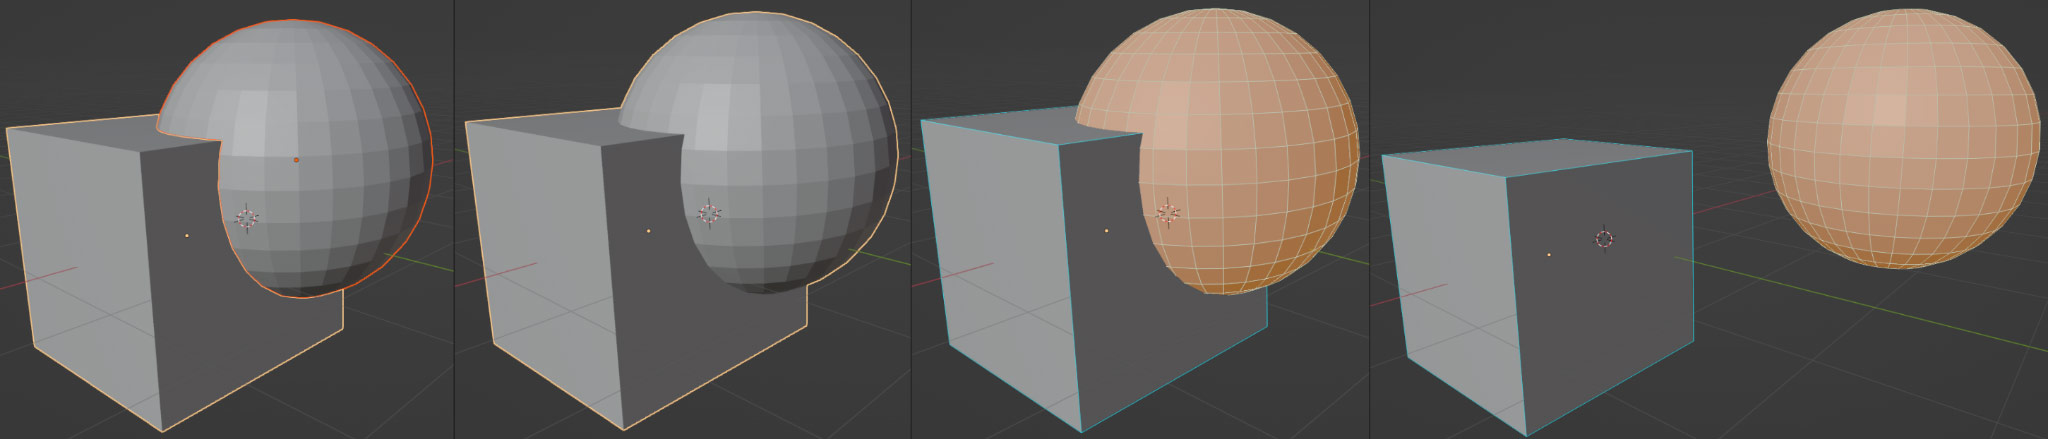
For any Boolean operation, you’ll need to start with two objects that overlap each other. The shapes and positions of the objects depend on your project, but they need to be overlapping for Boolean operations to be of use. For my example, I’ll be using a Cube and a UV Sphere!
For clarity, I’ll refer to the cube as my Primary object, and the sphere as my Secondary object.
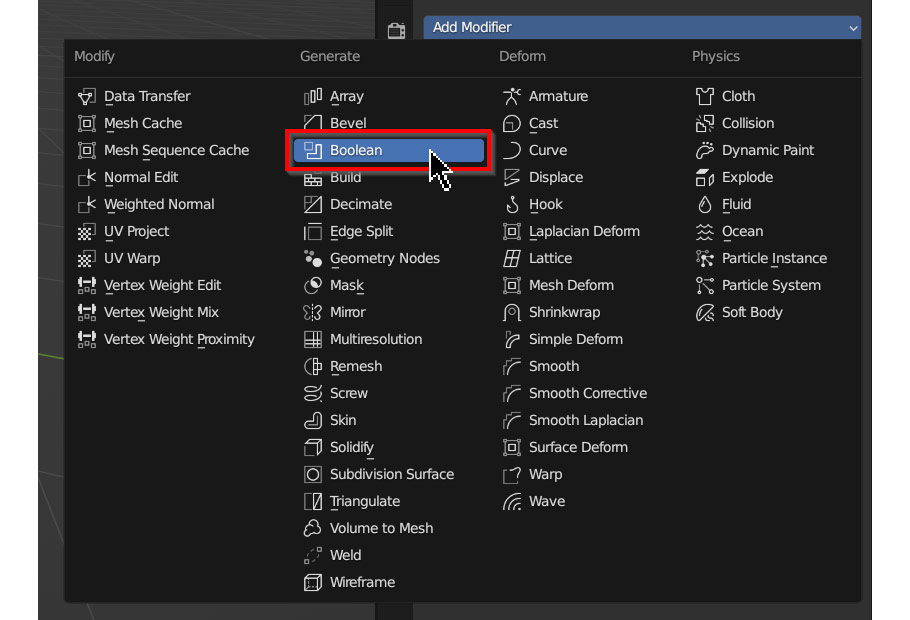
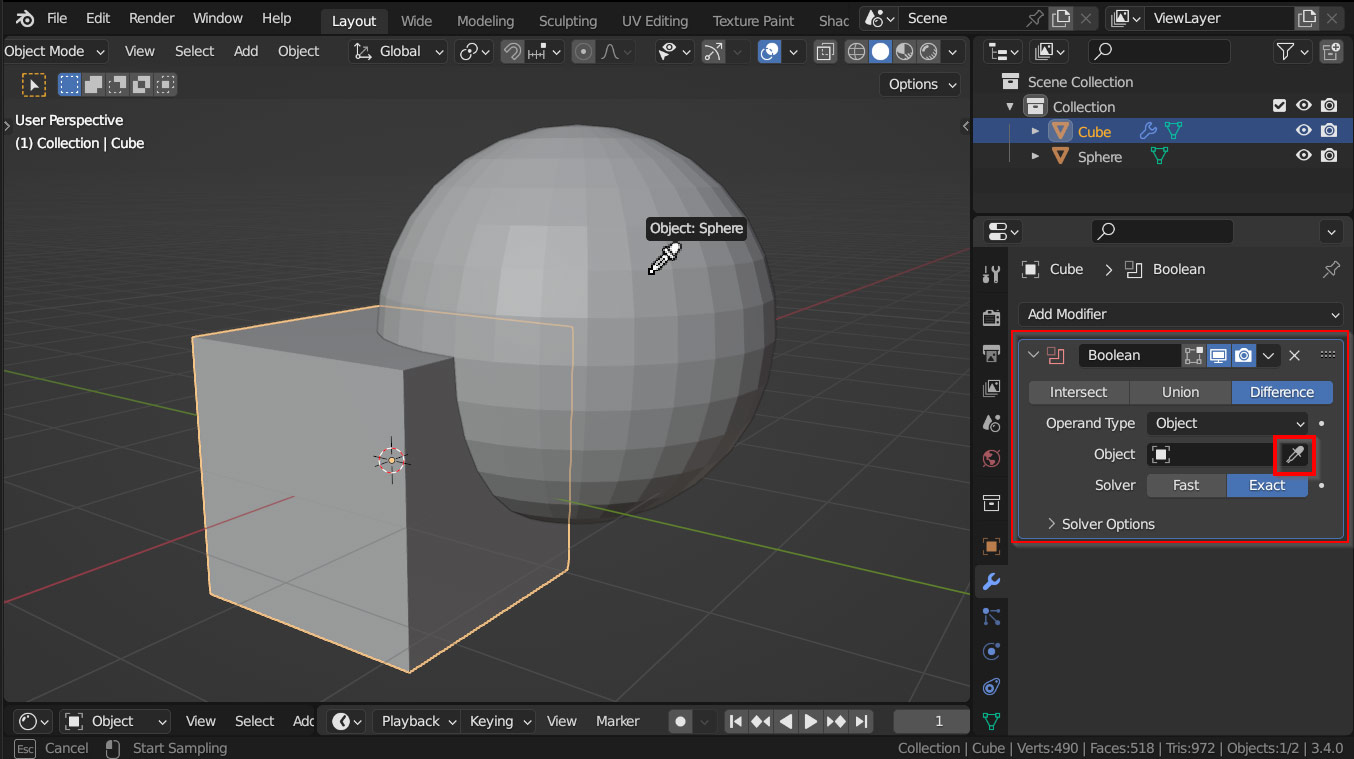
First, Select your primary object and go to the Properties Panel; under the Modifier Properties tab, click the Add Modifier to open it.
From the dropdown, choose Boolean to add a Boolean modifier to your object!
Once the Boolean modifier is added to your primary object, you’ll need to tell the Boolean modifier what other object to use for the operation. To do this, click the Eyedropper icon in the field labeled Object, and select your secondary object in the 3D viewport.
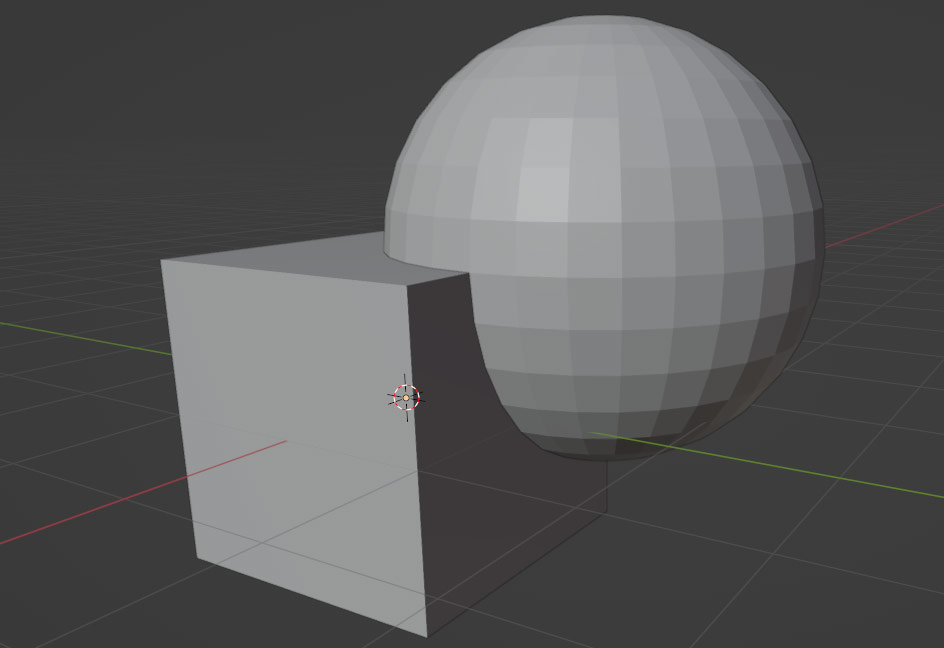
Once you’ve selected your secondary object in the boolean modifier, the boolean operation should become active right away. At first, it’s difficult to see any difference, because the original boolean object is in the way; so to make it easier to see what’s going on, I’m going to select my secondary object in the viewport, go to Properties Panel > Object Properties tab > Viewport Display, and under Display As, choose Wire.
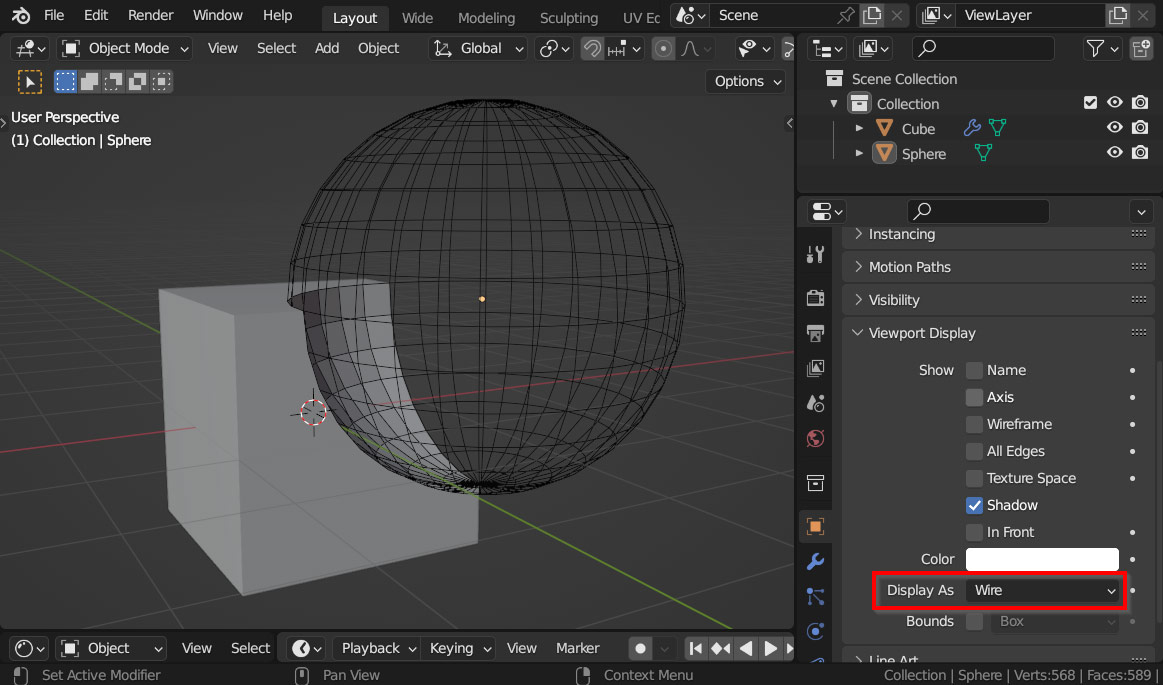
Now we can see that the sphere seems to be cutting into the cube! So, what’s going on here? Well, what you’re seeing is the Difference boolean operation – and it’s one of the three different options for booleans: Intersect, Union, and Difference. These are all essentially math operations that act on the 3D objects in your scene:
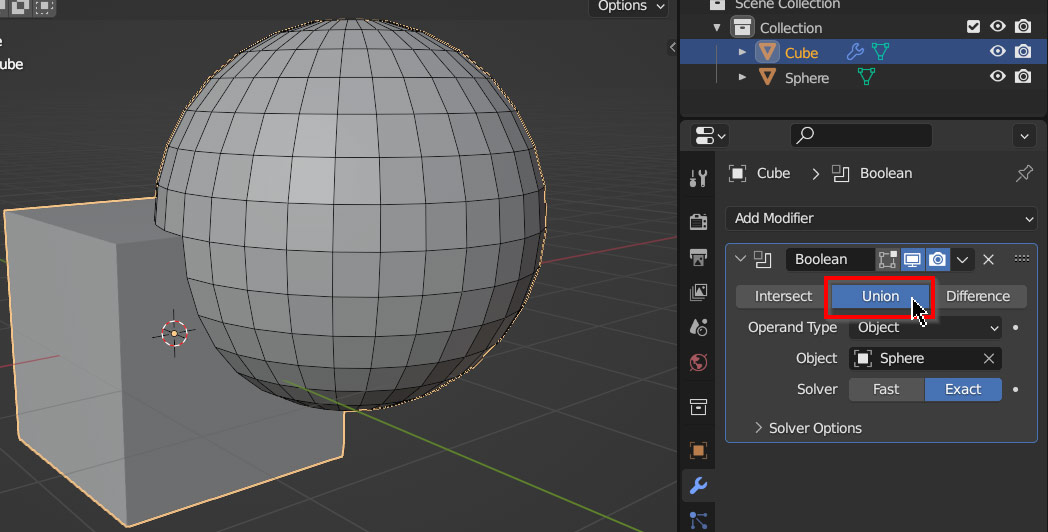
By default, the Boolean modifier is set to Difference, so in the screenshot, the sphere is being Subtracted from the cube; but to change the setting, simply go back to the Boolean modifier for the original object and select Intersect or Union instead.
Since the subject of this article is merging objects together, I’m going to go with Union!
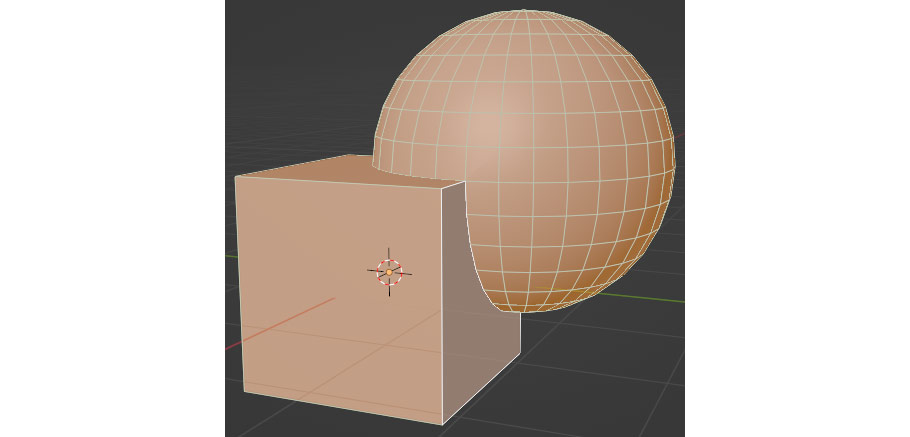
Once the modifier is working how you want it, you can make it permanent by opening the dropdown in the Top Bar of the Boolean modifier and selecting Apply.

Once you’ve applied the Boolean modifier, select your object and press Tab to enter Edit mode. If you look closely at the model now, you can see that the objects haven’t just been combined into one like with the Join function; the actual faces, edges, and vertices have been merged together to form a single solid shape!
Although Boolean operations aren’t too complicated to begin with, sometimes when you’re modeling you want something even faster. This is where the Bool Tool addon comes in!

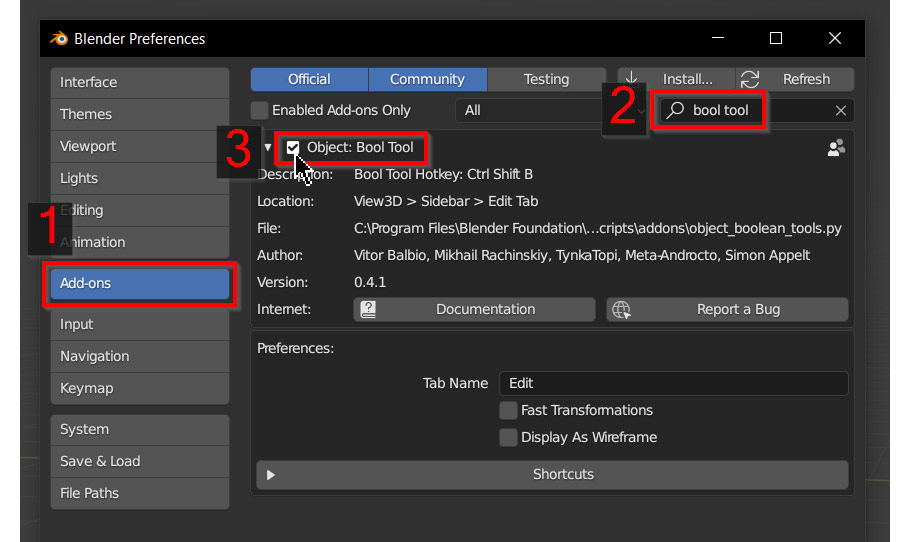
So, how do we install this addon? Well, luckily for us, Bool Tool actually ships with Blender by default – all you need to do is enable it. To enable Bool Tool, go to the Top Bar and under Edit, select Preferences to open the Preferences window – go to the Add-ons tab, type “Bool Tool” in the search bar, and check the box next to Object: Bool Tool once it shows up.
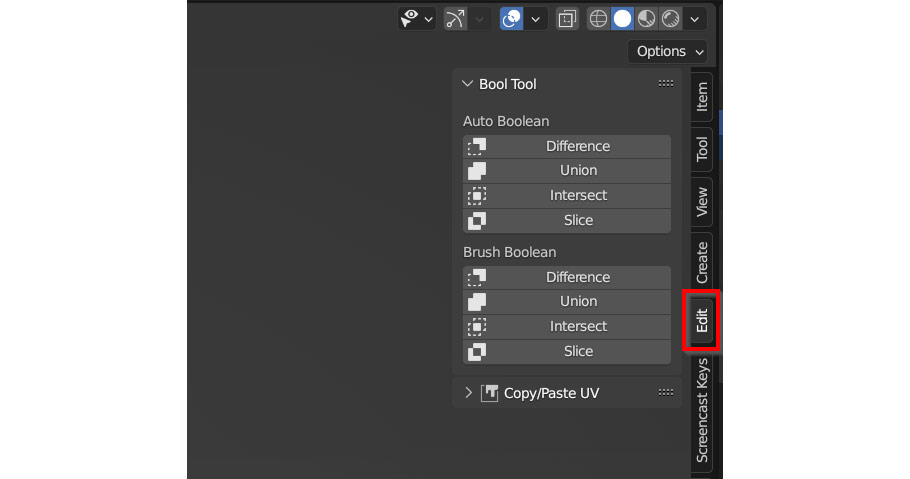
When it’s enabled, you’ll find the options for the addon in the Sidebar Menu under Edit. With these tools, you’ll be able to apply Boolean modifiers much more quickly! Auto Boolean instantly applies the selected Boolean to your mesh, while Brush Boolean creates Boolean modifiers which you can later remove or adjust.
If joining objects together using Ctrl/Cmd – J isn’t working, it may be that your Active Object isn’t a Mesh. In Blender, only meshes can be joined together – curves, cameras, empties, and lights can’t be joined with meshes! To change your Active Object, simply shift-click on one of the meshes in your scene – the highlight on it should turn from Orange to Yellow to indicate that it is Active.
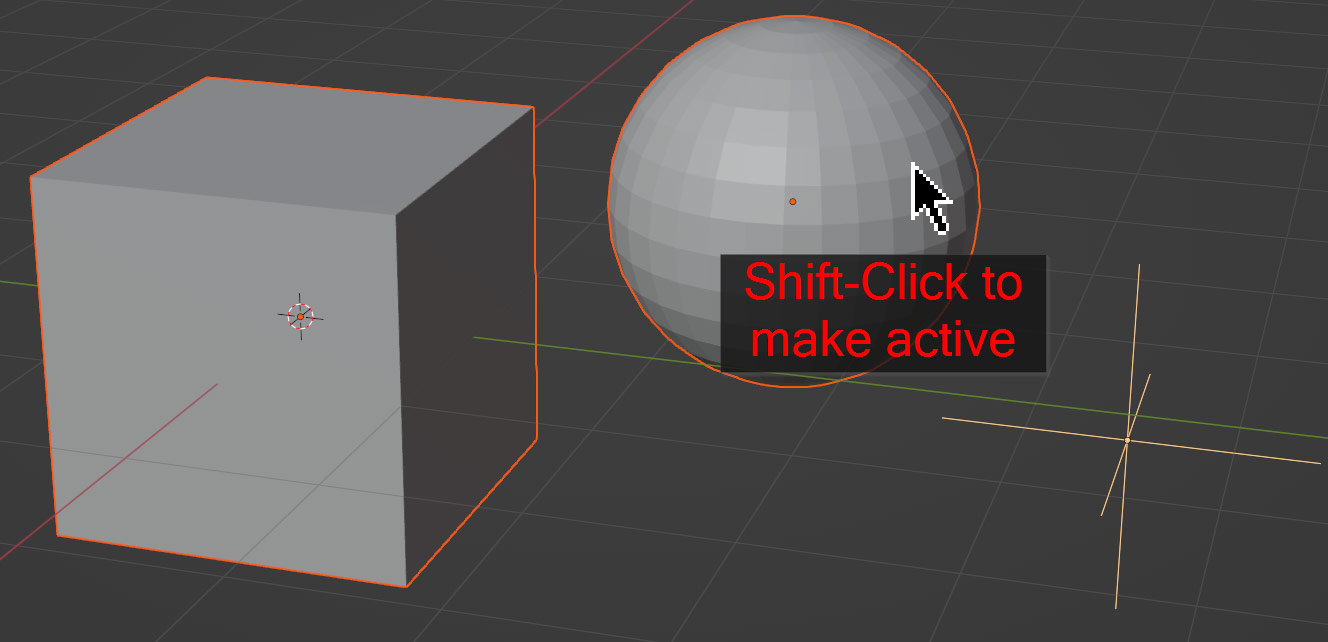
It is also possible for a different object to be active, even if you only have meshes selected (especially if you selected the meshes using the Box Select tool). But again, to fix this simply Shift-Click on one of your meshes to make it active!
It is also possible that the keyboard shortcut has been somehow un-bound – if this is the case, you should still be able to join objects by Right Clicking in the 3D view and selecting Join.
If you’ve got a modifier on one of the objects you’re joining together that isn’t the Active object, it will disappear. This is because modifiers work on a per-object basis, and when you join one object to another, the first object becomes part of the second, losing its original modifiers and inheriting the modifiers from the second object. This includes boolean modifiers.
So, if you don’t want the modifiers on an object to change when joining with another object, you either have to make sure both objects have the same modifiers as each other, or you have to Apply the modifiers before joining. The option you choose will depend a lot on your specific mesh.
If your boolean modifier isn’t working as expected, there are three likely causes: Inverted Normals, Double Vertices, or Non-Manifold Geometry. I’ll go over each of these individually!
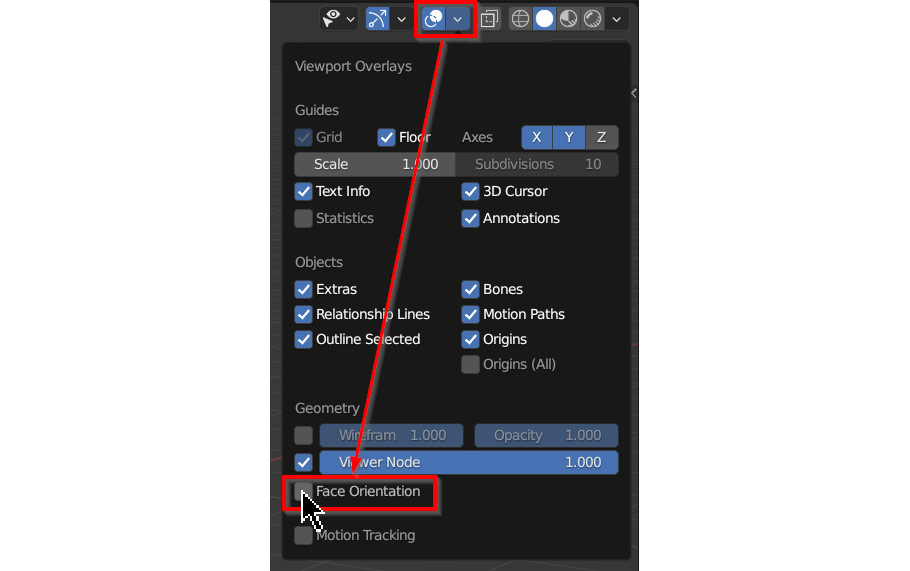
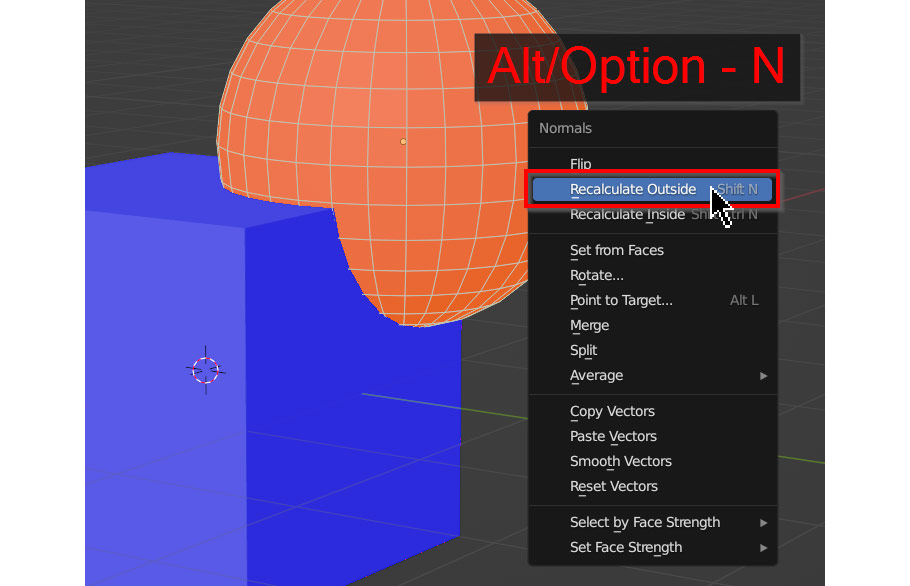
Inverted Normals: Sometimes, Inverted Normals can cause your boolean operation to malfunction. This means that some of the faces on your model are essentially inside-out. To check if this is the case, go to the Overlays dropdown and enable Face Orientation. If faces show up as red instead of blue on the outside of your model, it means they are inverted.
To fix this, select your entire model in Edit Mode, press Alt/Option – N to bring up the Normals menu, and select Recalculate Outside to automatically reset the faces on your model. Alternatively, in Face Select Mode, you can select the inverted (red) faces individually and use Alt/Option – N > Flip to manually fix them.
Double Vertices
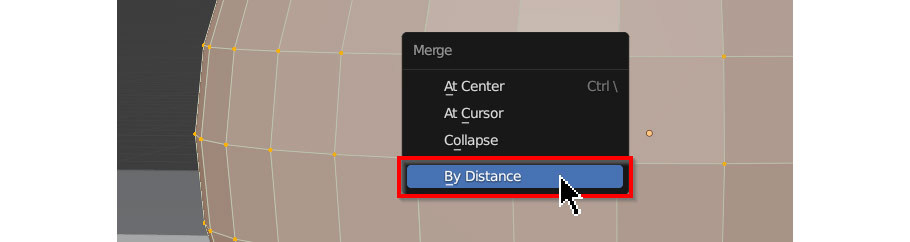
Sometimes vertices on your model can be doubled up, which causes problems with many different modifiers including Booleans. To fix this, simply press M to open the Merge menu, and select By Distance. This should automatically remove any double vertices on your model!
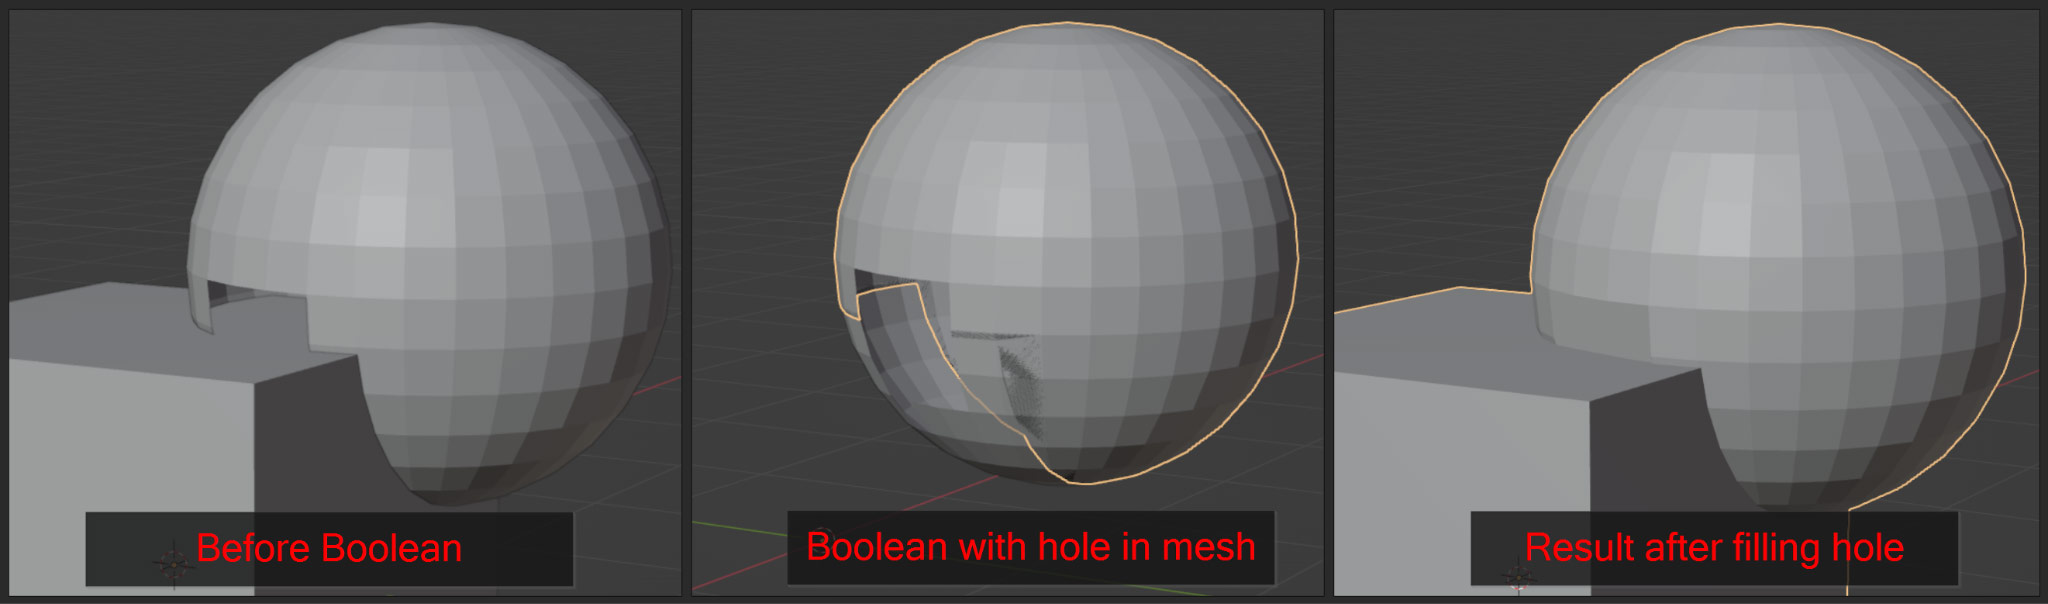
Non-manifold Geometry / Holes in Mesh
Sometimes, Non-Manifold Geometry can be the cause of Boolean modifier issues. Non-Manifold Geometry is a term that refers to any geometry that isn’t solid and closed – so this could refer to loose edges and faces, holes in the mesh, or loose vertices. If any geometry like this is present in the area of the mesh that is having a boolean applied to it, it can cause issues or possibly prevent the boolean modifier working at all!
To avoid this, it’s best practice to avoid creating holes or loose geometry in your mesh wherever possible; delete any loose faces or edges, and fill holes by selecting the surrounding edges and using the F hotkey.
So, to summarize what I’ve covered here:
That’s it! Like everything in Blender, merging objects seems daunting and confusing at first; but once you get used to it, you’ll find yourself integrating it into your workflow without even noticing. I hope this article was able to help clear up some confusion around the different ways to merge objects – and as always, thanks for reading!

Hello! I’m a self-taught 3D modeler and texture artist with experience on a variety of projects, ranging from planet creation to game props, vehicles, and environments. Although I’ve tried out a bit of everything, my main software is Blender. I’m a big fan of sci-fi and fantasy shows and books like The Expanse and Lord of the Rings, so most of my personal work has a fantasy or sci-fi theme – but I also love to experiment and try new things!


Add a comment