

 자동차
자동차
 트럭
트럭
 버스
버스
 모터사이클
모터사이클
 군용 차량
군용 차량
 전자 기기
전자 기기
 무기
무기
 건축물
건축물
 항공기
항공기
 가구
가구
 캐릭터
캐릭터
 동물
동물
 우주선
우주선
 음식
음식
 선박
선박
보기
In the 3D art world, getting good quality smooth shading on your projects is essential – but when you’re learning Blender for the first time, all the different options can be confusing. What exactly is smooth shading anyway? And with so many settings and choices, how can you know the right way to set it up for your project?
Well, that’s exactly what we’ll be discussing here!
In this article, I’ll cover what smooth shading is and how it works, different options for controlling smooth shading (and when to use them), and finally I’ll provide some solutions for common shading issues in the Troubleshooting section.
In Blender and other Polygonal 3D programs, models are composed of Faces. Of course, they’re composed of vertices and edges as well, but the parts you actually see are the faces – and faces, by their very nature, are flat. You can see this as soon as you open up Blender and start modeling; as you Extrude, Scale, or Move the faces on your model, you can see clear divides between each individual face on your object.
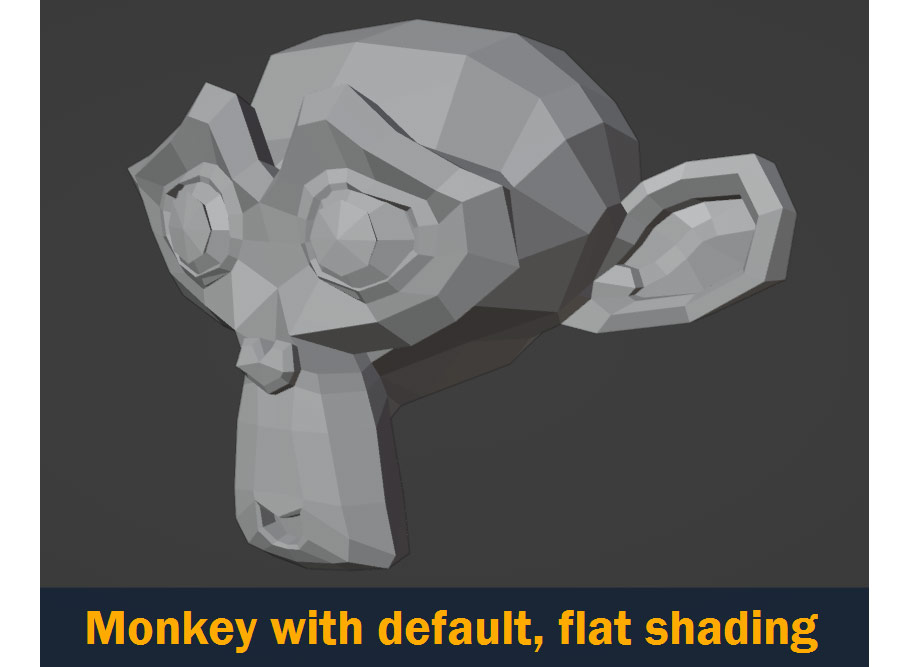
In real life though, things obviously don’t work this way. Smooth, rounded objects are all around us, so how do we recreate that in 3D?
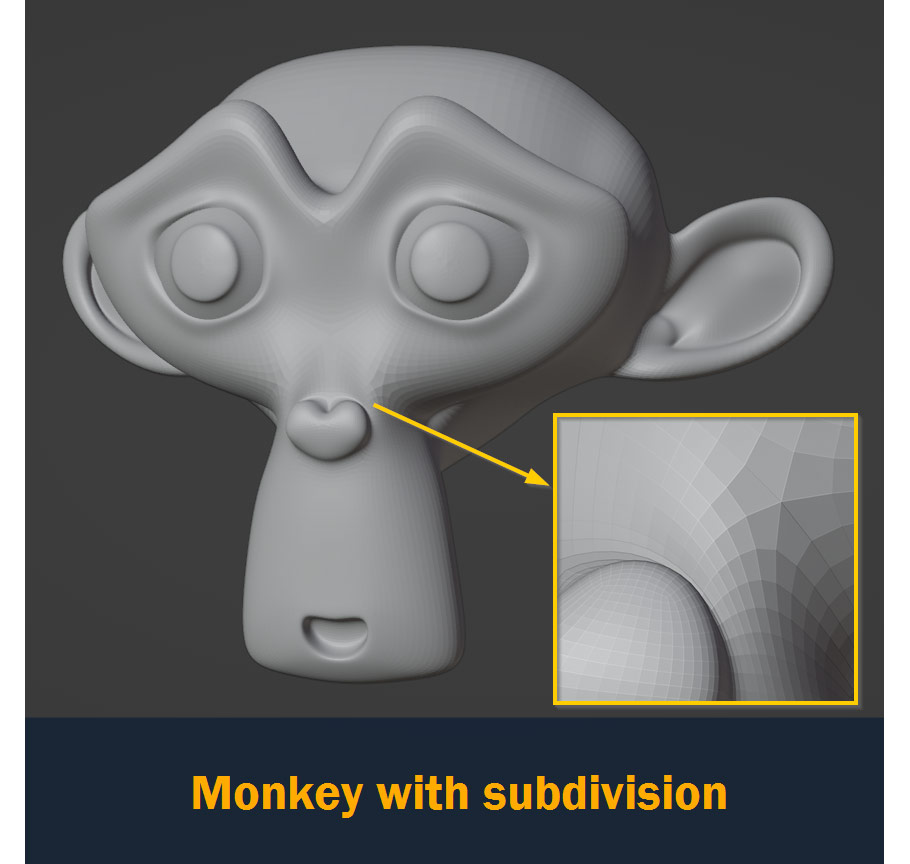
Well, one option is Subdivision. This physically splits up each of the faces on your model into smaller faces, and the higher the Level you assign, the smoother your model begins to look. But if we zoom in close, we can still see individual faces showing – and since subdivision adds physical faces to your scene, adding more and more subdivisions to your model until it looks smooth will eventually just crash your computer! Clearly we need a better solution.
That solution, as you might have guessed, is smooth shading!
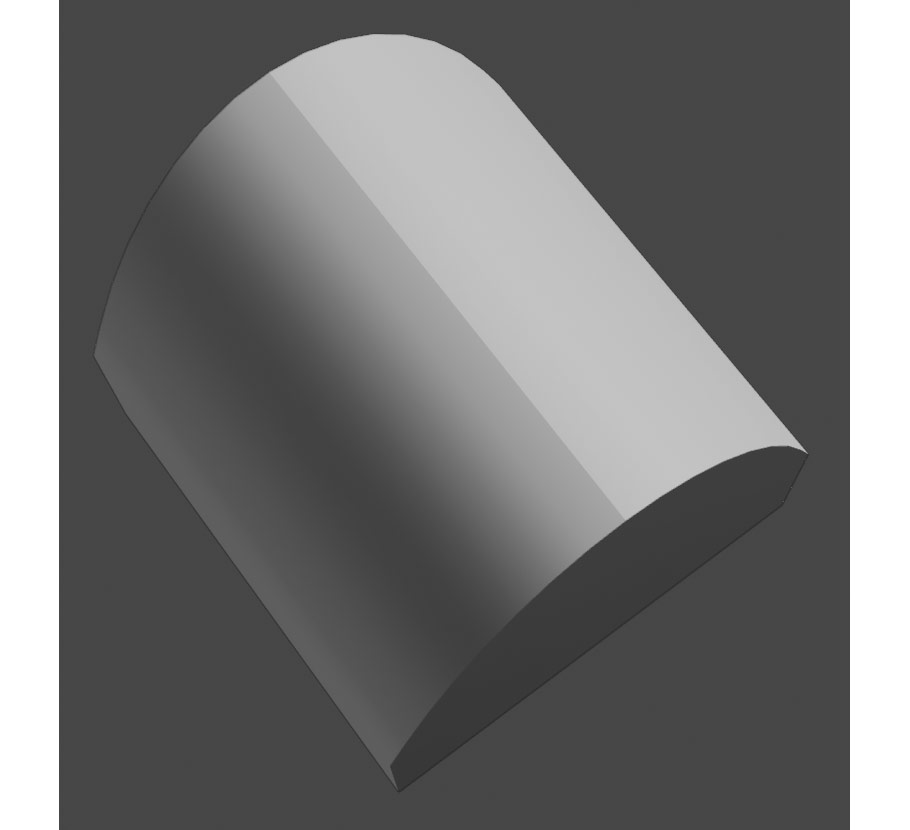
Smooth shading basically makes your model look smooth, without actually adding or changing any of the faces on the mesh – it uses a very efficient algorithm to essentially average the lighting across the faces on your model, giving the illusion of a perfectly smooth, soft surface.
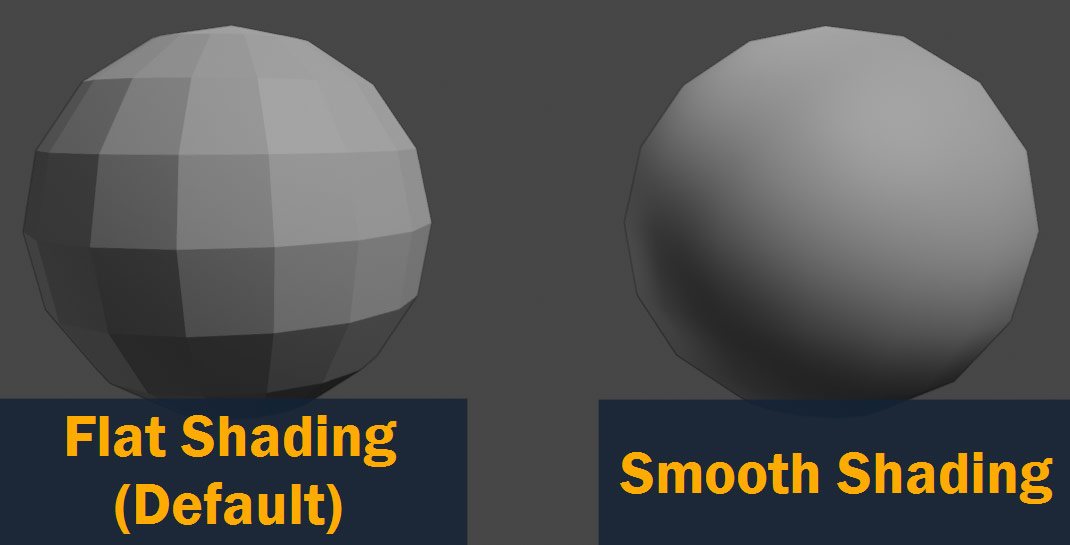
Smooth shading works on any 3D model, no matter how sharp its angles are in reality, which makes it a very powerful tool. But since smooth shading doesn’t actually affect the positions of faces and vertices in your mesh, it also has its limits – for example, it doesn’t do anything to make the edges of objects look smooth. Take the example above. Although the sphere on the right appears very smooth in the center, the illusion falls apart when you look at the edge, where you can very clearly see the angular edges of the polygons that make up the shape. That’s why things like subdivision are still important for many kinds of 3D modeling!
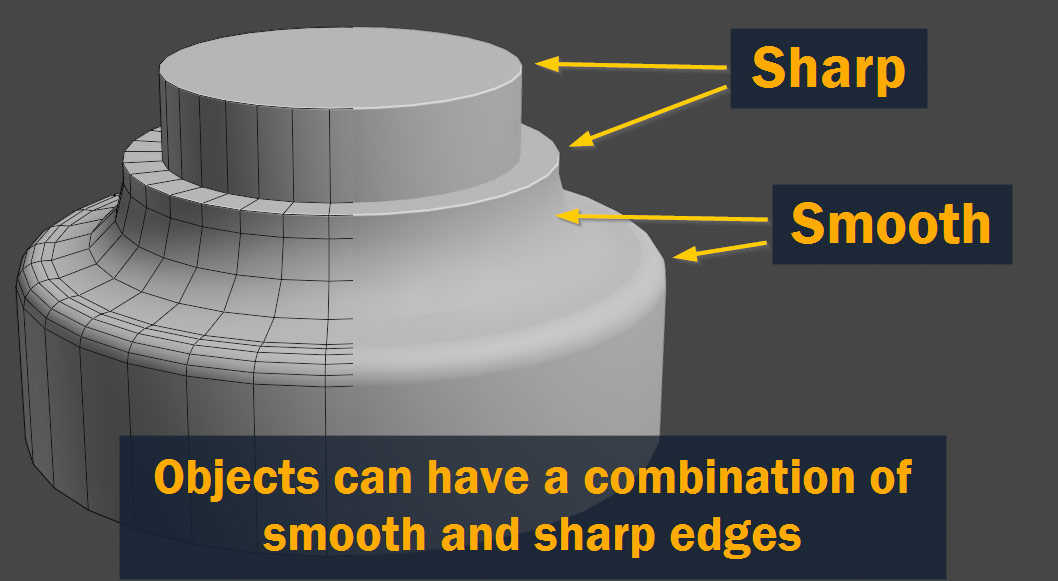
Now, as great as smooth, rounded-looking models are, you need to be able to control it – real objects have a combination of smooth and sharp parts. With smooth shading in Blender, you have this option; there are actually a few different ways to designate edges and faces as smooth or sharp, and the one you use depends on which kind of model you’re making. I’ll tell you a bit about all of them later on!
But before that, how do you set up smooth shading in the first place?
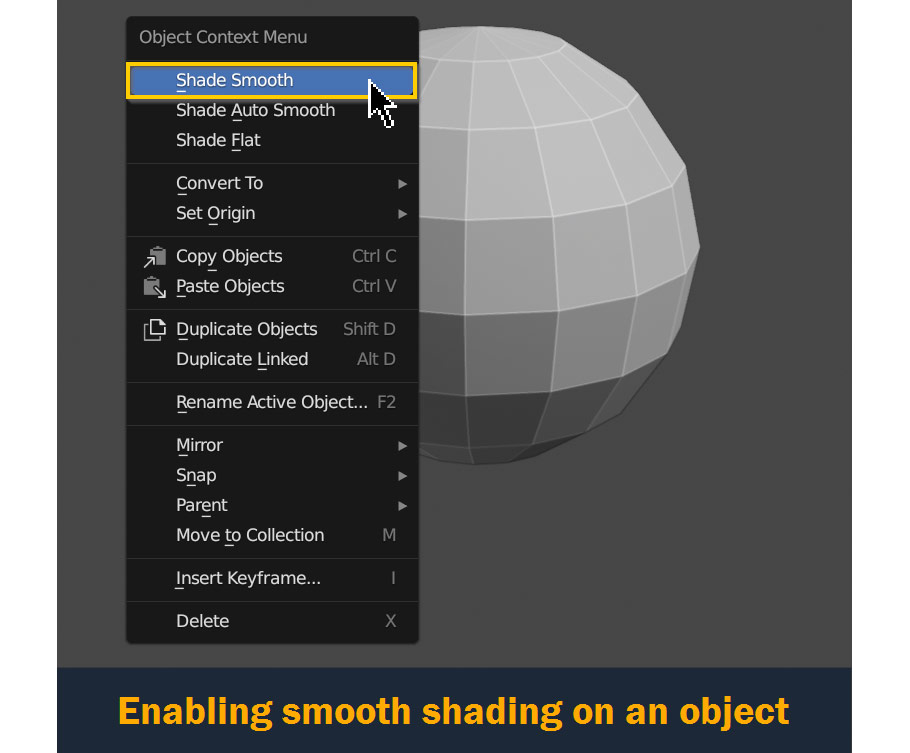
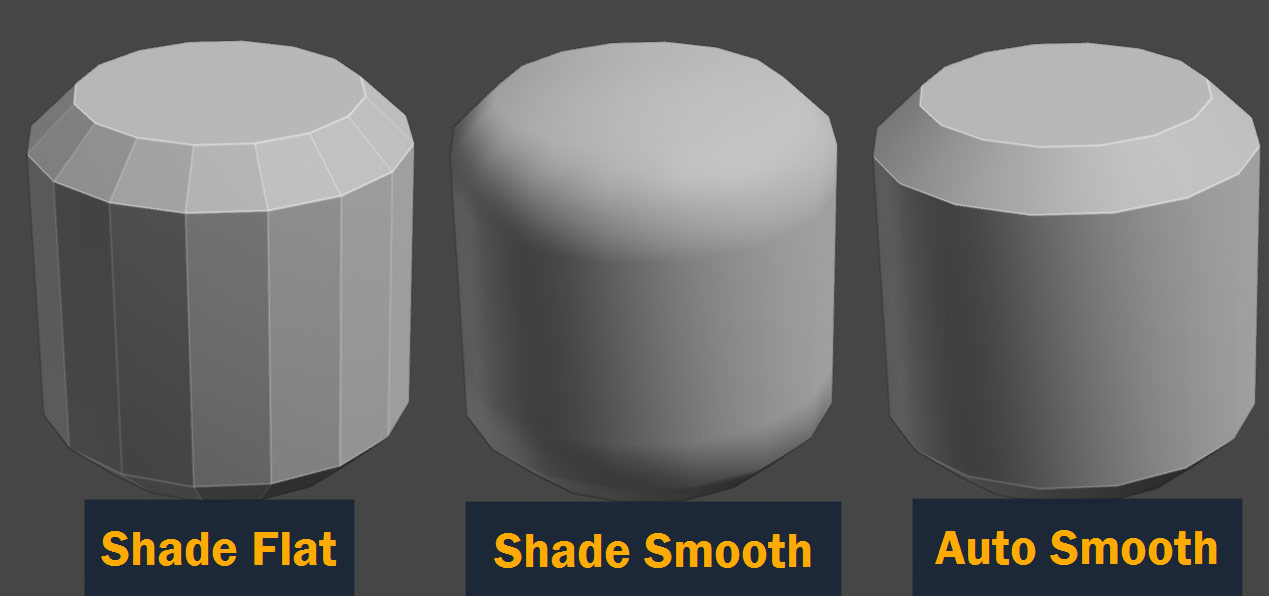
Ok, enough preamble. To set up smooth shading on an object in your 3D scene, simply Right Click the object and press Shade Smooth. Make sure you’re in Object Mode for this – check the top left side of the viewport to see what mode you’re in!
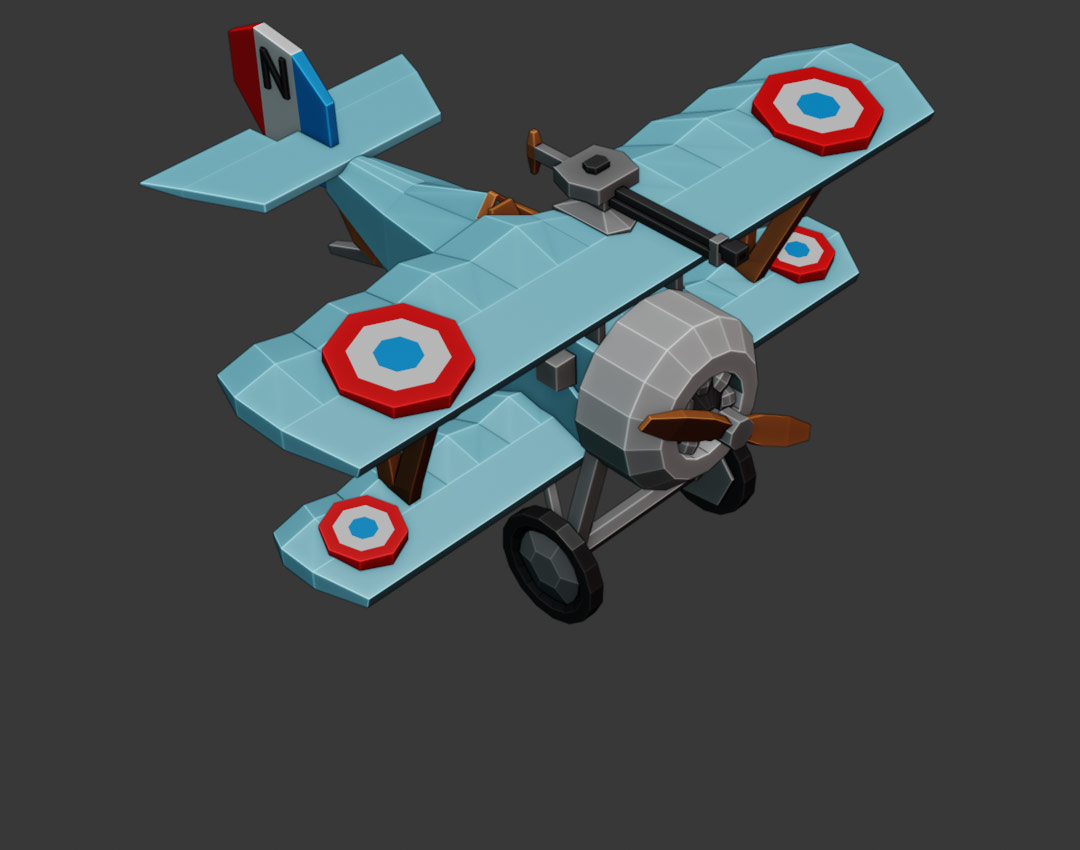
For almost all projects in 3D, you’ll want to use some form of smooth shading. That said, some styles do require flat shading; for example, see our game modeling article, where we create a cute, low-poly airplane model from scratch!
So if you’ve set an object to shade smooth and you want to go back, that’s just as easy – simply Right Click again and press Shade Flat!
Now, as we talked about before, for most 3D models you don’t want everything to be smoothed out.
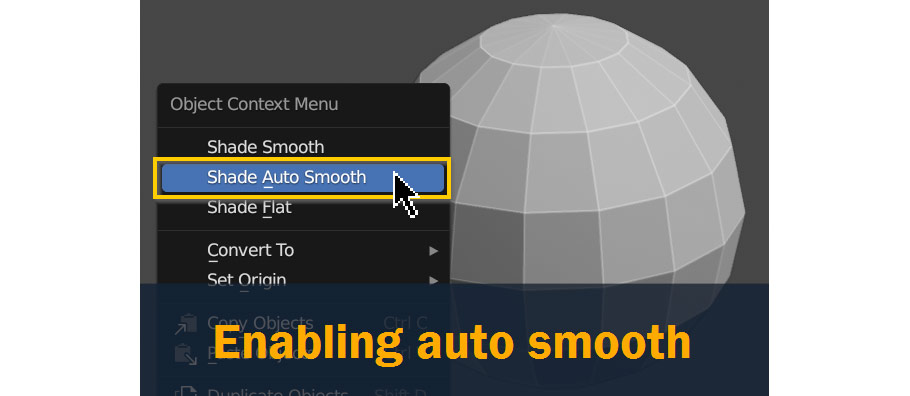
Auto Smooth is one way to control this. To enable it, Right Click on your model in object mode like before, and select Shade Auto Smooth.
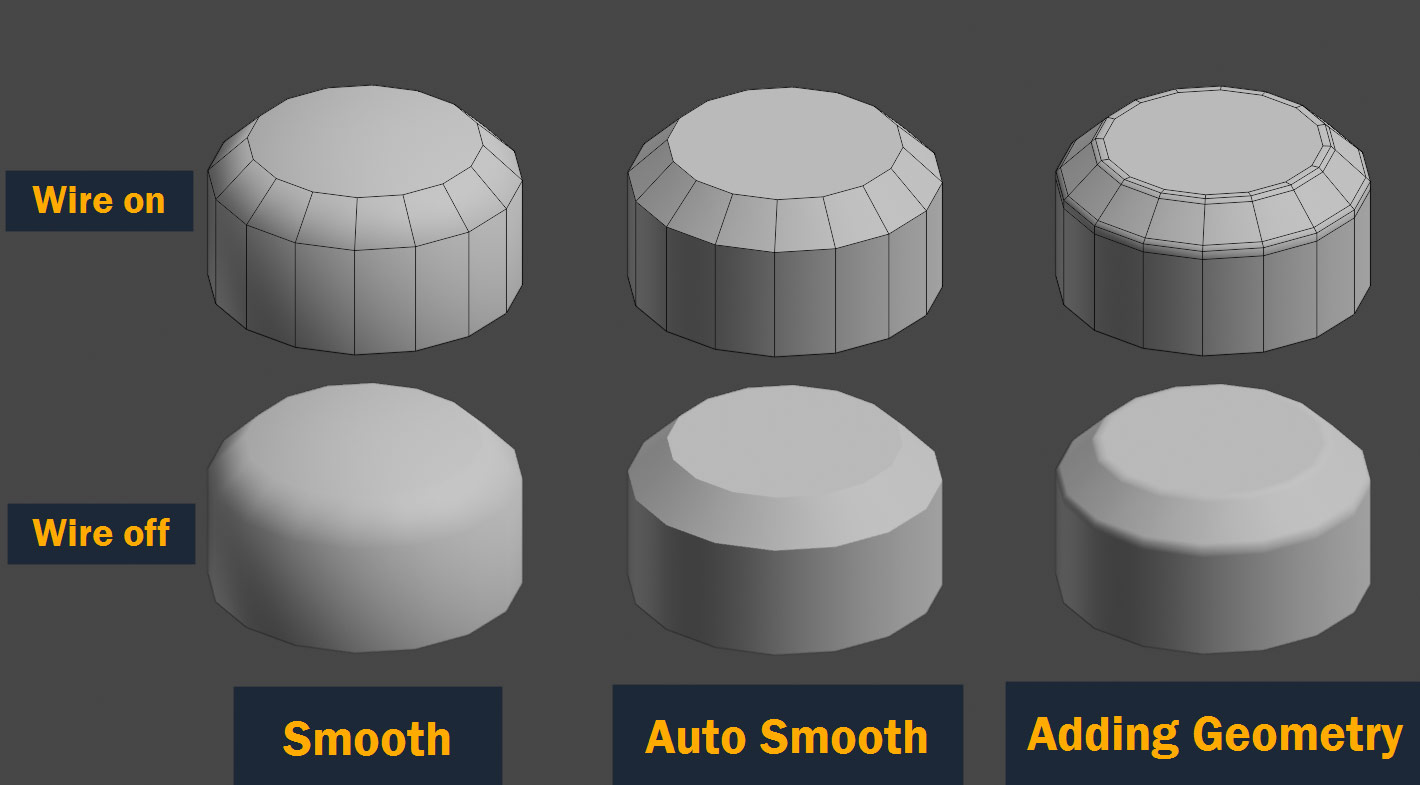
With auto smooth enabled, by default all edges with angles of less than 30° will be smooth, and edges with angles over 30° will be sharp. So basically, faces with gradual, soft transitions will be smoothed, but more extreme edges and borders will be displaced as sharp.
This is pretty good for a lot of models – with the default smooth shading, you can get some great results. But what if you want to go beyond that 30° limit; what if you want more faces smoothed, or fewer?
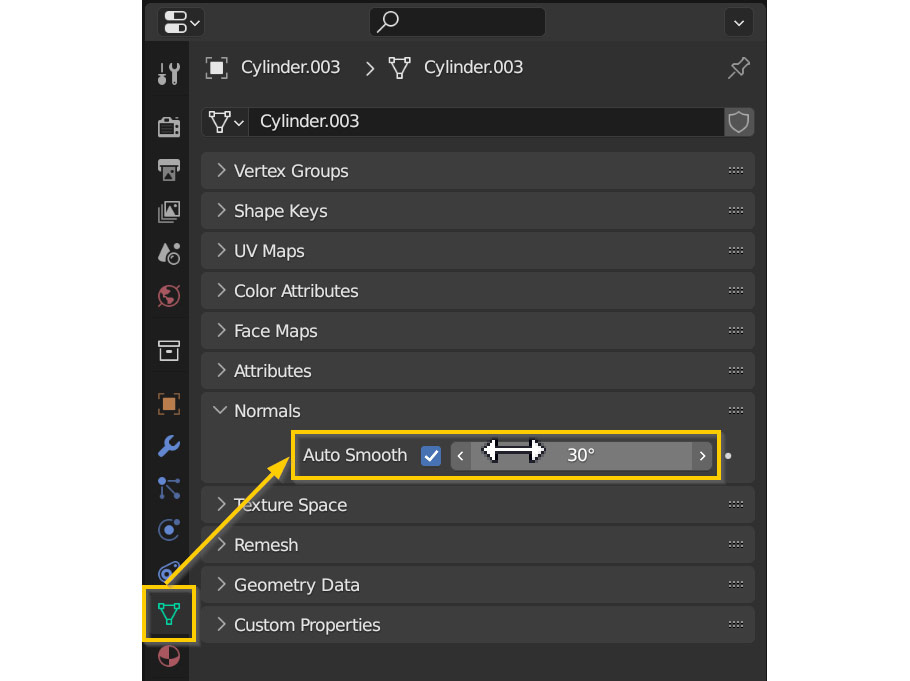
Well, if you want, you can actually set the auto smooth angle manually in the Properties Panel.
In the properties panel, go to the green Object Data Properties tab near the bottom of the list, and navigate to the Normals section. Here, you can enable and disable Auto Smooth using the checkbox, and type any angle you want into the text field!
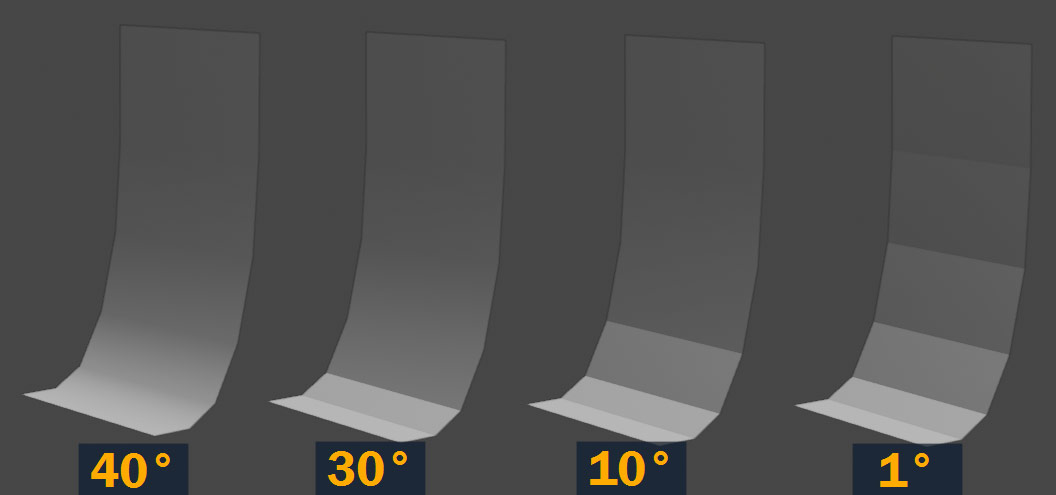
In this example, as the auto smooth angle decreases, we can see how more and more sharp edges become visible on the model:
So auto smooth is awesome – very simple and easy to use. But for many more complex models, often we need more control over which parts of the mesh are smooth or sharp.
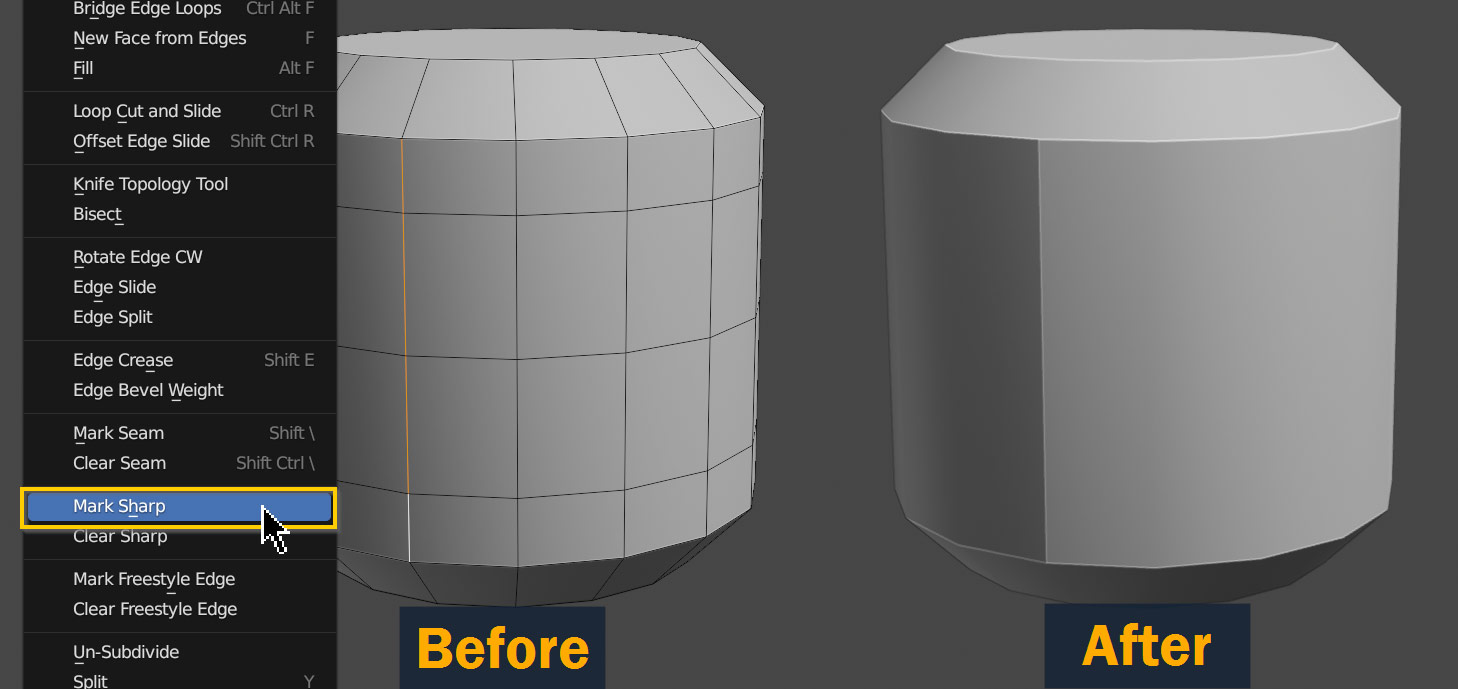
We can do this using the Mark Sharp tool, which works in conjunction with auto smooth.
To use it, first make sure auto smooth is enabled like we saw in the previous section; next, go into Edit Mode on an object by pressing the Tab key, and select a smooth-shaded edge. Finally, Right Click and select Mark Sharp. The edge should now display as sharp!
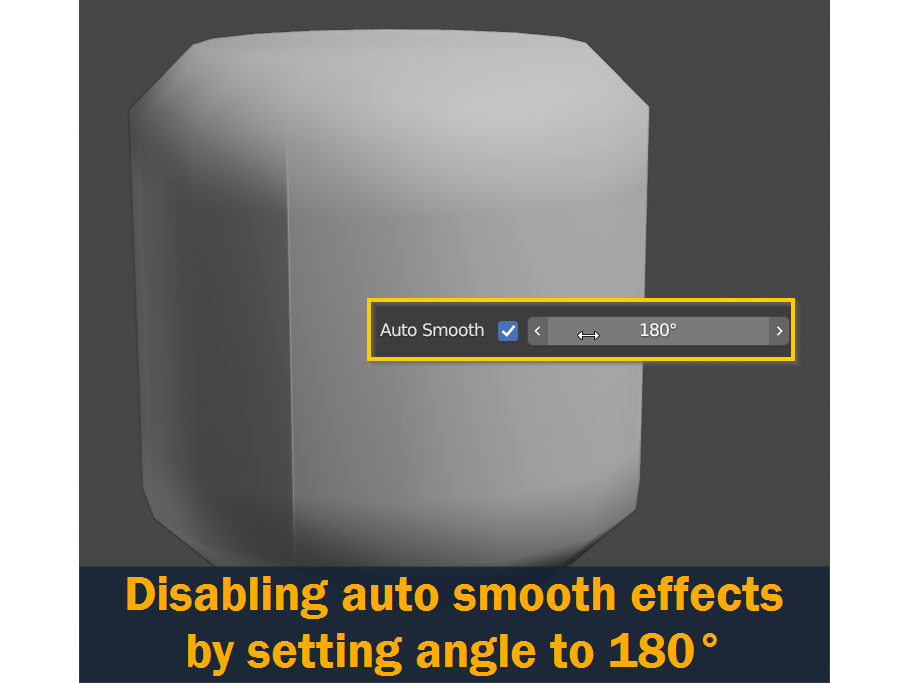
Now, in this example, Mark Sharp is being used at the same time as Auto Smooth, so both are contributing to how the object is shaded. But if we want complete control, we can effectively disable auto smooth by simply typing in a high angle value, like 180° – which will mean that the only edges that show up as sharp will be the ones that we purposefully marked!
As great as auto smooth and mark sharp are, they have their limitations in terms of realism. The hard edges that they create are, from a rendering standpoint, infinitely sharp – but edges in real life almost all have some kind of bevel or rounded shape, which reflects light even if it’s too small to easily see.
Ideally, in game and film assets, you want to create a similar bevel on the edges of your models – but in game models with very low polygon limits, such as tiny details or assets for mobile games, adding these physical bevels to everything isn’t practical; and that’s where Auto Smooth and Mark Sharp come in handy!
Even in these cases though, an artificial bevel is usually baked into the material using a Normal Map. Bevels are just that important!
So, maybe auto smoothing and marking sharp edges doesn’t work for everything. But what’s the alternative?
Well, for film assets and higher detail game assets, smooth shading is usually controlled by the 3D geometry itself.
In most cinematic and higher-end game assets, instead of using auto smooth and mark sharp to create hard edges, 3D artists usually rely on the faces and edges of the model to control how smooth or hard edges appear.
Since the shading on a certain edge or face is essentially the average of the faces and edges surrounding it, moving and adding edges on your model changes how it’s shaded. For example, if you wanted to directly affect how the shading on a smooth-shaded object appears, you might move two edges closer together to get a sharper looking edge – or move them apart to get something softer.
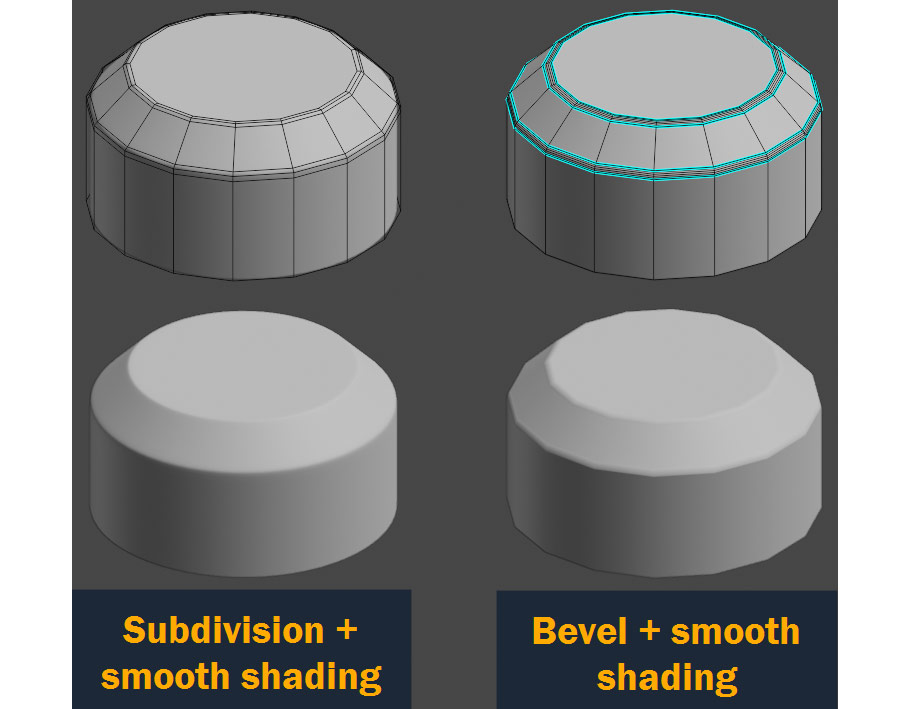
In most higher detail models though, artists don’t actually control the shading directly at all. Usually, artists will add Subdivision, Bevels, or both; and in general, these replace any direct ways of controlling shading like the ones we’ve been talking about. But under the hood, the shading still works the exact same way I’ve shown here, so it’s valuable to have an understanding of how exactly that works!
If auto smooth and sharp edges aren’t working properly and you see that the Angle field is grayed out, it means that your model has Custom Split Normals Data baked into it (common with imported models and after applying certain modifiers).
To reset this, go to the Properties Panel, go to the green Object Data Properties tab, and look in the Geometry Data section; press the option labeled Clear Custom Split Normals Data. This should get the shading working as expected again!

If certain sections of your model have strange or out-of-place shadows or bright areas, it may be that the face normals have been inverted or flipped.
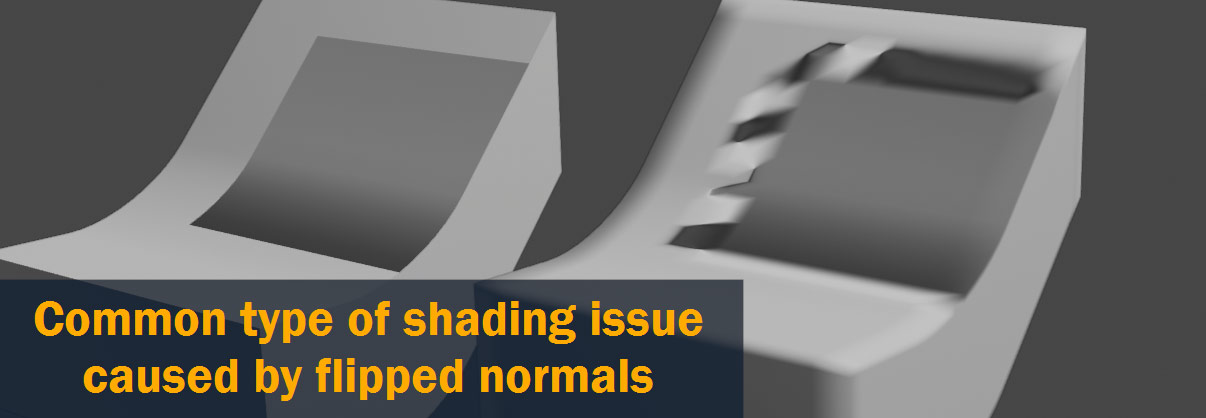
To fix this, go into Edit Mode, press A to select all. Next, press Alt/Option – N to open the Normals menu and select Recalculate Outside (or if your model is an interior space or concave shape, Recalculate Inside). This should solve the problem!

If unwanted hard edges are appearing on your mesh where they shouldn’t be, there are two likely causes: Doubled-up vertices, or an interior face.
To eliminate double vertices on your mesh, enter into Edit Mode, and press A to select all. Next, press M to open the Merge menu, and select By Distance. If any vertices on your model are doubled up, this should get rid of them! Just make sure to double check your mesh afterwards; sometimes Merge By Distance can merge vertices in places you didn’t intend, if they’re too close together.

If merging by distance doesn’t work, it’s worth checking for Interior Faces on your model. These can appear accidentally during modeling, and if you don’t notice them they can cause some confusing issues.
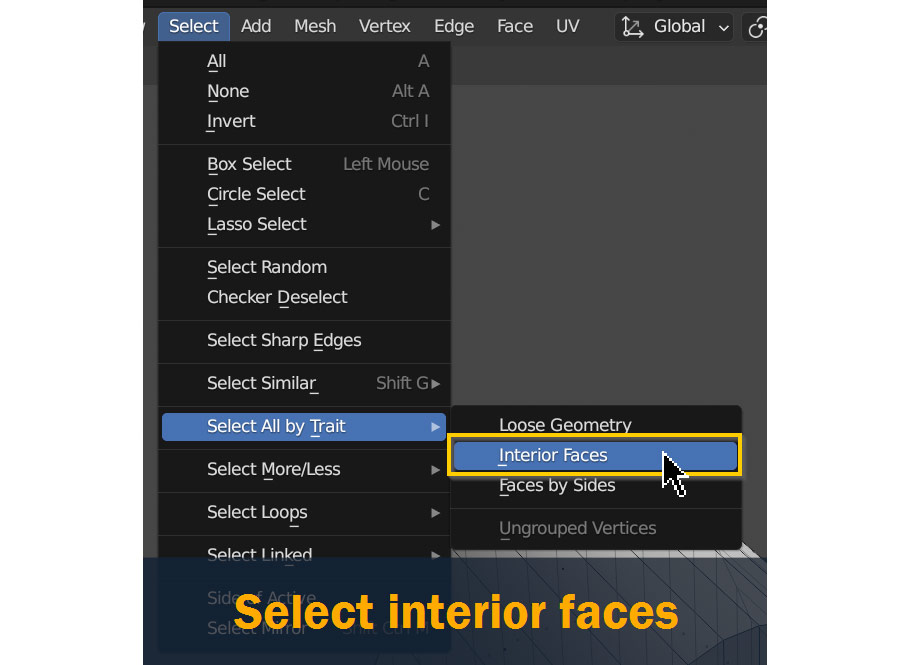
Luckily, Blender has a quick way to find and delete them – in Edit Mode, with Face Select Mode on, open the Select menu in the viewport top bar. Press Select All by Trait, and choose Interior Faces. This should select all interior faces on your mesh automatically – now you can simply press Delete > Faces to get rid of them!
With those confounding issues cleared up, we’ve reached the end of the article!
Although smooth shading might seem like a complicated topic to new artists, I hope that this article was able to clear up some confusion, and give you an idea of how you might approach shading in your own work.
Whether you’re using Flat shading for a stylized workflow, Auto Smooth and Mark Sharp for a game asset, or plain old Shade Smooth for a more detailed model, there’s an option to suit every project.
I hope this article was helpful – if you have any ideas or thoughts on any of this, feel free to leave them in the comments section below!
Best of luck with all your future projects, and thanks for reading!

Hello! I’m a self-taught 3D modeler and texture artist with experience on a variety of projects, ranging from planet creation to game props, vehicles, and environments. Although I’ve tried out a bit of everything, my main software is Blender. I’m a big fan of sci-fi and fantasy shows and books like The Expanse and Lord of the Rings, so most of my personal work has a fantasy or sci-fi theme – but I also love to experiment and try new things!


Add a comment